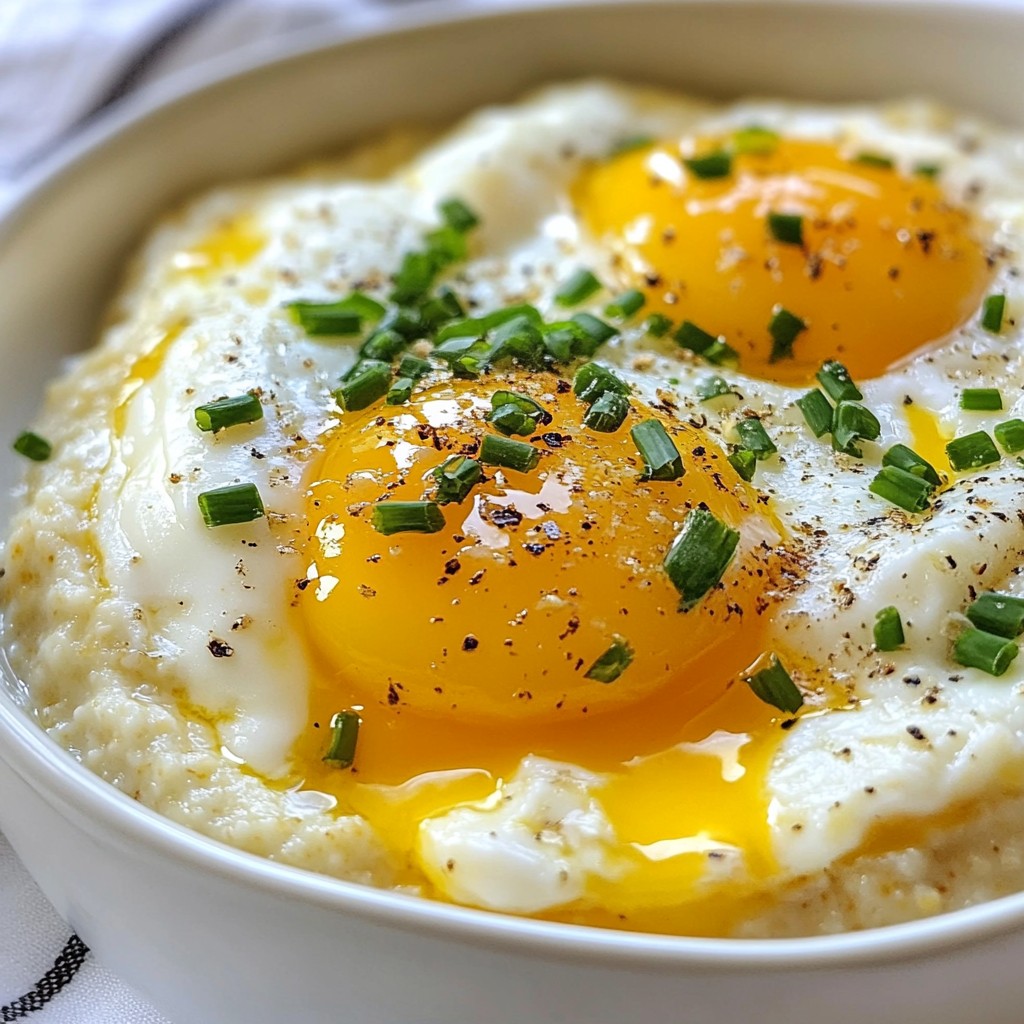
If you're craving a simple comfort meal, look no further than Grandma's Fluffy Grits and Eggs. This dish brings back warm memories and fills your belly with joy. With just a few ingredients, you can whip up creamy grits topped with delicious eggs. Whether you're a kitchen novice or a seasoned cook, I’ll guide you through each step. Let’s bring this classic recipe to your table!
Why I Love This Recipe
- Comfort Food: This dish is the ultimate comfort food, offering a warm and satisfying start to the day.
- Easy to Make: With simple ingredients and straightforward steps, anyone can whip this up in no time.
- Versatile: Customize the recipe by adding your favorite toppings or spices for a unique twist each time.
- Family Tradition: This recipe has been passed down through generations, making it a cherished family favorite.
Ingredients
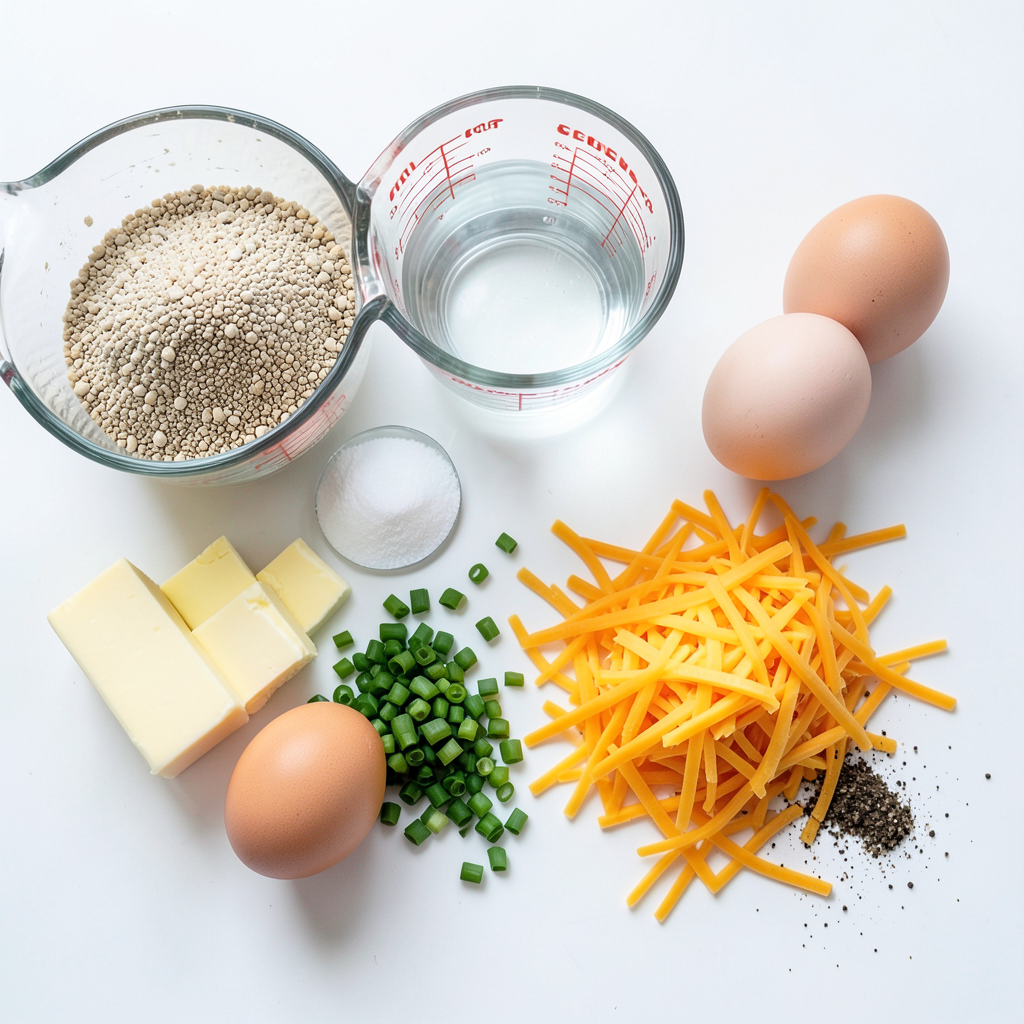
List of Ingredients
- 1 cup stone-ground grits
- 4 cups water (or combination of water and milk)
- 1 teaspoon salt
- 4 large eggs
- 2 tablespoons butter
- 1 cup shredded sharp cheddar cheese
- ¼ cup chopped fresh chives (optional)
- Fresh ground black pepper to taste
For this dish, I always use stone-ground grits. They give a great texture and flavor. You can mix water and milk for creamier grits. The salt brings out the taste, so do not skip it.
I like to add sharp cheddar. It melts beautifully and adds richness. Chives are a nice touch, but they are optional. They add a fresh taste and color.
You will need four large eggs. You can cook them sunny-side-up or scrambled. The choice is yours! Butter helps make the eggs rich and tasty. Finally, fresh ground black pepper adds a nice kick to the dish.
Gather all these ingredients, and you are ready to start cooking!
Step-by-Step Instructions
Preparation of the Grits
To start, bring 4 cups of water to a boil in a large pot. Add 1 teaspoon of salt to the water. Once it boils, whisk in 1 cup of stone-ground grits gradually. This helps to avoid lumps. Lower the heat to low.
Cooking the Grits
Cook the grits for about 20 to 25 minutes. Stir occasionally as they cook. You want the grits to be thick and creamy. If you want them creamier, add milk halfway through cooking. This adds a lovely richness.
Incorporating Cheddar Cheese
After the grits are cooked, take them off the heat. Stir in 2 tablespoons of butter and 1 cup of shredded sharp cheddar cheese. Mix well until the cheese melts and blends in. Taste and adjust the seasoning if needed.
Preparing the Eggs
Heat a non-stick skillet over medium heat. Add a little butter to the skillet. Crack 4 large eggs into the skillet. You can cook them sunny-side-up or scrambled, based on your choice. Cook the eggs until the whites are set, but the yolks stay runny. This takes about 3 to 4 minutes.
Serving the Dish
To serve, spoon a generous amount of the creamy grits onto each plate. Top it with the cooked eggs. If you like, sprinkle with chopped fresh chives and fresh ground black pepper for extra flavor. Enjoy this simple comfort meal!
Tips & Tricks
Achieving the Perfect Texture for Grits
To make perfect grits, start with stone-ground grits. They have a better texture. Use four cups of water for a creamy feel. If you want extra creaminess, add milk halfway through cooking. Stir the grits often. This helps them cook evenly. Cook them for about 20-25 minutes, until thick. The final result should be smooth and fluffy. If the grits seem too thick, add a bit more water or milk.
How to Cook Eggs to Preference
Cooking eggs can change the dish's taste. For sunny-side-up eggs, heat a non-stick skillet with butter over medium heat. Crack the eggs gently into the pan. Cook until the whites are set, but the yolks remain runny, about 3-4 minutes. If you prefer scrambled eggs, whisk them in a bowl first. Pour them into the hot skillet and stir gently. Cook until they are just set. This will give you soft and creamy scrambled eggs.
Best Seasoning Combinations
Seasoning can elevate your dish. I like to use fresh ground black pepper for a kick. Chopped chives add a nice onion flavor and color. You can mix in some garlic powder or paprika for added depth. If you want more heat, a pinch of cayenne pepper works well. Always taste your food before serving. Adjust the salt and pepper to your liking. A little seasoning can make a big difference.
Pro Tips
- Use Stone-Ground Grits: For the best flavor and texture, always choose stone-ground grits over instant or quick-cooking varieties.
- Infuse Flavor: Consider adding a bay leaf or garlic clove to the water while the grits cook for an extra layer of flavor.
- Perfectly Cooked Eggs: For a classic sunny-side-up egg, gently baste the whites with butter to help them cook evenly without flipping.
- Serving Suggestion: Serve the grits and eggs with a side of hot sauce or sautéed greens for a delicious breakfast experience.
Variations
Creamy Grits with Milk vs. Water
Using milk makes your grits rich and creamy. Water gives a lighter texture. You can mix both for a nice balance. Start with 4 cups of water. If you want creamier grits, add 1 to 2 cups of milk halfway through cooking. This small change can make a big difference in flavor and texture.
Different Types of Cheese to Use
Cheddar cheese is a classic choice for grits. It adds sharpness and richness. You can try other cheeses too. Cream cheese makes grits super creamy. Gruyère gives a nutty taste. Parmesan can add a salty kick. Feel free to mix and match cheeses to find your favorite flavor.
Egg Variations: Scrambled, Poached, or Fried
You can make your eggs in many ways. Scrambled eggs mix well with grits. They add fluffiness and goodness. Poached eggs give a runny yolk that blends perfectly with creamy grits. Fried eggs offer a crispy edge and golden yolk. Choose your favorite method, or try them all! Each style adds its own twist to the dish.
Storage Info
How to Store Leftover Grits
To store leftover grits, let them cool completely. Then, transfer the grits to an airtight container. Refrigerate the container. The grits will stay fresh for about three to five days. If you want them to last longer, consider freezing instead.
Reheating Suggestions
When ready to eat, you can reheat grits in a pot or microwave. For the pot, add a splash of water or milk. Heat on low, stirring often until warm. In the microwave, place grits in a bowl and cover. Heat in short bursts, stirring in between, until heated through.
Freezing Grits and Eggs
You can freeze grits and eggs, but it's best to freeze them separately. To freeze grits, place them in a freezer-safe container. They will last up to three months. For eggs, let them cool, then place them in a freezer bag. When ready to eat, thaw overnight in the fridge before reheating.
FAQs
How do I make my grits creamier?
To make your grits creamier, use a mix of water and milk. Start by boiling water, then add salt. Gradually whisk in the grits. Cook them slowly. Halfway through, stir in milk for a rich taste. You can also add more butter or cheese for extra creaminess.
Can I use instant grits instead of stone-ground?
Yes, you can use instant grits. They cook much faster than stone-ground grits. Just follow the package instructions. However, stone-ground grits have a better texture and flavor. They give a heartier, more rustic feel to your dish.
What can I serve with grits and eggs?
You can serve grits and eggs with many sides. Bacon or sausage pairs well for a hearty meal. Fresh fruit adds a sweet touch. You could also include sautéed greens for a healthy option. Hot sauce or salsa can give it a nice kick.
How long do leftovers last?
Leftover grits will last about three to four days in the fridge. Store them in an airtight container to keep them fresh. You can reheat them in the microwave or on the stove. Add a splash of water or milk to restore creaminess as you heat.
Making grits and eggs is simple and satisfying. We covered the key ingredients, cooking steps, and great tips to enhance your dish. Remember, adjusting textures and flavors can elevate your meal. Try different cheeses or egg styles for variety. Store leftovers properly to enjoy later. With this guide, you can create a delicious breakfast anytime. Enjoy your new cooking skills and savor each bite!