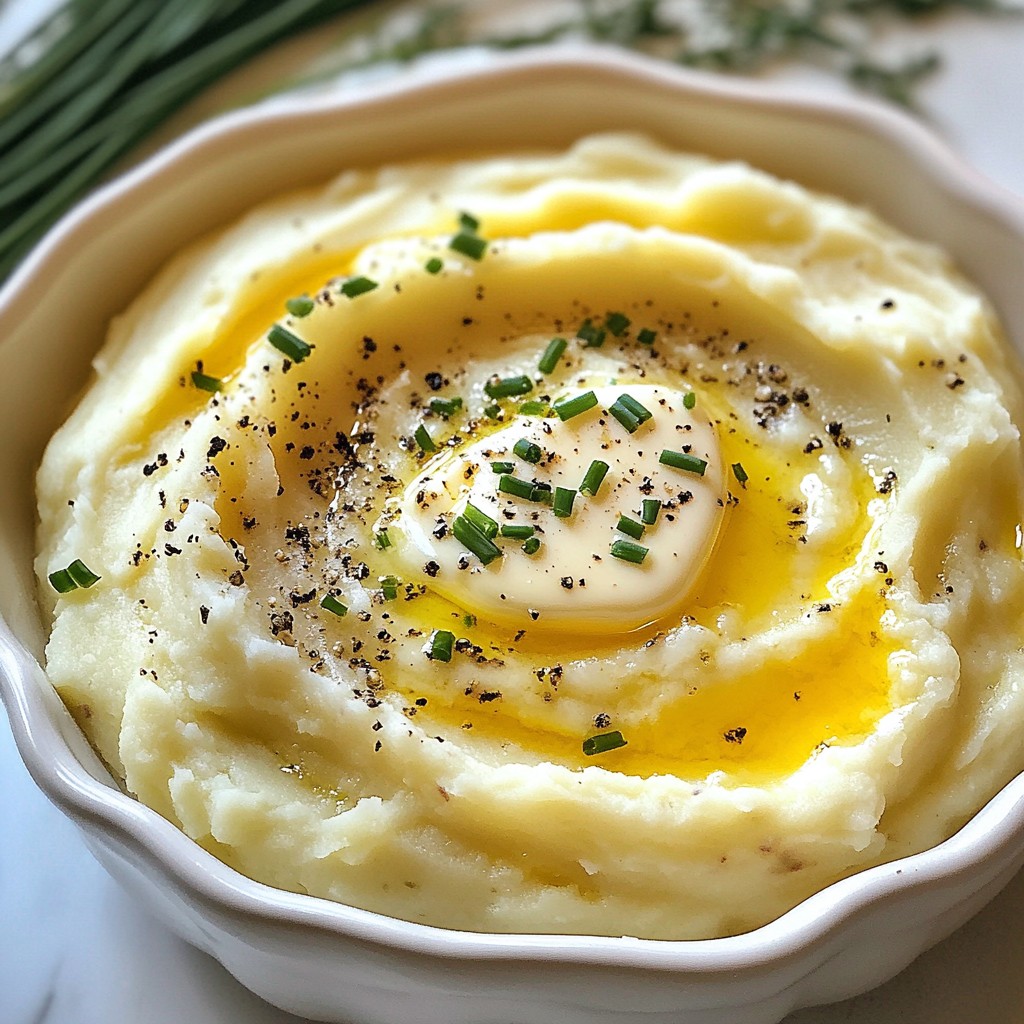
If you're looking for a comforting and creamy side dish, you've come to the right place. My cozy creamy homestyle mashed turnips with chives offer a warm twist on traditional mashed potatoes. The smooth texture combined with the bright flavor of fresh chives will surely impress your family and friends. Let's dive in and discover how to create this delicious dish that warms the heart!
Why I Love This Recipe
- Comforting Flavor: The creamy texture and subtle sweetness of mashed turnips create a cozy dish that warms the heart.
- Simple Ingredients: This recipe uses everyday ingredients that are easy to find, making it accessible for everyone.
- Versatile Side Dish: Mashed turnips pair beautifully with various main courses, from roasted meats to vegetarian dishes.
- Quick to Prepare: With a total time of just 30 minutes, this dish can easily fit into a busy weeknight dinner.
Ingredients
Main Ingredients
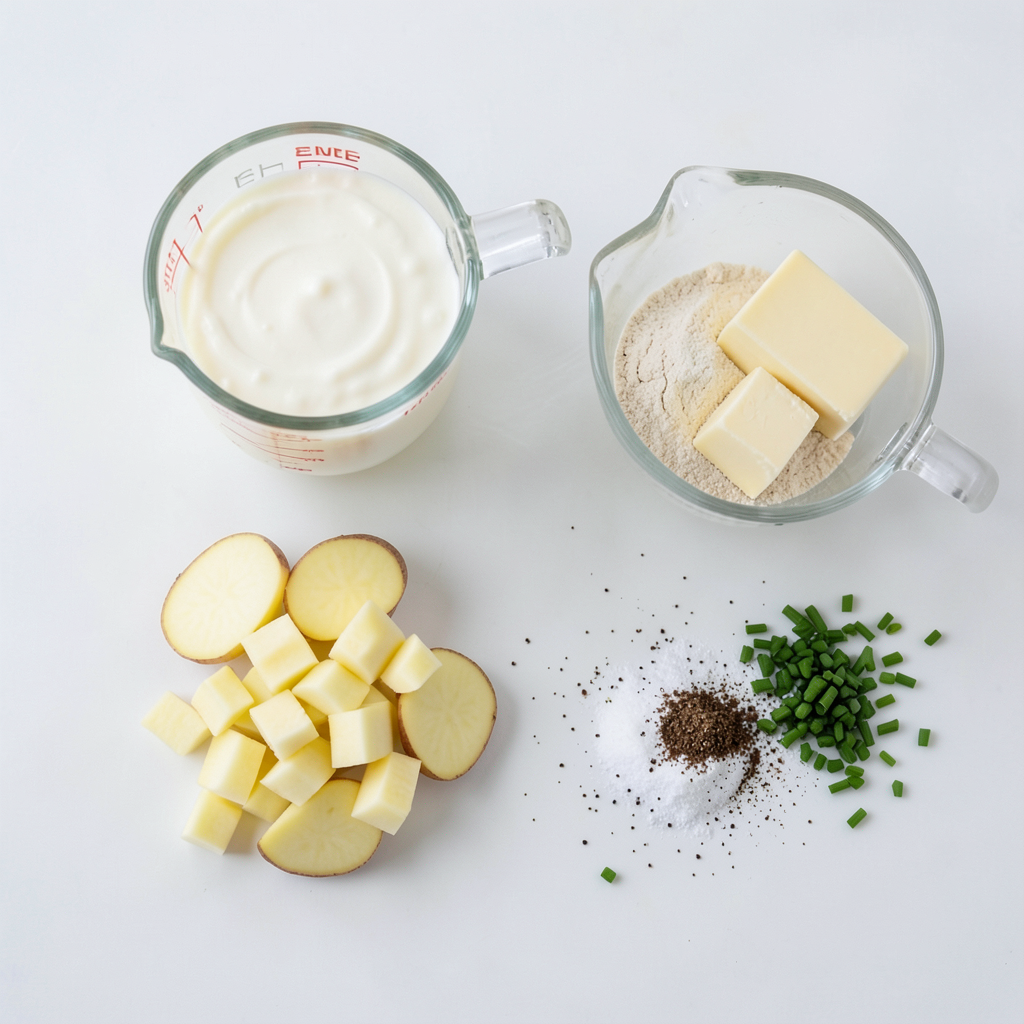
- 2 lbs turnips, peeled and chopped
- 1 cup heavy cream
- 4 tablespoons unsalted butter
Seasoning and Flavor Boosters
- 1 teaspoon garlic powder
- Salt and black pepper, to taste
- 1/4 cup fresh chives, finely chopped
Step-by-Step Instructions
Preparing the Turnips
To start, place the chopped turnips in a large pot. Cover them with cold water, then add a pinch of salt. Bring the pot to a boil over high heat. Once boiling, reduce the heat to medium. Cook the turnips for 15 to 20 minutes. You want them to be fork-tender.
How do you check for doneness? Simply take a fork and poke a turnip. If it goes through easily, they are ready.
Mashing and Combining Flavors
Next, drain the cooked turnips and return them to the pot. This keeps everything simple. Now, add the heavy cream, butter, and garlic powder to the pot.
Mash the turnips using a potato masher. Keep mashing until the mix is smooth and creamy. Make sure to remove all lumps for the best texture.
Final Touches
Now it’s time to mix in the chives. Stir them in gently. This adds a fresh taste and color. Adjust the seasoning with salt and black pepper to your liking. This step lets you make the dish perfect for your taste.
For a smoother texture, feel free to use a hand mixer or food processor. Serve your cozy creamy mashed turnips right away, or keep them warm until it's time to eat. Enjoy every bite!
Tips & Tricks
Achieving Creamy Consistency
To get that perfect creamy texture, start with your tools. I recommend using a potato masher for a rustic feel. It gives you control over the mash. If you want it ultra-smooth, a hand mixer works great too. Just be careful not to overmix; you don’t want gluey turnips.
Next, let’s talk about butter and cream ratios. Using just the right amount of both makes all the difference. I suggest four tablespoons of unsalted butter and one cup of heavy cream. This balance creates a rich, creamy dish without overpowering the turnips' natural flavor.
Enhancing Flavor
If you want to elevate the taste, try substituting garlic powder with fresh minced garlic. Fresh garlic gives a punch that’s hard to resist. Just sauté it briefly in butter before adding it to the mashed turnips.
When seasoning, always taste as you go. Start with salt and black pepper. Adjust them to fit your taste. This simple step ensures every bite is full of flavor.
Variations
Ingredient Swaps
Feel free to get creative with the cream. You can use whole milk or even unsweetened almond milk for a lighter version. This swap keeps it creamy while cutting down on calories.
Adding cheese can also boost richness. Try sharp cheddar or creamy goat cheese. Just fold it in after mashing for a delicious twist.
Herb Alternatives
Chives are great, but don’t stop there! Fresh dill, parsley, or thyme can bring new life to this dish. Each herb adds its unique taste and aroma.
For seasonal flavors, consider adding roasted garlic in the fall or fresh basil in the summer. Experiment with what you have on hand. Your mashed turnips will shine with every change!
Storage Info
Proper Storage Techniques
To keep your cozy creamy mashed turnips fresh, store them in an airtight container. Place them in the fridge and enjoy them within three days. The cool air helps slow spoilage.
If you want to save them for later, you can freeze the leftovers. Use a freezer-safe container, and make sure to leave some room for expansion. These turnips can last up to three months in the freezer. Just remember to label the container with the date!
Reheating Suggestions
Reheating your mashed turnips is easy. The best method is to use the stove. Place the turnips in a saucepan over low heat. Stir them gently and add a splash of cream or milk to help them regain their creamy texture.
You can also use a microwave. Just cover the dish to keep moisture in. Heat in short bursts, stirring in between, until warmed through. This helps keep the texture smooth and the flavor intact.
With these storage and reheating tips, you can savor every bite of your cozy mashed turnips!
Pro Tips
- Choose the Right Turnips: Look for firm, smooth turnips without any blemishes or soft spots for the best flavor and texture.
- Perfect Creaminess: Adjust the amount of heavy cream to reach your desired consistency. For a richer flavor, consider using half-and-half or adding more butter.
- Herb Variations: Experiment with different herbs like parsley or dill for a unique twist on the classic flavor profile.
- Make Ahead: You can prepare the mashed turnips in advance and store them in the refrigerator. Reheat gently on the stove or in the microwave, adding a splash of cream if needed.
FAQs
What are the benefits of using turnips?
Turnips are low in calories and high in vitamins. They have fiber that helps digestion. One cup of turnips gives you vitamin C and potassium. This makes them a great choice for healthy meals.
When you compare turnips to potatoes, turnips have a slightly peppery taste. They are less starchy, which makes them lighter. If you want a healthier side dish, turnips are the way to go.
Can I make this recipe ahead of time?
Yes, you can make this recipe ahead of time. Prepare the mashed turnips and let them cool. Then, place them in an airtight container. Store them in the fridge for up to three days.
When you are ready to serve, reheat them on the stove or in the microwave. Add a splash of cream to keep them creamy. Stir well to bring back the smooth texture.
How can I adjust the recipe for dietary restrictions?
For dairy-free options, use coconut cream or almond milk instead of heavy cream. You can also use dairy-free butter. This change keeps the dish creamy without dairy.
If you want to lower the sodium, use less salt or try a salt-free seasoning blend. This way, you can enjoy the flavor without the extra sodium.
This article covered how to make delicious creamy turnip mash. We explored key ingredients, like turnips, cream, and butter, to achieve a rich flavor. You learned step-by-step instructions, tips for perfect consistency, and creative variations for your recipe. Remember, proper storage can keep your mash fresh for later. Embrace the nutritional benefits of turnips and adjust the recipe as needed. Enjoy cooking and experimenting with this tasty dish!