Welcome to the sweet world of Salted Caramel Apple Dip! This creamy treat pairs perfectly with crunchy apples. I’ll guide you through easy steps to whip up this delightful dip, adding a twist of salt to rich caramel. With simple ingredients and tips, you’ll impress your friends and family. Ready to bring smiles to snack time? Let’s dive in and make this delicious dip together!
Why I Love This Recipe
- Delicious Flavor Combination: The sweet, crisp apples paired with the rich, buttery caramel create a delightful contrast that's hard to resist.
- Quick and Easy: This recipe comes together in just 20 minutes, making it perfect for last-minute gatherings or a sweet snack.
- Customizable: Add your favorite toppings like nuts or chocolate for a personal twist that suits your taste.
- Perfect for Sharing: This dip is great for parties and gatherings, allowing everyone to enjoy a tasty treat together.
Ingredients
List of Ingredients
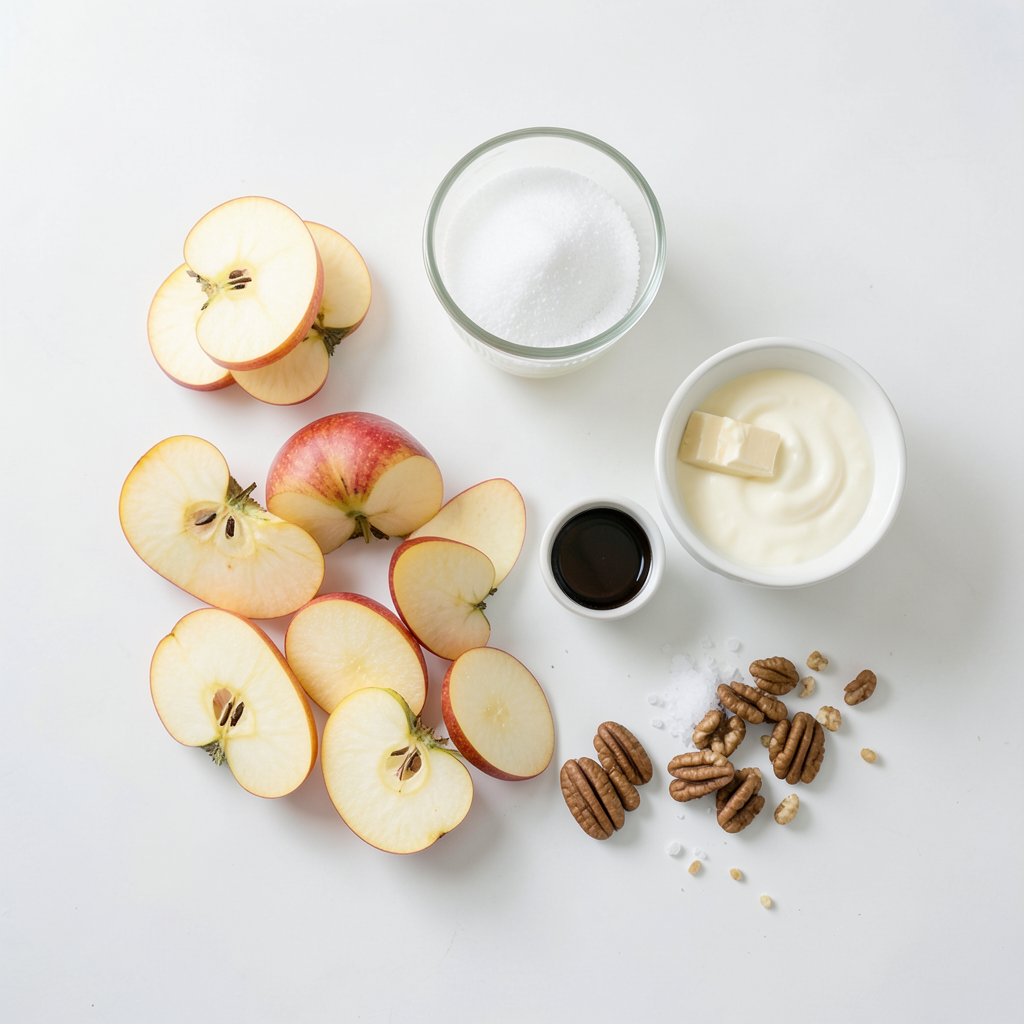
For this creamy salted caramel apple dip, you will need:
- 2 large apples (Honeycrisp or Granny Smith), sliced
- 1 cup granulated sugar
- 6 tablespoons unsalted butter
- 1/2 cup heavy cream
- 1 teaspoon vanilla extract
- 1 teaspoon sea salt
- Optional: chopped nuts (pecans or walnuts) for topping
Substitutions for Key Ingredients
If you want to switch things up, here are some ideas:
- Sugar: You can use brown sugar for a richer flavor.
- Butter: Use vegan butter for a plant-based option.
- Heavy cream: Try coconut cream for a dairy-free dip.
- Apples: Pears or even bananas work well too.
Optional Toppings and Add-Ins
Make your dip even more fun with these extras:
- Chopped nuts like pecans or walnuts add crunch.
- Mini chocolate chips for a sweet twist.
- A sprinkle of cinnamon for warmth.
- Drizzles of chocolate sauce for extra indulgence.
These ingredients and substitutes open up many tasty paths for you. Get creative and enjoy!
Step-by-Step Instructions
Preparing the Apples
To start, wash your apples well. I like to use Honeycrisp or Granny Smith. Their crispness makes them perfect for dipping. Slice the apples into wedges. Make sure to remove the core; this makes them easy to eat. Once you have your apple slices ready, set them aside.
Making the Salted Caramel
Now, let’s make the salted caramel. In a medium saucepan, add the granulated sugar over medium heat. Stir constantly. You want the sugar to melt and turn a golden amber color. This will take about 5 to 7 minutes. Be patient!
Once the sugar is melted, carefully add the unsalted butter. The mix will bubble up, so watch out! Stir until the butter is fully melted. Then, slowly drizzle in the heavy cream while you stir. Be careful of the steam; it can be hot. Keep stirring until the mixture is smooth and creamy.
Remove the saucepan from the heat. Now, stir in the vanilla extract and sea salt. This adds the perfect touch! Allow the caramel to cool slightly. It will thicken as it cools.
Serving the Dip
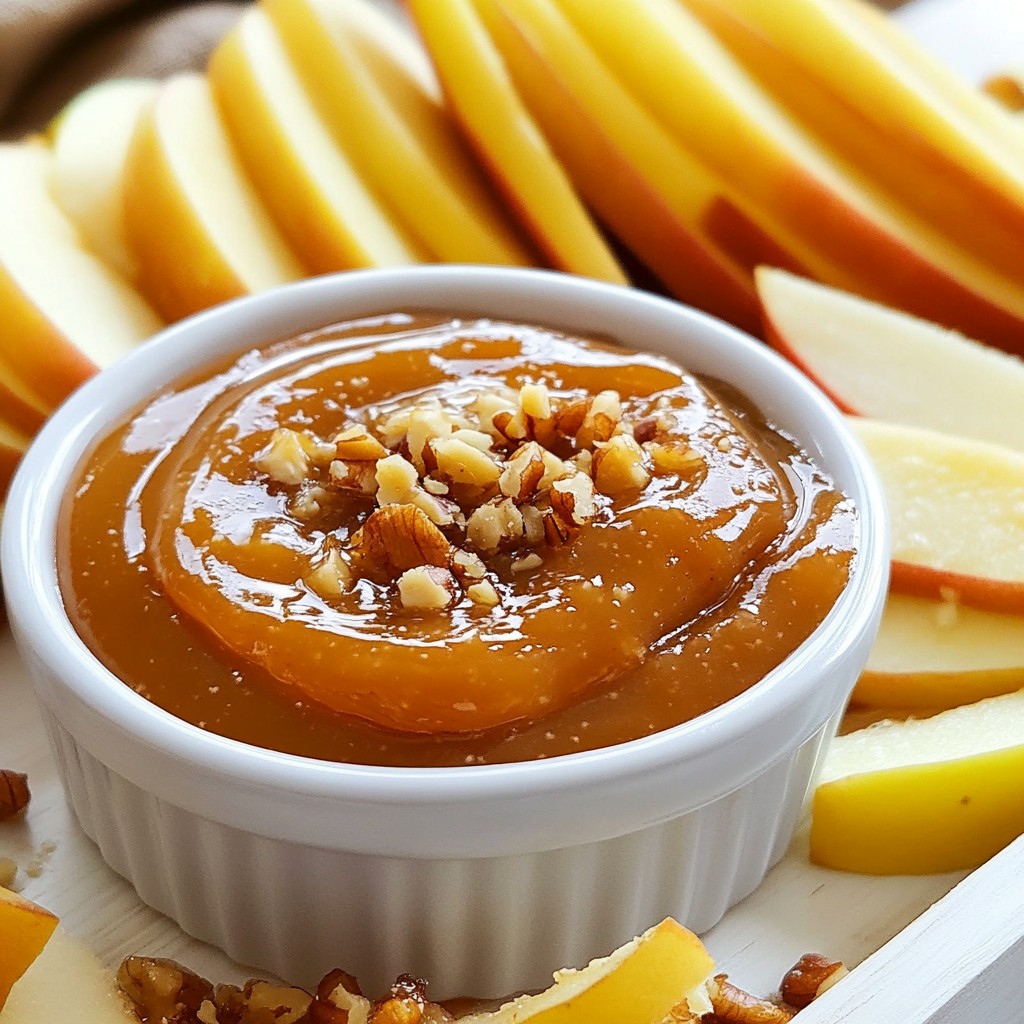
Time to serve! Place the salted caramel in a small bowl. Arrange the apple slices around the bowl. For extra flavor, you can sprinkle chopped nuts on top of the caramel. Pecans or walnuts work great and add a nice crunch. Enjoy this delightful treat with friends or family!
Tips & Tricks
Pro Tips for Perfect Caramel
To make the best salted caramel, follow these simple tips:
- Use a heavy saucepan: This helps heat evenly and prevents burning.
- Stir constantly: Keep stirring while the sugar melts to avoid hot spots.
- Watch the color: When the sugar turns golden amber, it's ready for butter.
- Add cream carefully: Pour the cream slowly to avoid splatters and steam.
How to Avoid Common Mistakes
Mistakes can happen, but you can avoid them with these tips:
- Don’t rush the sugar: Melting too fast can cause burning. Patience is key.
- Avoid water: Make sure your pan is dry before adding sugar. Water can make it clump.
- Don’t skip the salt: Salt balances the sweetness. Without it, the caramel may taste flat.
- Cool before serving: Let the caramel thicken a bit. This keeps it from being too runny.
Suggestions for Presentation
Make your salted caramel apple dip look great with these ideas:
- Use a wooden board: Place the apple slices around a small bowl of caramel on a board. It looks rustic and inviting.
- Add nuts on top: Chopped pecans or walnuts add a nice crunch and extra flavor.
- Garnish with sea salt: A sprinkle on top makes it look fancy and enhances the taste.
- Colorful apples: Mix different apple colors for a vibrant display. Honeycrisp and Granny Smith look great together.
Pro Tips
- Use Fresh Apples: Choose crisp, fresh apples for the best flavor and texture in your dip.
- Watch the Caramel Color: Keep a close eye on the sugar while it melts; once it turns golden amber, it's ready for the butter.
- Cool Before Serving: Allow the caramel to cool slightly before serving to enhance its thickness and flavor.
- Add a Twist: Experiment with different nuts or toppings like chocolate chips for a unique flavor profile.
Variations
Flavor Variations
You can change the taste of your salted caramel apple dip. Adding spices is a great way to do this. Try a pinch of cinnamon or nutmeg. These spices add warmth and depth. You can also mix in a bit of pumpkin spice for a fall twist. If you like a bit of heat, add a dash of cayenne pepper. This adds a fun kick that surprises the taste buds.
Healthy Alternatives
If you want a healthier option, coconut sugar is a good choice. It has a lower glycemic index than regular sugar. This means it raises blood sugar more slowly. You can also use maple syrup for a unique flavor. It adds a hint of earthiness to your dip. Remember, the caramel may be a bit darker with these swaps, which can look nice!
Vegan Options
For a vegan version, substitute the dairy ingredients. Use coconut milk or almond milk instead of heavy cream. For the butter, try using coconut oil or a vegan butter. These swaps keep the rich flavor while making it plant-based. Your friends won’t even know it’s vegan! Add some chopped nuts on top for a nice crunch and extra nutrition.
Storage Info
How to Store Leftover Dip
To store leftover dip, place it in an airtight container. Make sure the dip cools first. Cover it tightly to keep it fresh. You can store it in the fridge for later use.
Reheating Instructions
To reheat the salted caramel, pour it into a small saucepan. Heat it over low heat. Stir it gently until it becomes warm and smooth again. You can also use a microwave. Place it in a microwave-safe bowl, heat in short bursts, and stir in between.
Shelf Life and Best Practices
The dip lasts about one week in the fridge. To keep it fresh, avoid letting it sit out too long. If you notice any change in smell or look, it's best to throw it away. Always check for freshness before serving again.
FAQs
How do I prevent my caramel from burning?
To prevent burning, stir the sugar constantly. Use a heavy saucepan for even heat. Keep the heat at medium; too high can cause quick burning. Once the sugar melts, pay close attention. The golden amber color shows it's ready. Be patient and avoid rushing the process.
Can I make this dip ahead of time?
Yes, you can make this dip ahead of time. Prepare the caramel and let it cool. Store it in an airtight container in the fridge. It will thicken as it cools. When ready to serve, gently reheat it. Use low heat and stir often to restore its creamy texture.
What apples are best for dipping?
I recommend Honeycrisp or Granny Smith apples. Honeycrisp apples are sweet and juicy. They provide a nice crunch. Granny Smith apples are tart and balance the sweet caramel. Both types add great flavor to your dip. Choose apples that look fresh and firm for the best results.
We explored how to create a tasty salted caramel apple dip. You learned about essential ingredients and creative substitutions. I shared step-by-step instructions for making the dip and offered tips to perfect your caramel. You discovered different flavor variations and healthy alternatives too. Remember to store any leftovers properly and reheat gently.
With these insights, you now have all you need to impress your friends and family. Happy dipping!