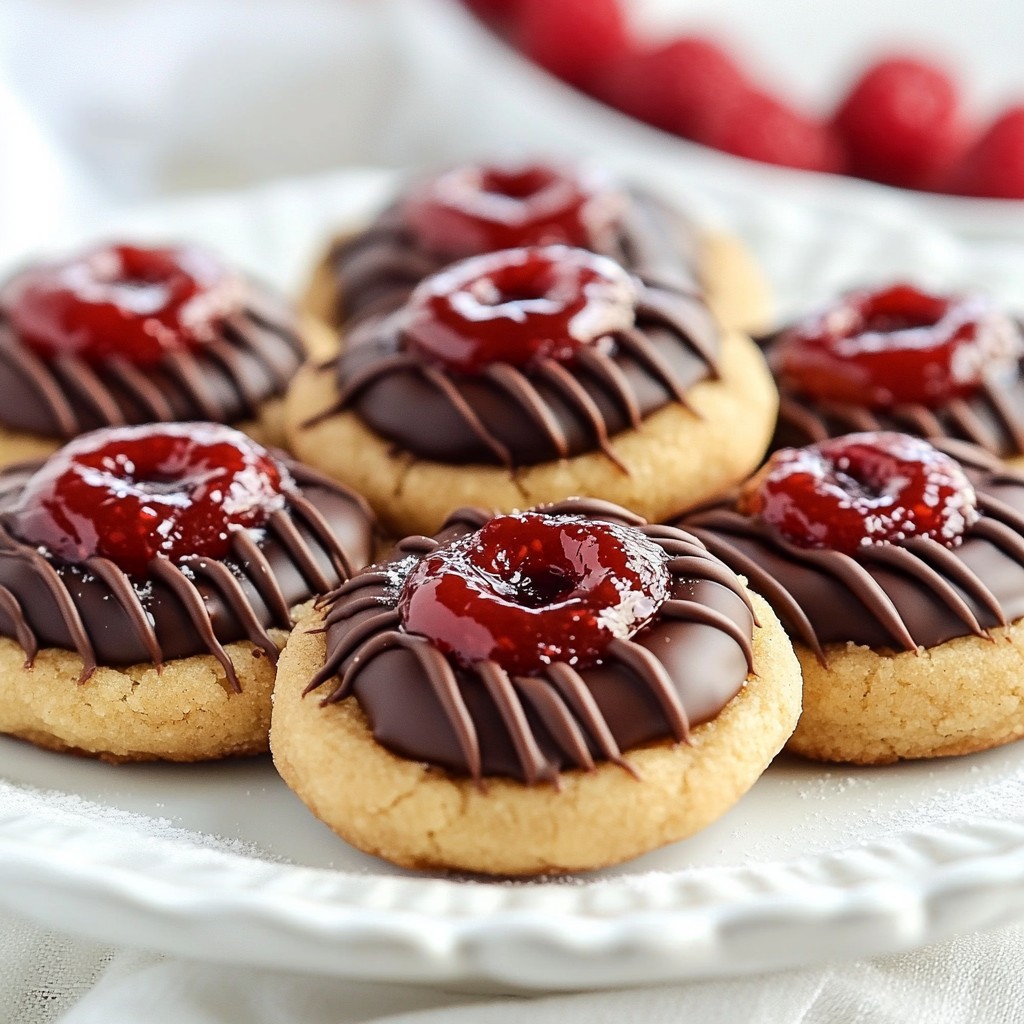
If you love cookies that blend tart raspberry and rich chocolate, you're in for a treat! My Raspberry Chocolate Thumbprint Cookies are the perfect mix of sweet and tangy. With easy steps and helpful tips, you’ll impress your friends and family. Whether you're baking for a special event or just craving a delicious snack, this recipe will guide you to cookie perfection. Let’s dive into these delightful bites and get baking!
Why I Love This Recipe
- Delicious Flavor Combination: The rich chocolate pairs wonderfully with the tart raspberry jam, creating a perfect balance of sweetness and acidity.
- Easy to Make: This recipe requires simple ingredients and straightforward steps, making it accessible for bakers of all skill levels.
- Beautiful Presentation: The vibrant raspberry jam and chocolate drizzle make these cookies visually stunning, perfect for any occasion.
- Perfect for Sharing: With 24 cookies in one batch, they're great for parties, gatherings, or simply sharing with friends and family.
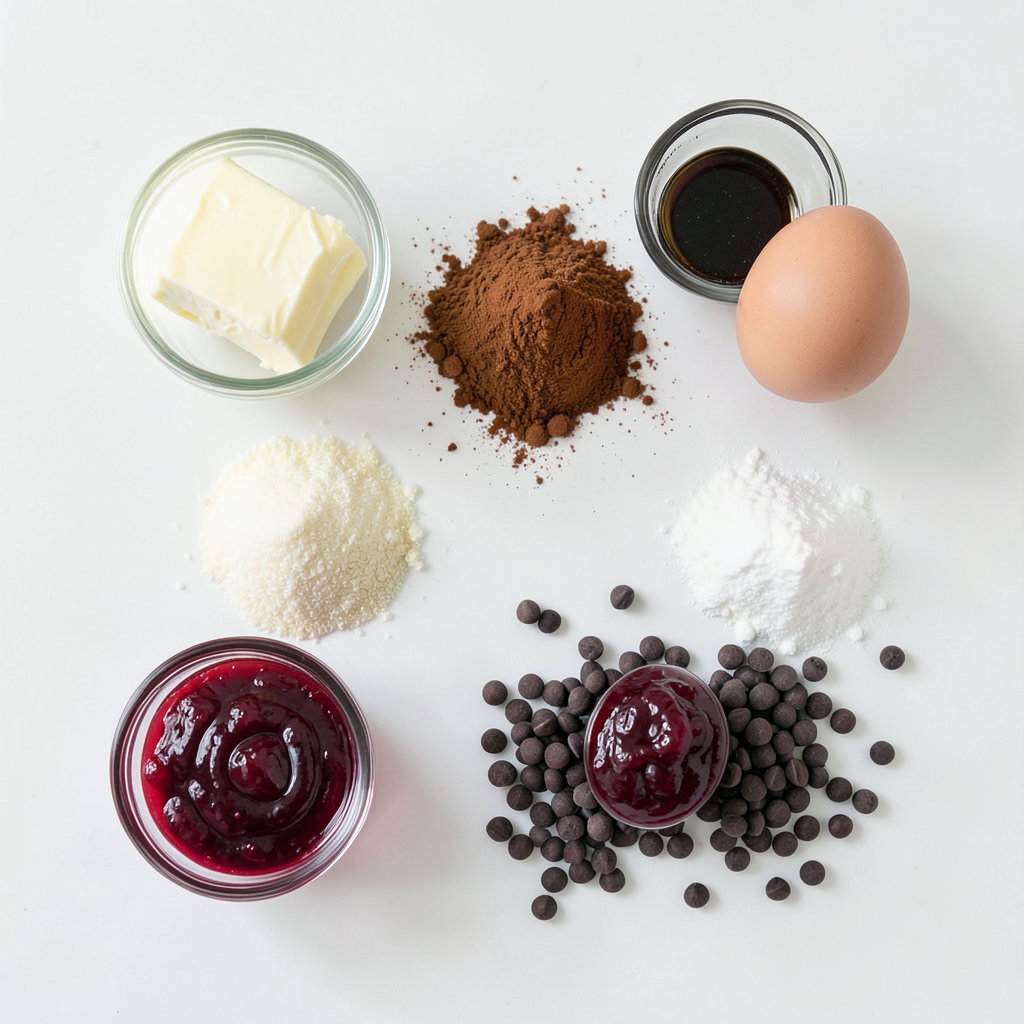
Ingredients
To make Raspberry Chocolate Thumbprint Cookies, you need these simple ingredients:
- 1 cup unsalted butter, softened
- 3/4 cup granulated sugar
- 1/2 cup brown sugar, packed
- 1 large egg
- 1 teaspoon vanilla extract
- 2 cups all-purpose flour
- 1/2 cup cocoa powder
- 1/4 teaspoon baking powder
- 1/4 teaspoon salt
- 1 cup raspberry jam
- 1/2 cup semi-sweet chocolate chips (for drizzling)
When choosing cocoa powder, opt for high-quality brands for the best taste. I like to use Dutch-process cocoa for a richer flavor. Always ensure your butter is softened, as this helps create a light and fluffy dough.
Step-by-Step Instructions
Preparation Steps
1. Start by preheating your oven to 350°F (175°C). This step ensures even baking.
2. Line two baking sheets with parchment paper. This keeps the cookies from sticking.
3. In a large bowl, cream 1 cup of softened butter with 3/4 cup of granulated sugar and 1/2 cup of brown sugar. Mix until the texture is light and fluffy.
4. Add 1 large egg and 1 teaspoon of vanilla extract to the butter mixture. Beat well until combined.
5. In a separate bowl, whisk together 2 cups of all-purpose flour, 1/2 cup of cocoa powder, 1/4 teaspoon of baking powder, and 1/4 teaspoon of salt.
6. Gradually mix the dry ingredients into the wet mixture until a dough forms. Don’t overmix.
7. Scoop out tablespoon-sized balls of dough. Roll them into smooth balls and place on the baking sheets. Space them about 2 inches apart.
8. Use your thumb or the back of a teaspoon to press an indent in the center of each dough ball. Make it deep enough to hold the jam.
9. Now fill each thumbprint with 1 teaspoon of raspberry jam. This adds a burst of flavor.
10. Bake in the oven for 12-15 minutes. The edges should be firm, while the centers remain soft.
Tips for the perfect thumbprint:
- Ensure the indent is deep; this helps hold more jam.
- Don’t overbake; soft centers make the cookies chewy.
Cooling and Drizzling Instructions
1. After baking, remove the cookies from the oven. Let them cool on the baking sheets for 5 minutes.
2. Then, transfer them to a wire rack to cool completely. This prevents sogginess.
3. While the cookies cool, melt 1/2 cup of semi-sweet chocolate chips. Place them in a microwave-safe bowl.
4. Microwave in 30-second intervals, stirring each time until smooth. This prevents burning.
5. Drizzle the melted chocolate over the cooled cookies. Use a fork or a piping bag for a neat look.
6. Allow the chocolate to set before serving. This gives a nice finish.
Techniques for a professional-looking drizzle:
- Use a piping bag for control.
- Practice your drizzle on parchment before decorating cookies.
Tips & Tricks
Baking Tips
To get the best results, keep your oven at 350°F (175°C). This heat works great for the cookies. Watch them bake for about 12-15 minutes. The edges should be firm, but the centers must stay soft. If you want a more chewy cookie, try baking for a minute less. Always check your cookies a bit early to avoid overbaking.
Troubleshooting Common Issues
Dough can sometimes stick to your hands or the baking sheet. To fix this, chill the dough for about 30 minutes. This makes it easier to handle. If the jam pools instead of staying in the thumbprint, try making the indent deeper. A deeper indent holds more jam without spilling over.
Presentation Tips
For a special touch, arrange your cookies on a nice plate. Dust them lightly with powdered sugar for a chic look. You can also add fresh raspberries on the side for extra color and flavor. Drizzle melted chocolate over the cookies for a beautiful finish. Use a fork or piping bag for neat lines. This adds a fun detail that makes them look professional.
Pro Tips
- Room Temperature Butter: Ensure your butter is at room temperature for easier creaming with the sugars, resulting in a lighter, fluffier cookie.
- Chill the Dough: For best results, chill the dough for 30 minutes before baking. This helps prevent spreading and allows the flavors to meld.
- Use Quality Jam: Choose a high-quality raspberry jam for the best flavor, as it will be the star of the cookie.
- Chocolate Drizzle Techniques: For a more elegant presentation, use a piping bag to drizzle the melted chocolate over the cookies.
Variations
Alternative Fillings
You can switch up the jam or filling used in these cookies. Instead of raspberry jam, try chocolate hazelnut spread. It adds a rich flavor that pairs well with the cocoa dough. Apricot jam is another great choice. Its sweet and tangy taste can brighten the cookies. You can even use lemon curd for a citrus twist. Each option gives a unique touch to your thumbprint cookies.
Cookie Dough Variations
You can enhance the cookie dough to add more flavor or texture. Chopped nuts, like walnuts or pecans, bring a nice crunch. Adding a pinch of cinnamon or nutmeg can give warmth to the taste. For a fresh twist, try adding citrus zest, like orange or lemon. This will brighten up the flavors and make the cookies even more delightful.
Dietary Adjustments
If you want to make these cookies gluten-free, use a gluten-free flour blend. Just ensure the blend contains xanthan gum for the right texture. For a vegan version, swap the butter with coconut oil and the egg with a flax egg. To make a flax egg, mix one tablespoon of ground flaxseed with three tablespoons of water. Let it sit for a few minutes until it thickens. These adjustments will keep your cookies tasty while catering to different diets.
Storage Info
How to Store Cookies
To keep your raspberry chocolate thumbprint cookies fresh, store them in an airtight container. This method locks in moisture, keeping them soft. Place parchment paper between layers to prevent sticking. Keep the container at room temperature, away from sunlight. These cookies stay fresh for up to five days.
Freezing Instructions
You can freeze these cookies before or after baking. For freezing unbaked dough, form the dough balls, then place them on a baking sheet. Freeze the balls until solid, then transfer them to a freezer bag. You can bake them straight from the freezer, adding a few minutes to the bake time.
If you want to freeze baked cookies, let them cool completely first. Then, stack them in a container with parchment paper between layers. They can last in the freezer for up to three months. Just thaw them in the fridge overnight before enjoying.
FAQs
Can I make these cookies ahead of time?
Yes, you can prepare the dough in advance. Just follow these steps:
- Mix the dough as per the recipe.
- Shape it into balls and place them on a baking sheet.
- Cover the sheet with plastic wrap.
- Store it in the fridge for up to two days.
When ready, take them out, make the thumbprints, and fill with jam. Bake as usual!
Can I substitute the butter?
You can use alternatives for butter. Some good options include:
- Coconut oil: It gives a nice flavor.
- Vegan butter: A direct swap for regular butter.
- Applesauce: Use half the amount of butter. This will make the cookies softer.
Make sure to adjust other ingredients if needed for best results.
What should I do if I don’t have raspberry jam?
No raspberry jam? No problem! You can try these alternatives:
- Strawberry jam: A sweet swap that works well.
- Blueberry jam: It adds a fun twist.
- Nut butter: For a creamy filling, use almond or peanut butter.
These options will still give you tasty cookies!
This blog post covered everything you need to create delicious thumbprint cookies. From finding the right ingredients to tips on baking and serving, I shared ideas to make them stand out. Remember, you can customize the fillings and even adjust recipes for dietary needs. Keep these handy tips in mind to boost your baking skills. With the right techniques, you can enjoy perfect cookies every time. Don't hesitate to experiment and make these treats your own!