If you love sweet treats, you’ll adore this Pineapple Upside-Down Cake recipe! It’s simple and fun to make, perfect for any occasion. I’ll share my tips for getting that gooey topping just right, secret ingredients for extra flavor, and cool variations to try. Whether you’re a baking pro or just starting out, you’ll impress everyone with this delightful and easy cake. Let’s dive into the sweet goodness!
Ingredients
Overview of Ingredients
Pineapple upside-down cake is a sweet treat that is simple to make. It has juicy pineapple and a soft, fluffy cake. Each ingredient plays a key role in creating this dessert. The flavors blend well, and the cake looks beautiful when served.
List of Required Ingredients
Here’s what you need for this recipe:
– 1 can (20 oz) pineapple slices, drained (reserve juice)
– 1/4 cup butter, melted
– 1/2 cup brown sugar
– 1/2 tsp ground cinnamon
– 1 1/2 cups all-purpose flour
– 1 cup granulated sugar
– 1/2 cup unsalted butter, softened
– 2 large eggs
– 1 tsp vanilla extract
– 1/2 cup milk
– 1 tsp baking powder
– 1/2 tsp baking soda
– A pinch of salt
– Maraschino cherries (optional, for garnish)
Substitutions and Alternatives
You can swap some ingredients if needed. Here are some ideas:
– Use fresh pineapple instead of canned for a brighter taste.
– Replace all-purpose flour with a gluten-free blend for a gluten-free option.
– For a dairy-free version, use coconut oil and almond milk.
– If you want a richer flavor, try using dark brown sugar instead of light.
These changes can help you customize the cake to fit your needs!
Step-by-Step Instructions
Preparation of the Cake Pan
Start by preheating your oven to 350°F (175°C). This step is key for even baking. Grab a 9-inch round cake pan. Coat it with non-stick spray or butter to prevent sticking. This makes it easy to flip the cake later.
Creating the Topping Mixture
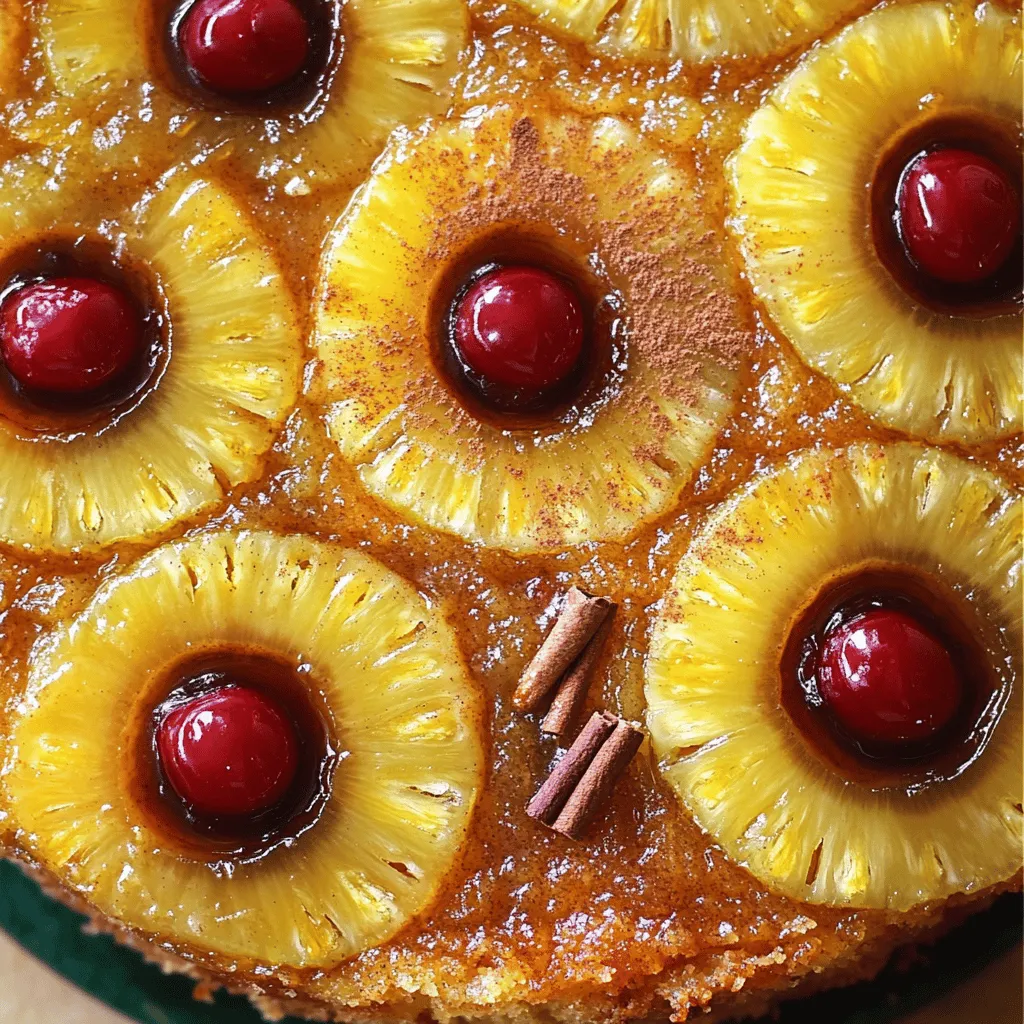
In a small bowl, mix 1/4 cup melted butter with 1/2 cup brown sugar. Stir until smooth. Spread this mixture evenly on the bottom of the cake pan. This will create a sweet layer for the pineapples. Next, place 1 can of drained pineapple slices on top in a single layer. If you like, add maraschino cherries in the center of each slice. To finish, sprinkle 1/2 teaspoon of ground cinnamon over everything for extra flavor.
Mixing the Batter
In a large mixing bowl, cream together 1/2 cup softened butter and 1 cup granulated sugar. Beat until light and fluffy. Then, add 2 large eggs one at a time. Mix in 1 teaspoon of vanilla extract. In another bowl, whisk together 1 1/2 cups flour, 1 teaspoon baking powder, 1/2 teaspoon baking soda, and a pinch of salt. Gradually combine this dry mix with the wet mix. Alternate with 1/2 cup milk, starting and ending with the flour. Mix until just combined. Pour the batter over the pineapple in the pan. Smooth the top with a spatula. Now, you’re ready to bake!
Tips & Tricks
Ensuring the Cake Stays Moist
To keep your cake moist, use fresh ingredients. Always check the dates on your eggs and milk. Mix the batter until just combined; overmixing can make it dry. Adding a bit of pineapple juice from the can adds moisture. You can also cover the cake with plastic wrap after it cools to trap moisture.
Troubleshooting Common Baking Issues
If your cake sinks in the middle, it might be underbaked. Always check with a toothpick. If it’s too dense, you may have overmixed the batter. Make sure to follow the recipe closely for best results. If the cake sticks to the pan, try cooling it longer before inverting. Greasing the pan well helps prevent sticking.
Best Practices for Serving
Serve the cake warm for the best taste. Adding a scoop of vanilla ice cream makes it even better. Slice the cake carefully to keep the pineapple topping intact. For an extra touch, drizzle some caramel sauce over the top. This makes the cake look special and appealing.

Variations
Tropical Additions and Flavor Twists
You can easily change the flavor of your cake. Try adding mango or coconut for a tropical twist. You can also use different fruits like peaches or cherries. Just make sure to drain them well. This will keep the cake from being too soggy. For a spicy kick, add some grated ginger or nutmeg. These additions can make your cake stand out.
Gluten-Free Options
If you need a gluten-free cake, swap all-purpose flour for a gluten-free blend. Many brands offer great mixes that work well in baking. Just make sure it has a good balance of starches and flours. You might also need to add a bit more liquid. This helps keep the cake moist and fluffy.
Vegan Adaptations
To make this cake vegan, replace eggs with flaxseed meal or applesauce. Use almond or soy milk instead of regular milk. You can also swap butter for coconut oil. This gives the cake a nice flavor while keeping it plant-based. Make sure to check for vegan-friendly sugar as well. This way, everyone can enjoy this tasty treat!
Storage Info
Best Practices for Storing Cake
To keep your pineapple upside-down cake fresh, wrap it well. Use plastic wrap or aluminum foil. Store it at room temperature for up to two days. If you need to keep it longer, the fridge is a good option. Just remember, cold air can dry it out. So, wrap it tightly. This cake is best enjoyed fresh, but proper storage helps maintain its taste.
How to Freeze Pineapple Upside-Down Cake
Freezing pineapple upside-down cake is simple. First, let the cake cool completely. Once cool, slice it into pieces. Wrap each slice in plastic wrap. Then, place the wrapped slices in a freezer bag. This helps keep them fresh and prevents freezer burn. You can freeze the cake for up to three months. Label your bag with the date for easy tracking.
Reheating Recommendations
When you’re ready to enjoy your frozen cake, remove a slice from the freezer. Let it thaw in the fridge overnight. If you’re in a hurry, you can thaw it on the counter for a couple of hours. To reheat, place the slice on a microwave-safe plate. Heat it in the microwave for about 15-30 seconds. Check it to ensure it’s warm but not too hot. Enjoy your cake warm for the best taste!
FAQs
What is the origin of Pineapple Upside-Down Cake?
Pineapple Upside-Down Cake started in America in the early 1900s. Canned pineapple became popular around that time. This cake gained fame at the 1925 Pineapple Festival in Hawaii. The cake’s fun twist creates a beautiful presentation. It’s a true treat for any gathering or celebration.
How can I make it without eggs?
You can replace eggs with other ingredients. Use 1/4 cup of unsweetened applesauce for each egg. Another option is a flax egg. Mix 1 tablespoon of ground flaxseed with 3 tablespoons of water. Let it sit for five minutes until it thickens. These swaps work well in the recipe.
Can I use fresh pineapple instead of canned?
Yes, fresh pineapple works great! Just slice it into rings. Make sure to remove the core before using. You can also grill the slices for added flavor. Fresh pineapple adds a bright taste to the cake.
What are some favorite serving suggestions?
Serve this cake warm or at room temperature. It pairs well with whipped cream or vanilla ice cream. You can also add a sprinkle of toasted coconut for a tropical twist. Garnishing with maraschino cherries adds a fun pop of color.
How do I prevent the cake from sticking to the pan?
To avoid sticking, grease the pan well with butter or cooking spray. You can also line the bottom with parchment paper. This extra step helps ensure an easy release. Let the cake cool for about 10 minutes before flipping it over.
This blog post covered how to make a great Pineapple Upside-Down Cake. We looked at key ingredients, step-by-step instructions, and helpful tips to make your cake shine. Remember, you can customize this recipe with tropical flavors or gluten-free options. Storing cake properly keeps it fresh longer, and reheating is simple. With these ideas, you’re ready to bake your cake and impress friends. Enjoy your time in the kitchen and have fun sharing your delicious creation!