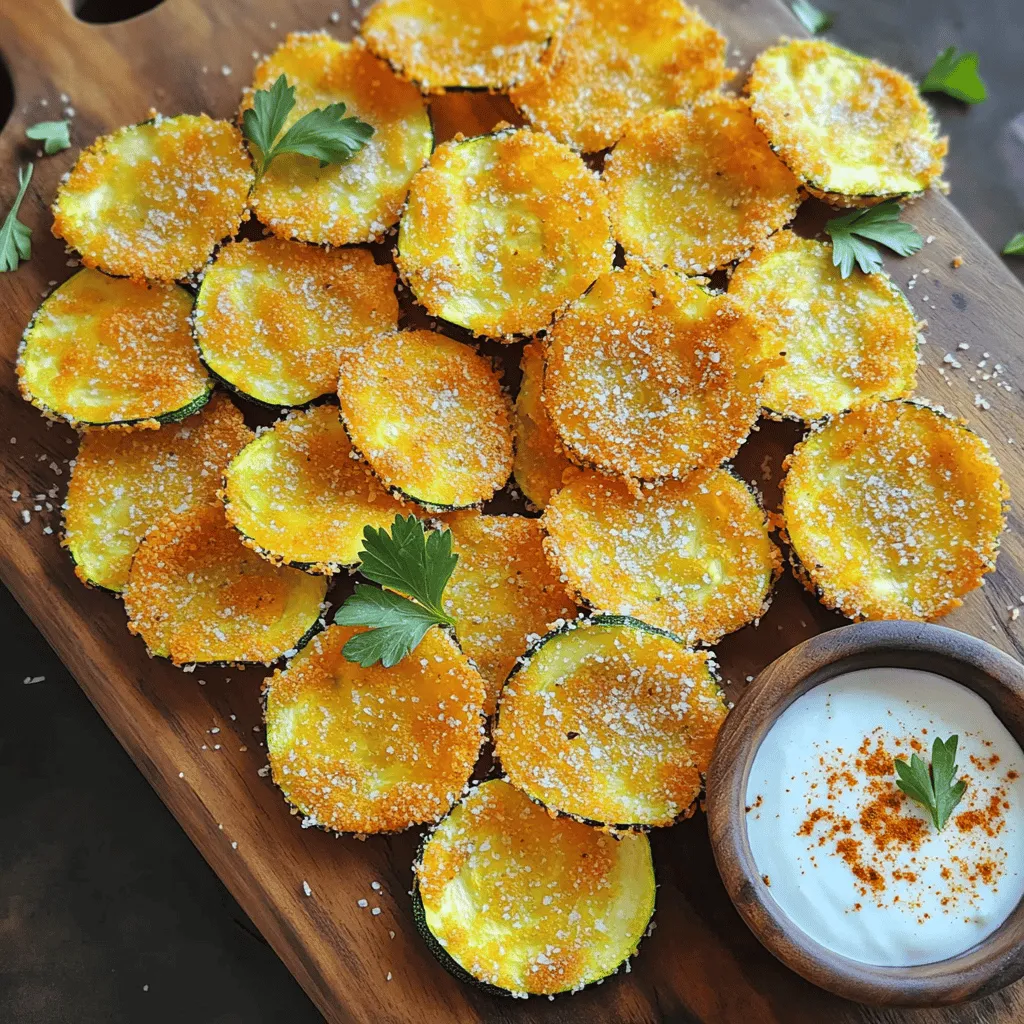
If you’re looking for a healthy snack that’s both crunchy and flavorful, you’ve come to the right place! Today, I’m sharing my easy recipe for oven-baked zucchini chips. With just a few fresh ingredients and some simple seasonings, you’ll create a delicious treat your whole family will love. Say goodbye to store-bought snacks and hello to this fun way to enjoy zucchini. Let’s dive into the crispy goodness!
Ingredients
Main Ingredients
To make delicious oven-baked zucchini chips, you need a few core ingredients.
– 2 medium zucchinis
– 1 cup breadcrumbs (panko for extra crunch)
– 1/2 cup grated Parmesan cheese
Fresh zucchinis are key. They should be firm and shiny. Look for ones without spots or blemishes. Fresh zucchinis give your chips great flavor and nice texture.
Seasoning and Coating
Adding seasonings makes these chips pop with flavor. You will want:
– 1 teaspoon garlic powder
– 1 teaspoon onion powder
– 1 teaspoon paprika
– Salt and pepper to taste
Feel free to mix and match seasonings. Try Italian herbs for a twist or chili powder for some heat. You can also use different types of cheese for variety.
Additional Equipment
You will need some kitchen tools to get started:
– Baking sheet
– Parchment paper
– Mixing bowls
For best results, use a baking sheet with a rim. This helps keep the chips from sliding off. Parchment paper prevents sticking and makes cleanup a breeze.
Step-by-Step Instructions
Preparation Steps
To make perfect zucchini chips, start by preheating your oven to 425°F (220°C). This high heat helps get them crispy. Next, line a baking sheet with parchment paper. The paper prevents sticking and makes clean-up easier.
Now, slice the zucchinis. Cut them into thin rounds, about 1/8 inch thick. A sharp knife works best for this. Thin slices ensure that each chip gets nice and crispy. If you have a mandoline, use it for even, quick slicing.
Coating the Zucchini
For the coating, grab two bowls. In one bowl, whisk two large eggs until frothy. In the second bowl, mix breadcrumbs, grated Parmesan cheese, garlic powder, onion powder, paprika, salt, and pepper. Stir well to combine.
Next, take each zucchini slice. Dip it into the egg mixture, letting any extra egg drip off. Then, coat it in the breadcrumb mix. Press the crumbs lightly onto the zucchini, ensuring a good layer sticks. This step is key for a crunchy texture.
Baking Process
Now it’s time to bake your zucchini chips. Place the coated slices on the baking sheet in a single layer. Make sure they do not touch each other. This helps them cook evenly. Spray or drizzle the tops with olive oil for added crispiness.
Bake the chips for 20-25 minutes. Flip them halfway through to ensure even cooking. Keep an eye on them. They should turn golden brown and look crispy. If they start to brown too quickly, lower the oven temperature slightly. Once done, let them cool for a few minutes before serving.Enjoy your delicious, crunchy snack!
Tips & Tricks
Achieving Maximum Crispiness
To get the best crunch from your zucchini chips, you need to bake them at the right temperature. I recommend preheating your oven to 425°F (220°C). This high heat helps the chips crisp quickly, giving them a great texture. Bake them for 20 to 25 minutes. Flip them halfway through for even cooking.
Using olive oil is key for that extra crunch. A light spray or drizzle on the chips before baking helps them brown nicely. It not only adds flavor but also enhances the crispy texture.
Serving Suggestions
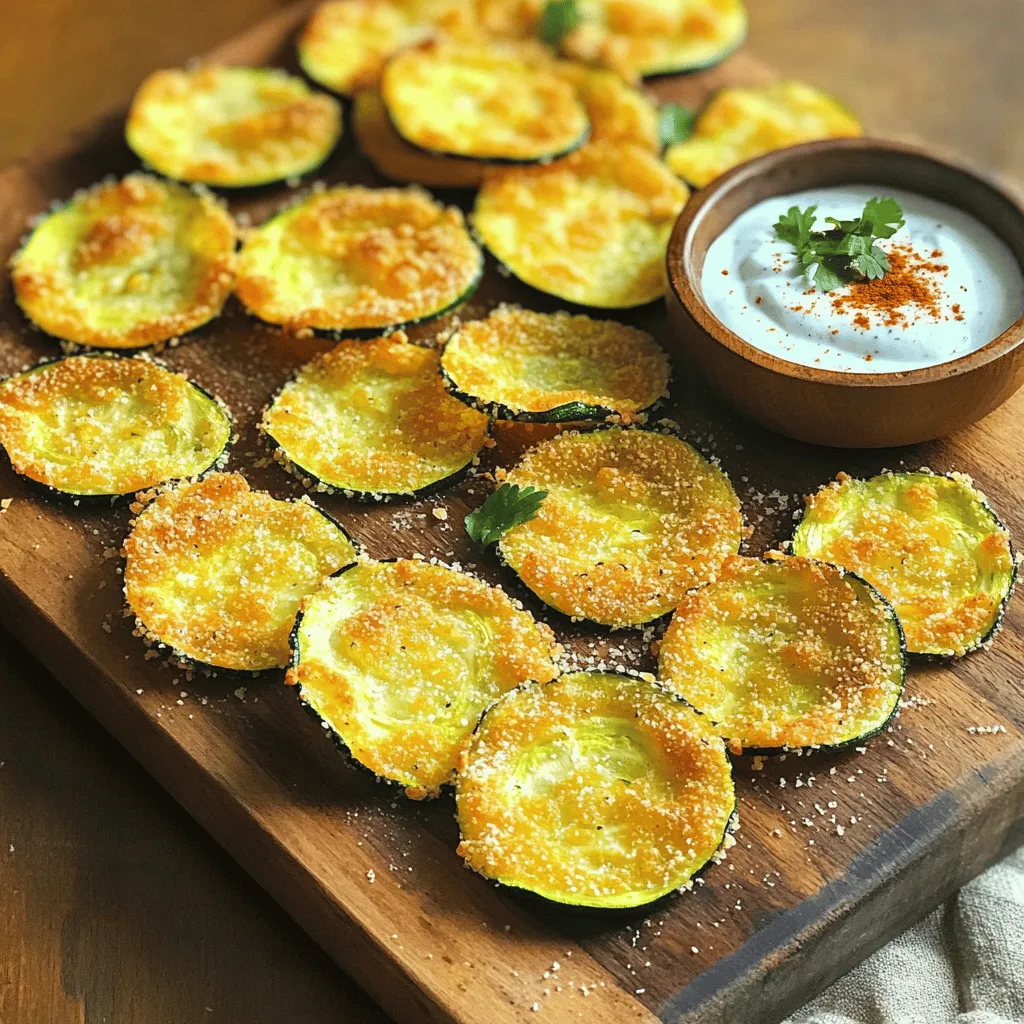
When it comes to serving, make it fun! You can present your chips on a rustic wooden board or in a cute cone made from parchment paper. For added flavor, pair your zucchini chips with a homemade dipping sauce. I love spicy yogurt or tangy marinara. These dips complement the chips well and make your snack even more delightful.
Common Mistakes to Avoid
Many people make mistakes when preparing zucchini chips. One common pitfall is not slicing the zucchini thin enough. Aim for 1/8 inch thick slices for the best results. If they are too thick, your chips may end up soggy.
Another issue is overcrowding the baking sheet. Make sure the chips are in a single layer and not touching. This allows hot air to circulate, making them crispier. If your chips come out burnt, check your oven’s heat. Baking times may vary, so keep an eye on them as they cook.
Variations
Flavor Infusions
You can easily change the taste of your zucchini chips. Try adding spices like Italian seasoning or smoked paprika. Just sprinkle them on the zucchini slices before baking. This will give your chips a tasty twist.
Cheese is another fun addition. You can use different types, like cheddar or feta. Grate the cheese and mix it with the breadcrumbs. This will create a rich flavor and a nice crunch.
Alternative Cooking Methods
If you want to try a different way to cook zucchini chips, use an air fryer. Set the air fryer to about 375°F (190°C). Cook the chips for 10-15 minutes, checking often. They will get crispy quickly!
Oven-baking is great, but frying can also be tempting. Oven-baking is healthier since it uses less oil. You’ll have less grease and fat with baked chips. It’s a win-win!
Recipe Modifications
Want to make your chips gluten-free? You can swap regular breadcrumbs for gluten-free ones. Look for brands made from rice or corn for a great crunch.
If you follow a vegan diet, you can replace the eggs. Try using a mixture of flaxseed and water. Just mix 1 tablespoon of flaxseed with 2.5 tablespoons of water. Let it sit until it thickens. This will help the breadcrumbs stick just like eggs!
Storage Info
Best Practices for Storage
To keep leftover zucchini chips fresh, store them in an airtight container. This helps lock in flavor and crunch. You can place a paper towel inside to absorb any moisture. This small step can help prevent sogginess. If you want to keep them even longer, you can place the container in the fridge. Just remember, the chips are best eaten fresh for maximum crunch.
Reheating Instructions
When you want to enjoy your leftover chips, reheating is key. The best way to reheat them is in the oven. Preheat your oven to 375°F (190°C). Place the chips on a baking sheet in a single layer. Bake them for about 5-10 minutes. This method helps restore their crispiness. You can also use an air fryer for a quick fix. Just set it to 350°F (175°C) and heat for 3-5 minutes.
If you find that your chips are still a bit soggy after refrigeration, try this tip: brush them lightly with olive oil before reheating. This can help bring back that delightful crunch. Enjoy your chips like they’re fresh out of the oven!
FAQs
How long do homemade oven-baked zucchini chips last?
Homemade oven-baked zucchini chips can last for about 3 to 5 days. To store them, keep them in an airtight container. This helps keep them fresh and crispy. If you want to avoid sogginess, do not stack them. For best results, eat them soon after baking.
Can I use frozen zucchini for this recipe?
You can use frozen zucchini, but it may change the texture. Frozen zucchini has more water. This can make the chips soggy. If you choose frozen, thaw and drain the zucchini well. You may need to bake them a bit longer to get them crispy.
What are some healthy alternatives to breadcrumbs?
If you want a healthier coating, try these options:
– Almond flour
– Oats (ground into a flour)
– Crushed nuts (like walnuts or pecans)
– Cornmeal
These substitutes give a nice crunch while adding nutrition. You can mix in some spices to enhance the flavor.
Can kids help make this recipe?
Yes, kids can help with many tasks! Here are some age-appropriate ideas:
– Younger kids can wash the zucchinis.
– Older kids can slice the zucchinis with supervision.
– All kids can help coat the zucchini slices with the breadcrumb mix.
This recipe is fun and easy, making it a great family activity.
In this post, we covered how to make tasty oven-baked zucchini chips. We started with key ingredients, stressing the need for fresh zucchini. Then, we explored the seasonings and equipment to elevate your dish. Next, we provided clear steps for preparation, coating, and baking. Tips for crispiness and serving suggestions followed. We also shared variations and storage info.
Now, you can create a perfect, crunchy snack at home. Enjoy experimenting with flavors and sharing them with others!