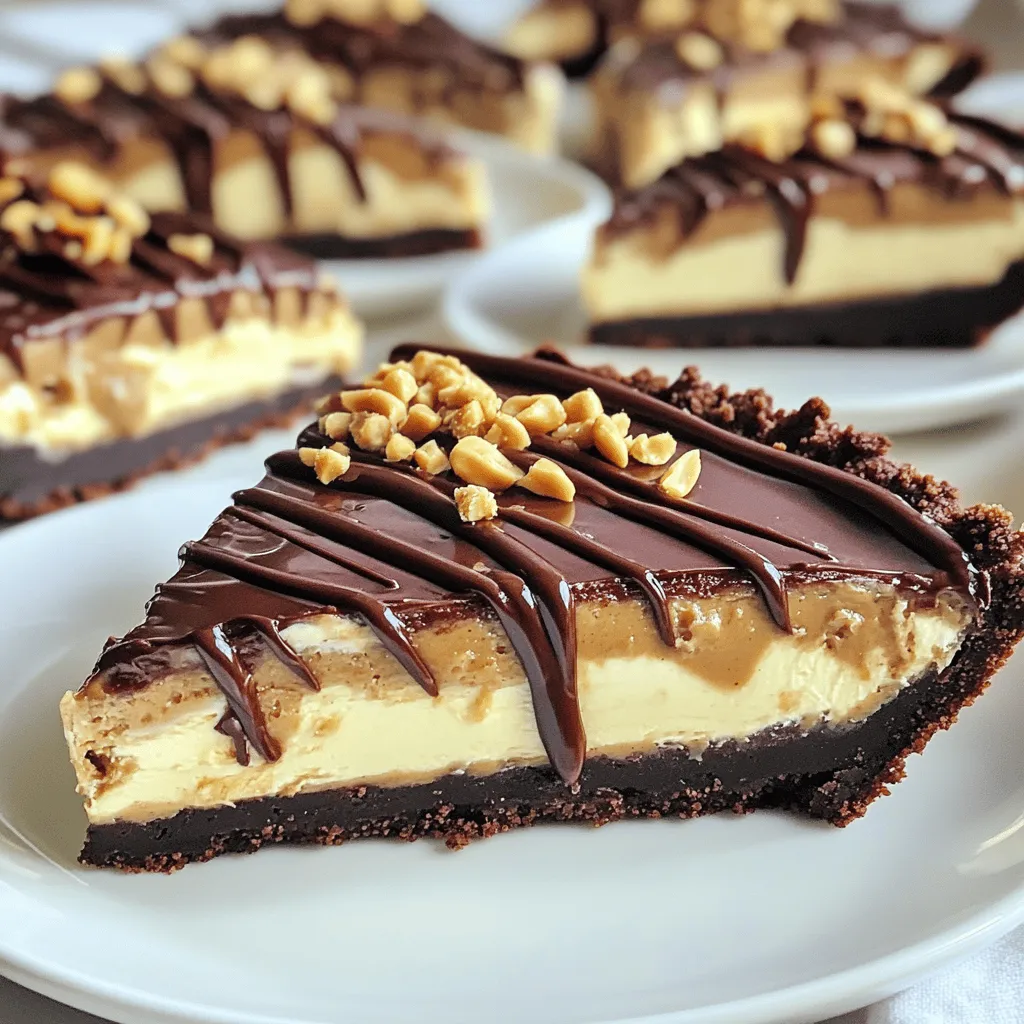
Are you ready to dive into a world of rich flavors and easy steps? This No-Bake Chocolate Peanut Butter Pie is a dessert dream come true! I’ll show you how to whip up this creamy treat without turning on the oven. Perfect for any occasion, it’s packed with chocolate and peanut butter goodness. Stay with me as we explore the ingredients, step-by-step directions, and tips for making it truly special!
Ingredients
List of Ingredients
– 1 1/2 cups chocolate cookie crumbs
– 1/2 cup unsalted butter, melted
– 1 cup creamy peanut butter
– 1 cup powdered sugar
– 8 oz cream cheese, softened
– 1 teaspoon vanilla extract
– 1 cup whipped cream (store-bought or homemade)
– 1/4 cup chocolate chips (for garnish)
– 2 tablespoons crushed peanuts (for garnish)
Ingredient Notes and Substitutions
Chocolate cookie crumbs form the base of this pie. You can use crushed Oreos or chocolate graham crackers. If you want a gluten-free option, use gluten-free cookies. Unsalted butter is best, but salted butter works too. Just skip the extra salt in the crust. Creamy peanut butter gives a smooth texture, but crunchy peanut butter adds a fun crunch. For a lighter filling, swap cream cheese for Greek yogurt.
Tips for Quality Ingredients
Always pick fresh ingredients for the best taste. Check the dates on the cream cheese and whipped cream. Use high-quality chocolate chips for the best garnish. When choosing peanut butter, look for natural options with no added sugar. They taste richer and less sweet, enhancing the pie’s flavor. Quality ingredients make a big difference in this simple treat.
Step-by-Step Instructions
Detailed Preparation Steps
1. Make the crust: In a medium bowl, mix 1 1/2 cups of chocolate cookie crumbs with 1/2 cup of melted unsalted butter. Stir until the crumbs are fully coated in butter.
2. Form the crust: Press the cookie mixture into a 9-inch pie pan. Make sure it covers the bottom and sides. Compact it evenly to hold its shape.
3. Mix the filling: In another bowl, beat 8 oz of softened cream cheese until smooth. This creates a creamy base.
4. Add peanut butter mix: Add 1 cup of creamy peanut butter, 1 cup of powdered sugar, and 1 teaspoon of vanilla extract to the cream cheese. Mix until creamy and well blended.
5. Fold in whipped cream: Gently fold in 1 cup of whipped cream. This keeps the filling light and fluffy.
6. Fill the crust: Pour the peanut butter filling into the chocolate crust. Use a spatula to spread it evenly.
7. Chill the pie: Cover the pie with plastic wrap. Refrigerate for at least 4 hours. This helps it firm up.
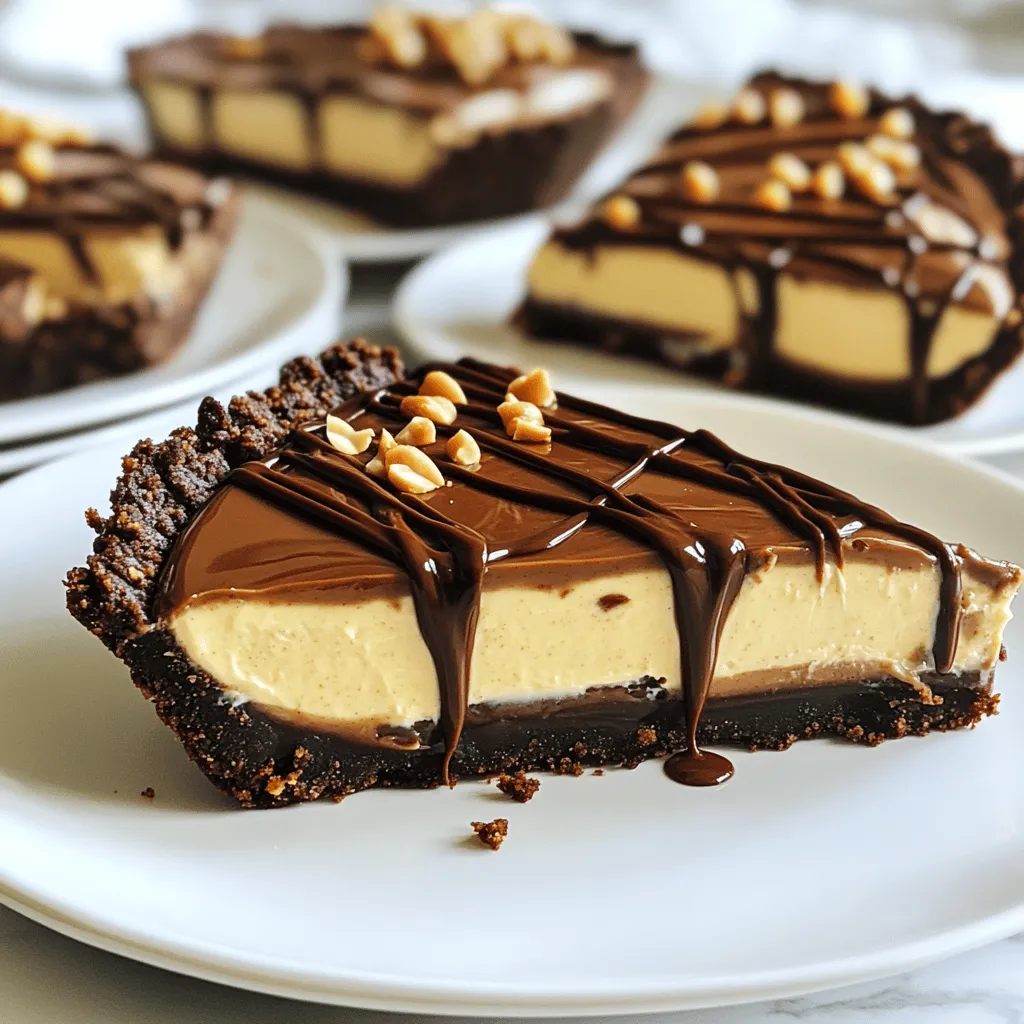
8. Garnish: Before serving, melt 1/4 cup of chocolate chips. Drizzle them over the pie. Sprinkle 2 tablespoons of crushed peanuts on top for extra crunch.
Tips for Each Step
– Crust: Use a flat-bottomed cup to press the crust firmly. This helps it hold together.
– Cream cheese: Make sure the cream cheese is really soft. This makes mixing easier.
– Whipped cream: If making homemade whipped cream, whip it until soft peaks form for better texture.
– Chilling: The longer you chill, the firmer it gets. Overnight is best if you can wait!
– Garnish: For a fun twist, add a drizzle of caramel sauce along with chocolate.
Visual Aids (Images)
Include images showing each step:
– Mixing the crust ingredients.
– Pressing the crust into the pie pan.
– Beating the cream cheese until smooth.
– Folding in the whipped cream.
– The finished pie before garnishing.
These visuals guide you and give a clear picture of what to expect.
Tips & Tricks
How to Make the Pie Extra Creamy
To make your pie extra creamy, use full-fat cream cheese. It gives a rich texture. Also, whip the cream until soft peaks form. This keeps the filling light and airy. When mixing in the whipped cream, fold gently. This keeps the air in, making it fluffier. You can also add a bit more peanut butter for a stronger flavor.
Common Mistakes to Avoid
One common mistake is not letting the cream cheese soften. If it’s cold, it won’t mix well. This can lead to lumps in your filling. Another mistake is rushing the chilling time. The pie needs at least four hours in the fridge. If you skip this, the pie won’t hold its shape. Lastly, be careful when pressing the crust. If it’s too loose, it will crumble when you slice it.
Serving Suggestions for the Best Experience
For the best experience, slice the pie into wedges. Serve each wedge on a plate for a nice look. You can add a dollop of whipped cream on top. Chocolate shavings also add a touch of elegance. For a fun twist, serve with fresh berries. They add a nice tartness that pairs well with the sweet pie. Enjoying this pie chilled will bring out its creamy goodness.
Variations
Add-Ins for a Unique Flavor
You can mix in some fun flavors to your pie. Try adding a swirl of caramel for a sweet touch. You can also fold in some mini chocolate chips for extra chocolate in every bite. Want a nutty crunch? Toss in crushed pretzels for a salty bite. These add-ins can change the whole pie, making it more exciting.
Alternative Crust Options
While chocolate cookie crumbs work well, you can be creative with the crust. For a healthier choice, use graham cracker crumbs. You could also try an oatmeal crust for a chewy texture. If you want a gluten-free option, use gluten-free cookie crumbs. This way, you still enjoy the pie without gluten.
Dietary Adjustments (Gluten-Free, Vegan)
Making this pie fit different diets is easy. For a gluten-free version, use gluten-free cookies for the crust. If you want a vegan pie, swap cream cheese for a vegan cream cheese. Use maple syrup instead of powdered sugar for sweetness. You can also replace whipped cream with coconut whipped cream. These changes keep the pie delicious and friendly for more diets.
Storage Info
How to Store Leftovers
To keep your pie fresh, cover it well. Use plastic wrap or foil. This stops air from getting in. You can store the pie in the fridge for up to five days. Make sure to keep it in a cool spot. If you notice any crust softening, eat it soon!
Freezing Instructions
You can freeze this pie for later! First, let the pie set completely in the fridge. After that, wrap it tightly in plastic wrap. Then, place it in a freezer-safe container. It can stay frozen for up to two months. To serve, thaw it in the fridge overnight before enjoying.
Best Practices for Reheating/Serving After Storage
No need to reheat this pie! It tastes best cold. When serving, slice it into wedges. If you want, add extra whipped cream or chocolate shavings. This makes it look fancy and fun. Enjoy your delicious treat!
FAQs
How to make No-Bake Chocolate Peanut Butter Pie?
To make this pie, start by mixing chocolate cookie crumbs with melted butter. Press this mixture into your pie pan to form the crust. In a separate bowl, beat softened cream cheese until smooth. Then, mix in creamy peanut butter, powdered sugar, and vanilla extract. Fold in whipped cream gently. Pour this filling into the crust and spread it evenly. Cover the pie and refrigerate for at least four hours until it’s firm. Drizzle melted chocolate chips on top and add crushed peanuts for a nice crunch.
Can I use crunchy peanut butter instead of creamy?
Yes, you can use crunchy peanut butter if you want more texture. This will add a fun crunch to each bite. Just keep in mind that it may change the creaminess of the filling. Some like the extra bite, while others prefer a smooth texture. It’s all about your taste!
How long does the pie need to set in the refrigerator?
The pie needs to set in the refrigerator for at least four hours. This helps it firm up properly. If you have time, letting it set overnight can make it even better. The flavors blend well, and the pie gets creamier with extra time. Just be patient; it will be worth the wait!
This blog gives you all you need to make a great no-bake chocolate peanut butter pie. We covered ingredients, step-by-step instructions, tips, variations, storage, and common questions. With these details, you can avoid mistakes and impress everyone with your pie. Remember to choose quality ingredients and explore flavors that fit your taste. Now, you are ready to create an amazing dessert that brings joy to every occasion! Enjoy your baking adventure!