Get ready to delight your taste buds with a rich and decadent Chocolate Hazelnut Crepe Cake! This cake layers thin, delicate crepes with luscious chocolate hazelnut spread and creamy whipped topping. Whether you’re hosting a party or simply treating yourself, this cake is sure to impress. In this post, I’ll share easy step-by-step instructions, tips, and fun variations to make this dessert your own. Let’s dive in and bake!
Ingredients
Here’s what you need to make a delicious Chocolate Hazelnut Crepe Cake:
– 2 cups all-purpose flour
– 4 large eggs
– 3 cups milk
– 1/2 teaspoon salt
– 1 tablespoon vanilla extract
– 2 tablespoons unsalted butter, melted
– 1 cup chocolate hazelnut spread
– 2 cups heavy whipping cream
– 1/4 cup powdered sugar
– 1 teaspoon vanilla extract for whipped cream
– Crushed hazelnuts for garnish
– Cocoa powder for dusting
These ingredients come together to create layers of rich flavor and pleasing texture. The flour and eggs form the base of the crepes, while the chocolate hazelnut spread brings a sweet, nutty taste. The whipped cream adds lightness and balance. Crushed hazelnuts on top give a nice crunch, and cocoa powder adds a touch of elegance.
When you gather these items, choose high-quality chocolate hazelnut spread for the best taste. You can use brands like Nutella or any artisanal version you love. The heavy cream should be fresh to ensure your whipped cream is fluffy and stable.
Feel free to mix and match flavors if you want to personalize your cake!
Step-by-Step Instructions
Preparing the Crepe Batter
To make the crepe batter, start by mixing the following:
– 2 cups all-purpose flour
– 4 large eggs
– 3 cups milk
– 1/2 teaspoon salt
– 1 tablespoon vanilla extract
– 2 tablespoons unsalted butter, melted
Whisk these ingredients in a large bowl until the batter is smooth. This step is key. A smooth batter means smooth crepes. After mixing, let the batter rest for about 30 minutes. This resting time helps improve the texture and makes the crepes softer.
Cooking the Crepes
Next, heat a non-stick skillet or a crepe pan over medium heat. Once hot, pour a small ladle of batter into the skillet. Quickly swirl it around to create a thin layer. Cook for about 1-2 minutes, or until the edges start to lift and it turns lightly golden. Flip the crepe carefully and cook for an additional minute. Transfer the cooked crepe to a plate and repeat this step until you use all the batter. You should end up with about 12-15 crepes, perfect for stacking.
Assembling the Cake
Now, let’s assemble the cake. Start by placing one crepe on a serving plate. Spread a thin layer of chocolate hazelnut spread over the crepe. Next, add a layer of whipped cream made from:
– 2 cups heavy whipping cream
– 1/4 cup powdered sugar
– 1 teaspoon vanilla extract
To make the whipped cream, beat these ingredients until stiff peaks form. After spreading the whipped cream, place another crepe on top. Repeat the layering process until all crepes are stacked.
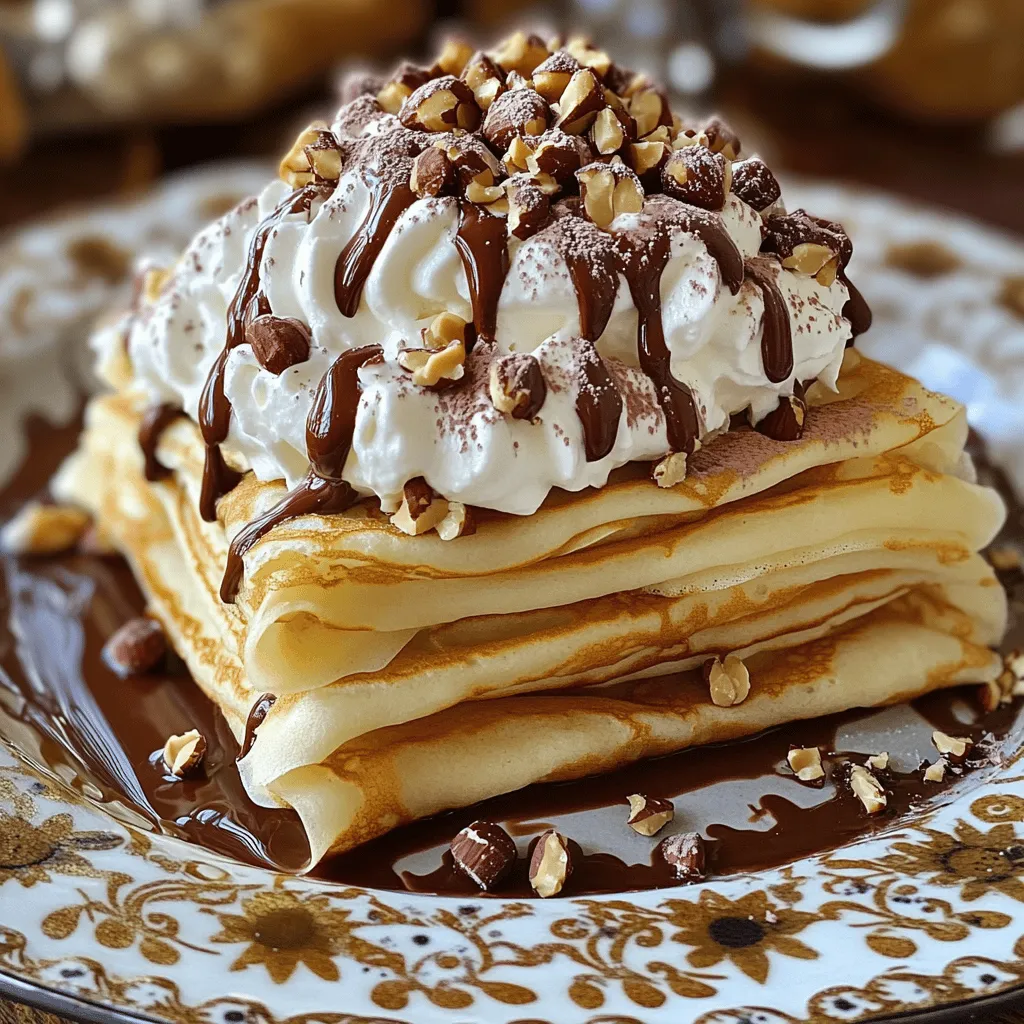
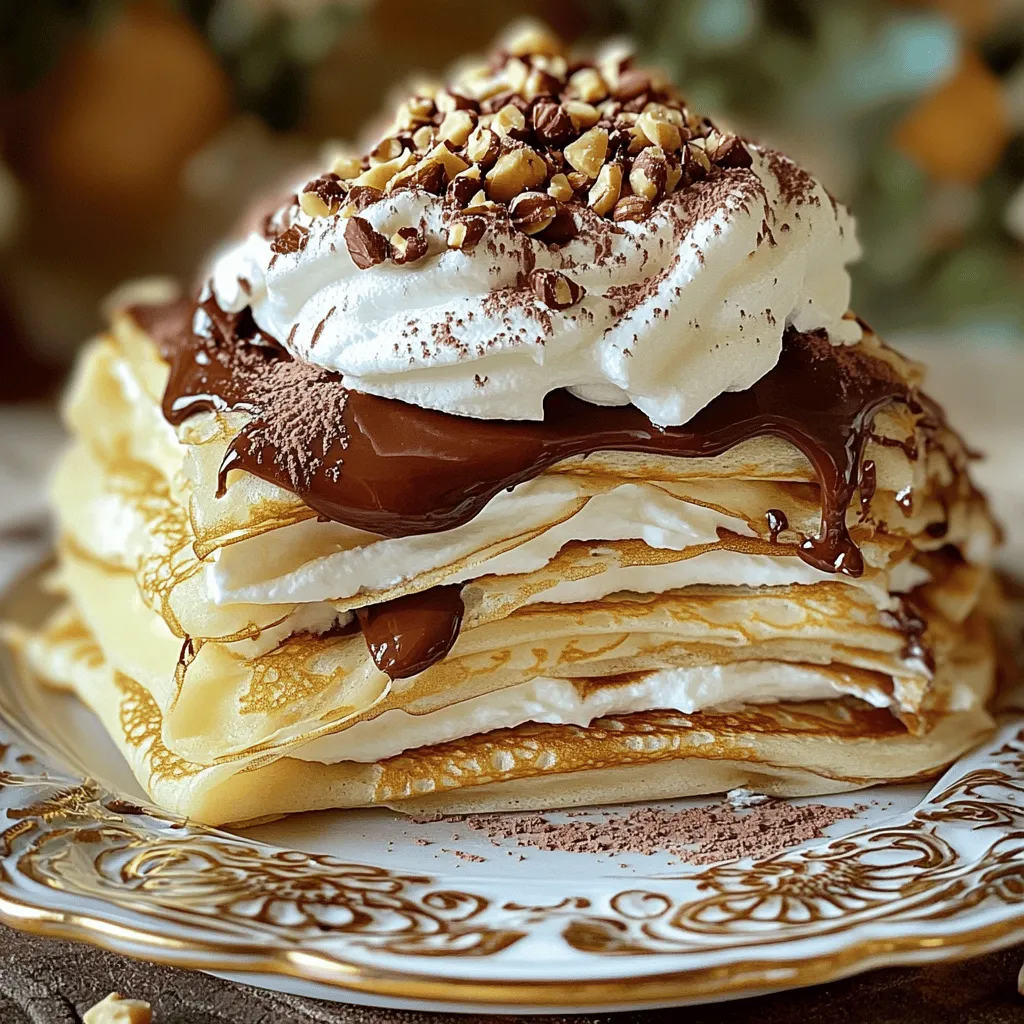
For the final touch, spread any remaining whipped cream on the top crepe layer. Smooth it out nicely. Dust with cocoa powder and sprinkle crushed hazelnuts on top for a delightful crunch. Chill the crepe cake in the refrigerator for at least 1 hour before serving. This chilling allows the flavors to come together beautifully.
Tips & Tricks
Perfecting the Crepes
To avoid tearing while cooking, make sure your pan is hot. Use a non-stick skillet to help the crepes slide out easily. Pour a small amount of batter and swirl it quickly to form a thin layer. Cook for about 1-2 minutes until golden brown. Then, flip it carefully with a spatula.
The batter needs to rest for at least 30 minutes. This helps the flour hydrate and relaxes the gluten. A rested batter yields softer, more flexible crepes.
Enhancing Flavors
You can boost the taste by adding different extracts. Try almond or orange extract for a twist. These can add depth to your crepes without overpowering the chocolate hazelnut spread.
For toppings, consider fresh fruits like sliced strawberries or bananas. A drizzle of warm chocolate sauce will also add richness. You can sprinkle crushed hazelnuts on top for a delightful crunch.
Serving Suggestions
For a gourmet look, slice the cake carefully and place each piece on decorative plates. Top with a sprinkle of cocoa powder and some additional crushed hazelnuts. This makes each slice look special.
Pair your crepe cake with coffee or a glass of milk. These drinks complement the sweet flavors and create a complete dessert experience. You can also serve it with a scoop of vanilla ice cream for an extra treat.
Variations
Flavor Alternatives
You can switch up flavors in your Chocolate Hazelnut Crepe Cake. Try using different nut spreads, like almond or peanut butter. These spreads give a fun twist. You can also add fruit flavors by using fillings like strawberry or raspberry jam. This adds a fresh taste that pairs well with chocolate.
Dietary Adjustments
Want to make this cake gluten-free? Use alternative flours like almond or coconut flour. They work great as substitutes. For a vegan option, swap eggs with flaxseed meal and milk with almond or oat milk. This way, everyone can enjoy this tasty treat without missing out.
Thematic Crepe Cakes
Get creative with seasonal flavors! For fall, use pumpkin spice or apple cinnamon. In spring, try lemon zest or berry fillings. You can also customize your cake for special occasions. Decorate it with edible flowers for weddings or use holiday colors for festive events. These ideas make your crepe cake unique and fun!
Storage Info
Storing the Crepe Cake
To store your chocolate hazelnut crepe cake, cover it tightly with plastic wrap. This keeps the cake fresh and moist. Place it in the refrigerator. Your cake will last up to four days in the fridge. Keep an eye on it, and enjoy it while it’s at its best!
Freezing Instructions
If you want to freeze your crepe cake, follow these steps:
– Cool completely: Let the cake cool down to room temperature.
– Wrap well: Slice the cake and wrap each piece in plastic wrap.
– Use foil: After wrapping, cover it with aluminum foil.
– Label: Write the date on the foil. This helps you keep track.
Your crepes can stay fresh in the freezer for up to two months.
When you’re ready to enjoy, thaw the cake in the fridge overnight. This keeps the texture soft and yummy.
Reheating and Serving
To refresh the cake before serving, remove it from the fridge. Let it sit for 15 minutes at room temperature. This step brings back some of the creaminess. You can also microwave a slice for about 10-15 seconds. Just be careful not to overheat!
If you have leftovers, there are fun ways to use them. Chop the cake into small pieces and mix it into ice cream for a delicious treat. You can also make crepe cake parfaits with whipped cream and berries. Enjoy your creation in new ways!
FAQs
How do I ensure my crepes are thin?
To make thin crepes, pour a small amount of batter into the pan. Swirl the pan quickly to spread the batter into a thin layer. Keep the heat at medium. This helps cook the crepes evenly without burning them.
Can I make the crepe batter in advance?
Yes, you can make the crepe batter ahead of time. Store it in the fridge for up to 24 hours. Just remember to whisk it again before cooking. This will help keep your crepes smooth and easy to pour.
What can I use instead of chocolate hazelnut spread?
If you want to switch it up, use almond butter or peanut butter. You could also try a fruit spread for a fresh twist. These options still create a tasty layer in your crepe cake.
How long does it take for the flavors to meld?
After you assemble the crepe cake, chill it in the fridge for at least 1 hour. This allows the flavors to blend together nicely. The waiting time is worth it for a richer taste.
Can I add fruit to the crepe layers?
Absolutely! Sliced bananas, strawberries, or raspberries work well. Just layer the fruit between the crepes and the spread. This adds a lovely touch and some freshness to the cake.
What’s the best way to garnish my crepe cake?
For garnishing, spread whipped cream on top and dust with cocoa powder. Then, sprinkle crushed hazelnuts for crunch. A drizzle of chocolate sauce adds a beautiful finish, making it look extra special.
This blog post shows you how to make a delicious crepe cake from scratch. We covered the ingredients, step-by-step instructions, and tips for perfecting your crepes. I shared variations to fit different diets and creative ways to store and serve your cake.
In the end, have fun experimenting with flavors. Enjoy your tasty treat and impress your friends. A homemade crepe cake is always a hit!