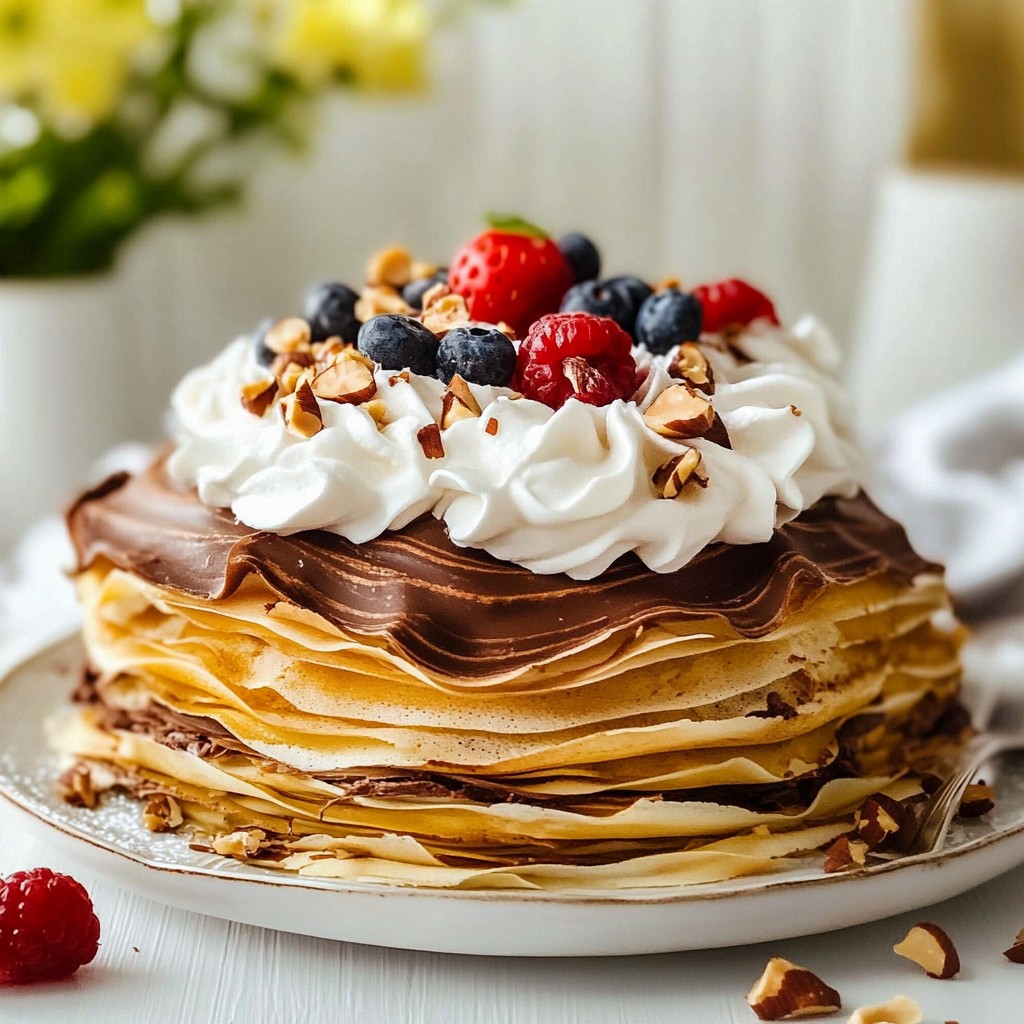
Welcome to a world of sweet delight with my Chocolate Hazelnut Crepe Cake! This layered dessert is simple yet stunning, perfect for impressing friends and family. Imagine delicate crepes filled with rich chocolate and nutty goodness. In this post, I'll guide you through every step, from gathering the right ingredients to decorating your cake. Let’s transform your kitchen and create a showstopper that everyone will love!
Why I Love This Recipe
- Decadent Layers: This crepe cake features rich layers of chocolate hazelnut spread and fluffy whipped cream, making each slice a delightful indulgence.
- Perfect for Any Occasion: Whether it’s a birthday, holiday, or just a special treat, this cake impresses guests and satisfies sweet cravings.
- Easy to Customize: You can easily switch up the flavors or toppings, adding fruits, different nuts, or even flavored whipped cream for a unique twist.
- Fun Cooking Activity: Making crepes is a fun and interactive cooking experience, perfect for involving friends or family in the kitchen.
Ingredients
Essential Ingredients for Chocolate Hazelnut Crepe Cake
To create a delightful chocolate hazelnut crepe cake, you need these key items:
- 2 cups all-purpose flour
- 4 large eggs
- 2 cups milk (whole or almond for a dairy-free option)
- 1/4 cup sugar
- 1/4 teaspoon salt
- 4 tablespoons unsalted butter, melted (plus extra for cooking)
- 1 1/2 cups chocolate hazelnut spread
- 1 cup heavy whipping cream
- 1/4 cup powdered sugar
- 1 teaspoon vanilla extract
- Chopped hazelnuts for topping
- Fresh berries for garnish (optional)
These ingredients come together to create a rich, layered dessert. The chocolate hazelnut spread is the star, offering a sweet and nutty flavor. The whipped cream adds a light texture, making each bite a treat.
Alternative Options (Dairy-Free, Gluten-Free, etc.)
If you need alternatives, don’t worry! You can easily adjust this recipe:
- Dairy-Free: Use almond milk instead of regular milk. Replace heavy cream with coconut cream for a rich taste.
- Gluten-Free: Substitute the all-purpose flour with a gluten-free flour blend. Make sure it works well for baking.
These swaps keep the cake tasty and inclusive for everyone.
Tools & Equipment Needed
To make this cake, you will need:
- Large mixing bowl
- Whisk or electric mixer
- Non-stick skillet or crepe pan
- Ladle for pouring batter
- Spatula for flipping crepes
- Serving plate for assembly
- Refrigerator for chilling
Having the right tools makes the process smoother. Each tool plays a role in creating beautifully cooked crepes and a stunning cake.
Step-by-Step Instructions
Preparing the Crepe Batter
To make the batter, grab a large mixing bowl. Add the flour, eggs, milk, sugar, and salt. Whisk it all together until smooth. This step is key for good crepes. Next, stir in the melted butter. Let the batter rest for 30 minutes. This lets the flour absorb the liquid, making the crepes tender.
Cooking the Crepes
Heat a non-stick skillet over medium heat. Lightly grease it with butter. Pour a small ladle of batter into the center of the skillet. Swirl it around to coat the bottom evenly. Cook for about 1-2 minutes until the edges lift and the bottom is golden. Flip the crepe and cook for another minute. Remove it from the skillet and place it on a plate. Repeat this process with the remaining batter. Stack the crepes on the plate as you go.
Assembling the Crepe Cake
Now it’s time to build your cake. Place one crepe on a serving plate. Spread a thin layer of chocolate hazelnut spread on top. Then, add a layer of whipped cream. Place another crepe on top and repeat this process. Keep layering crepes, chocolate hazelnut spread, and whipped cream until all crepes are stacked. Once assembled, smooth any imperfections with whipped cream on the top and sides. For a lovely finish, top with chopped hazelnuts and fresh berries if you like. Chill the cake in the fridge for at least one hour. This helps it set before you slice it.
Tips & Tricks
How to Achieve Perfect Crepes
To make great crepes, start with a smooth batter. Whisk together flour, eggs, milk, sugar, and salt. Let the batter rest for 30 minutes. This helps the flour absorb moisture. When cooking, use a non-stick skillet. Heat it over medium heat and add a little butter. Pour a small ladle of batter into the center. Swirl it around to cover the bottom. Cook until the edges lift and the bottom turns golden. Flip it gently and cook for one more minute. Stack your crepes on a plate, and you're ready for the next step!
Whipping Cream Tips for Stability
For stable whipped cream, use heavy whipping cream. Combine it with powdered sugar and vanilla in a bowl. Use a hand mixer or stand mixer to whip it. Stop when you see soft peaks form. Avoid over-whipping, or it may turn grainy. Keep the whipped cream cool in the fridge until you need it. This will help it hold its shape better between the layers of your cake.
Decorating Ideas for Presentation
To make your cake look beautiful, consider simple toppings. Chopped hazelnuts add a nice crunch and flavor. Fresh berries, like strawberries or raspberries, can brighten the dish. You can also drizzle more chocolate hazelnut spread on top. A dusting of powdered sugar gives it a nice touch. Arrange your toppings neatly for a stunning finish. These small details make your cake even more appealing!
Pro Tips
- Rest the Batter: Allowing the crepe batter to rest for at least 30 minutes helps the gluten relax, resulting in more tender crepes.
- Use a Non-Stick Pan: A non-stick skillet is key for easy flipping and prevents the crepes from sticking, making your cooking process smoother.
- Layering Technique: When stacking crepes, ensure even layers of chocolate hazelnut spread and whipped cream for a balanced flavor in every slice.
- Chill Before Serving: Chilling the assembled cake for at least an hour allows the flavors to meld and makes slicing easier.
Variations
Flavor Variations (Nutella, Frangelico, etc.)
You can change the flavor of your cake easily. Use Nutella instead of chocolate hazelnut spread. For a nutty twist, add Frangelico liqueur to the whipped cream. This adds a rich hazelnut flavor. You can also try flavored spreads like almond or peanut butter. Each option gives the cake a new taste.
Dietary Variations (Vegan, Gluten-Free, etc.)
Making a vegan version is simple. Substitute eggs with flaxseed meal mixed with water. Use almond or coconut milk for a dairy-free option. Replace the butter with coconut oil. For a gluten-free cake, swap all-purpose flour with almond flour or a gluten-free blend. Be sure to check labels for any hidden gluten.
Serving Suggestions (Pairing with Ice Cream, Berries, etc.)
This cake shines with ice cream. Vanilla or hazelnut ice cream pairs perfectly. Serve with a side of fresh berries for a fruity touch. Berries add color and taste. You can also drizzle chocolate sauce over the top for extra sweetness. Enjoy this cake chilled for the best experience.
Storage Info
Best Ways to Store Leftover Cake
To keep your cake fresh, wrap it well. Use plastic wrap or aluminum foil. You can also place it in an airtight container. This helps keep moisture in and air out. Store it in the fridge. The cool temperature helps maintain the taste and texture.
How Long Does Chocolate Hazelnut Crepe Cake Last?
When stored properly, your cake can last about 3 to 4 days in the fridge. After that, it may lose its flavor and texture. Always check for signs of spoilage before eating. If it looks or smells off, it's best to toss it.
Can You Freeze Crepe Cakes?
Yes, you can freeze crepe cakes! Wrap it tightly in plastic wrap, then in foil. This prevents freezer burn. It can last up to 2 months in the freezer. To eat, thaw it in the fridge overnight. Then enjoy the rich flavors again!
FAQs
How can I make my crepes thinner?
To make thinner crepes, use less batter. Pour a small amount in the center of the pan. Then, tilt the pan to spread the batter evenly. You can also add a little more milk to your batter. This will make your crepes more delicate and light.
Can I use other spreads instead of chocolate hazelnut?
Yes, you can! Try almond butter, peanut butter, or even fruit preserves. Each spread gives a new flavor. Just make sure to spread it thinly between the crepes. This keeps the layers balanced and tasty.
Is it possible to make this cake in advance?
Absolutely! You can make the crepes a day before. Stack them with parchment paper in between. Keep the cake in the fridge overnight. Just add the whipped cream and toppings before serving. This makes your dessert prep easier and quicker on the day of the event.
Making a Chocolate Hazelnut Crepe Cake is fun and rewarding. We explored the essential ingredients and alternatives, along with tools needed. I provided clear steps to prepare, cook, and assemble your cake perfectly. You learned tips for creating flawless crepes and beautiful decorations. Variations let you customize flavors and make it fit special diets. Finally, I shared the best ways to store your cake and answered common questions. Enjoy this delicious dessert, and share it with friends. You now have the tools to make it a hit in your kitchen!