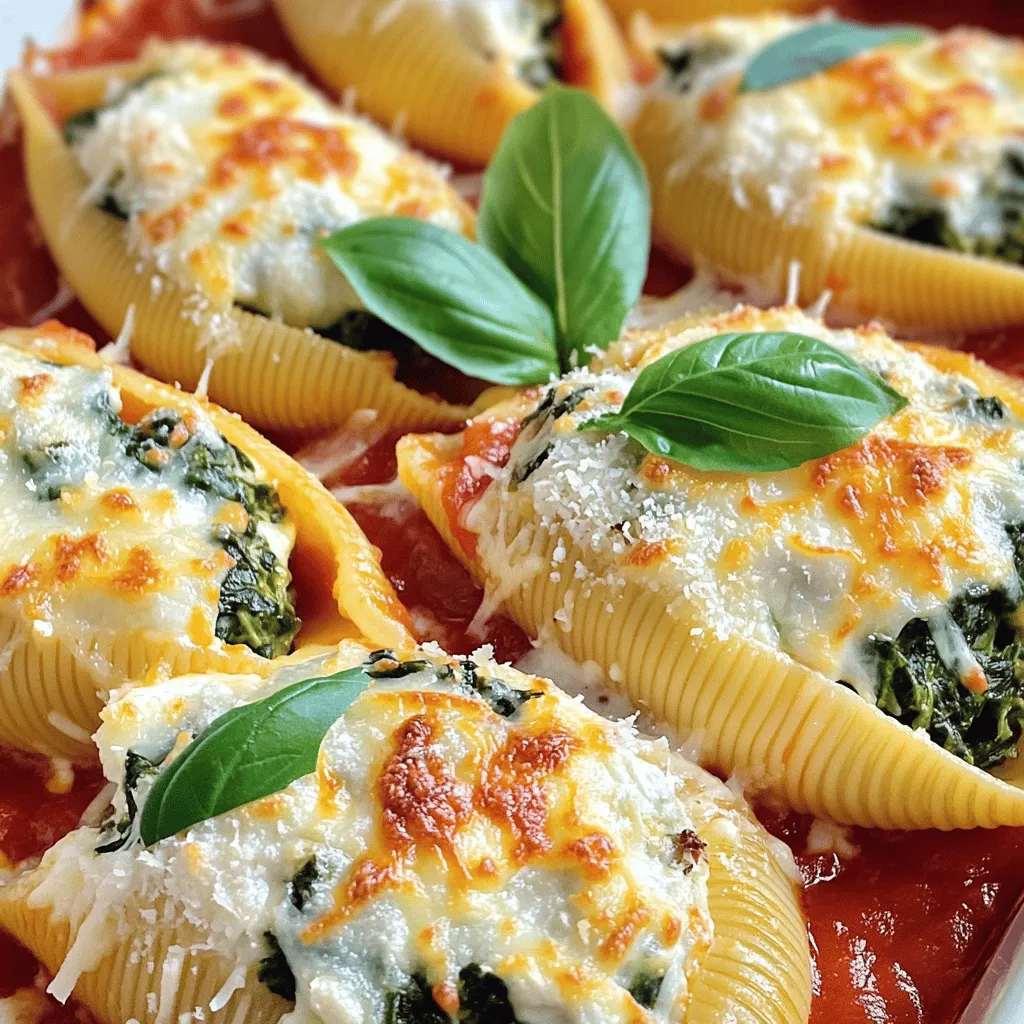
Are you ready to delight your taste buds? My Cheesy Spinach Stuffed Shells offer a simple and tasty dinner option that pleases everyone. Filled with creamy cheese and fresh spinach, these shells are a family favorite. In this post, I’ll share my easy recipe, cooking tips, and fun variations. Get ready to impress your loved ones with this comforting dish that’s packed with flavor!
Ingredients
Complete List of Ingredients
– 20 jumbo pasta shells
– 2 cups ricotta cheese
– 1 cup shredded mozzarella cheese
– 1 cup grated Parmesan cheese
– 2 cups fresh spinach, chopped
– 1 large egg
– 1 teaspoon garlic powder
– 1 teaspoon onion powder
– Salt and pepper to taste
– 3 cups marinara sauce
– Fresh basil for garnish
Key Ingredient Details
Each ingredient plays a big role in the taste of the dish. The jumbo pasta shells hold the filling. Ricotta cheese gives a creamy texture. Mozzarella cheese adds meltiness. Parmesan cheese brings a salty flavor. Fresh spinach adds color and nutrients. The egg helps bind the filling together. Garlic and onion powders boost taste. The marinara sauce adds a tangy base. Fresh basil brightens the dish, making it look and taste fresh.
Optional Add-Ins
You can mix in other fun ingredients! Try adding cooked ground meat for extra protein. For a spicy kick, add red pepper flakes. You can also use different cheeses like feta or goat cheese for unique flavors. If you love herbs, consider adding chopped parsley or oregano. These options let you customize your cheesy spinach stuffed shells just the way you like them!
Step-by-Step Instructions
Preheating and Cooking Pasta
First, preheat your oven to 375°F (190°C). This step is key for a perfect bake. While the oven warms up, fill a large pot with salted water. Bring it to a boil. Once boiling, add the jumbo pasta shells. Cook them until they are al dente, which means they should still have a bit of bite. This usually takes about 9-11 minutes. Drain the pasta and let it cool for a few minutes.
Preparing the Spinach and Cheese Filling
In a mixing bowl, combine the ricotta cheese, half of the mozzarella, and half of the Parmesan cheese. Then, add in the chopped spinach. Crack the large egg into the bowl. Sprinkle in the garlic powder, onion powder, salt, and pepper. Mix everything until you see a nice, smooth blend. This filling should be creamy and packed with flavor.
Stuffing the Shells and Assembling the Dish
Now, take your baking dish and spread a thin layer of marinara sauce on the bottom. Grab a spoon and fill each pasta shell with the spinach and cheese filling. Make sure to fill them generously. Place the stuffed shells in the baking dish with the open side facing up. Once all the shells are filled, pour the remaining marinara sauce over them. Finally, sprinkle the rest of the mozzarella and Parmesan cheese on top.
Baking Instructions
Cover the baking dish with aluminum foil. This helps keep the moisture in. Bake in your preheated oven for 25 minutes. After that, remove the foil and bake for another 10-15 minutes. Watch for the cheese to get bubbly and lightly golden. Once done, take them out and let them cool for a few minutes. Garnish with fresh basil before serving for a nice touch.
Tips & Tricks
Common Mistakes to Avoid
When making cheesy spinach stuffed shells, avoid overcooking the pasta. Cook it just until al dente. This keeps the shells firm and easy to stuff. Don’t skip the seasoning. Adding salt and pepper to the filling enhances the taste. Also, make sure to mix the filling well. This ensures that every bite is packed with flavor.
How to Perfectly Bake Stuffed Shells
To bake stuffed shells perfectly, preheat your oven to 375°F (190°C). Cover the dish with foil for the first part of baking. This helps the shells steam and stay moist. After 25 minutes, remove the foil. This allows the cheese to get bubbly and lightly golden. Check the shells after 10-15 minutes to avoid burning.
Serving Suggestions
Serve cheesy spinach stuffed shells with a side salad for a balanced meal. A simple green salad with a light vinaigrette pairs well. You can also add garlic bread for extra flavor. For a touch of freshness, sprinkle fresh basil on top just before serving. This adds color and a lovely aroma.
Variations
Meat Lover’s Cheesy Spinach Stuffed Shells
If you love meat, this version is for you! Add cooked ground beef, sausage, or turkey to the cheese filling. Mix in about one cup of cooked meat with the ricotta, spinach, and other ingredients. This adds a hearty layer to your stuffed shells. The blend of meat and cheese creates a rich flavor. You’ll enjoy every bite!
Vegan Version of Stuffed Shells
For a vegan twist, swap the cheeses for plant-based options. Use tofu or cashew cheese in place of ricotta. Add nutritional yeast for a cheesy taste. You can also use vegan egg substitutes, like flaxseed meal, to hold the filling together. Choose a vegan marinara sauce to keep the dish fully plant-based. This version is just as tasty!
Gluten-Free Options
If you’re gluten-free, use gluten-free pasta shells. Many brands offer great alternatives that cook just like regular pasta. Check the labels to ensure they are safe for your diet. You can follow the same filling recipe. It’s still packed with flavor and good for everyone. Enjoy a comforting meal without worry!
Storage Info
How to Properly Store Leftovers
To keep your cheesy spinach stuffed shells fresh, let them cool first. Place the shells in an airtight container. Make sure to separate layers with parchment paper to avoid sticking. Store them in the fridge for up to three days. When ready to eat, you’ll have a quick meal ready to go.
Reheating Instructions
Reheat the cheesy spinach stuffed shells in your oven for the best taste. Preheat the oven to 350°F (175°C). Place the shells in a baking dish. Add a little extra marinara sauce on top to keep them moist. Cover with foil and heat for about 20 minutes. Remove the foil for the last five minutes to crisp the cheese.
Freezing for Later Use
If you want to save some for later, freezing is a great option. First, let the stuffed shells cool completely. Then, place them in a freezer-safe container or bag. You can freeze them for up to three months. To reheat, thaw in the fridge overnight, then bake as mentioned above. Enjoy your delicious meal whenever you like.
FAQs
How Do You Make Cheesy Spinach Stuffed Shells from Scratch?
To make cheesy spinach stuffed shells, follow these steps:
– Preheat your oven to 375°F (190°C).
– Cook jumbo pasta shells in salted water until al dente, then drain.
– In a bowl, mix ricotta cheese, half the mozzarella, half the Parmesan, chopped spinach, egg, garlic powder, onion powder, salt, and pepper.
– Fill each shell with the mixture and place them in a baking dish.
– Spread marinara sauce over the shells and top with remaining cheese.
– Bake covered for 25 minutes, then uncover and bake for 10-15 more.
– Garnish with fresh basil before serving.
Can I Use Other Types of Cheese?
Yes, you can use other types of cheese!
– Try goat cheese or feta for a tangy touch.
– Cream cheese adds a smooth texture.
– Mix in cheddar for a sharper flavor.
Just remember to adjust the amount based on the cheese’s strength.
What Can I Serve with Cheesy Spinach Stuffed Shells?
Cheesy spinach stuffed shells pair well with many sides.
– Serve with a fresh green salad for crunch.
– Garlic bread complements the flavors nicely.
– Roasted vegetables add a healthy touch.
– A side of marinara sauce can enhance the meal.
How Long Do Stuffed Shells Last in the Fridge?
Stuffed shells can last in the fridge for about 3-5 days.
– Store them in an airtight container to keep them fresh.
– If they sit longer, they may lose flavor and texture.
Always check for any signs of spoilage before eating!
You learned about making cheesy spinach stuffed shells from start to finish. We covered the ingredients, step-by-step instructions, and tips for perfect results. You also explored tasty variations and storage methods.
Stuffed shells are fun to make and easy to adapt. Whether you eat them right away or freeze them for later, these dishes please everyone. Enjoy cooking and sharing this meal with your loved ones. Happy cooking!