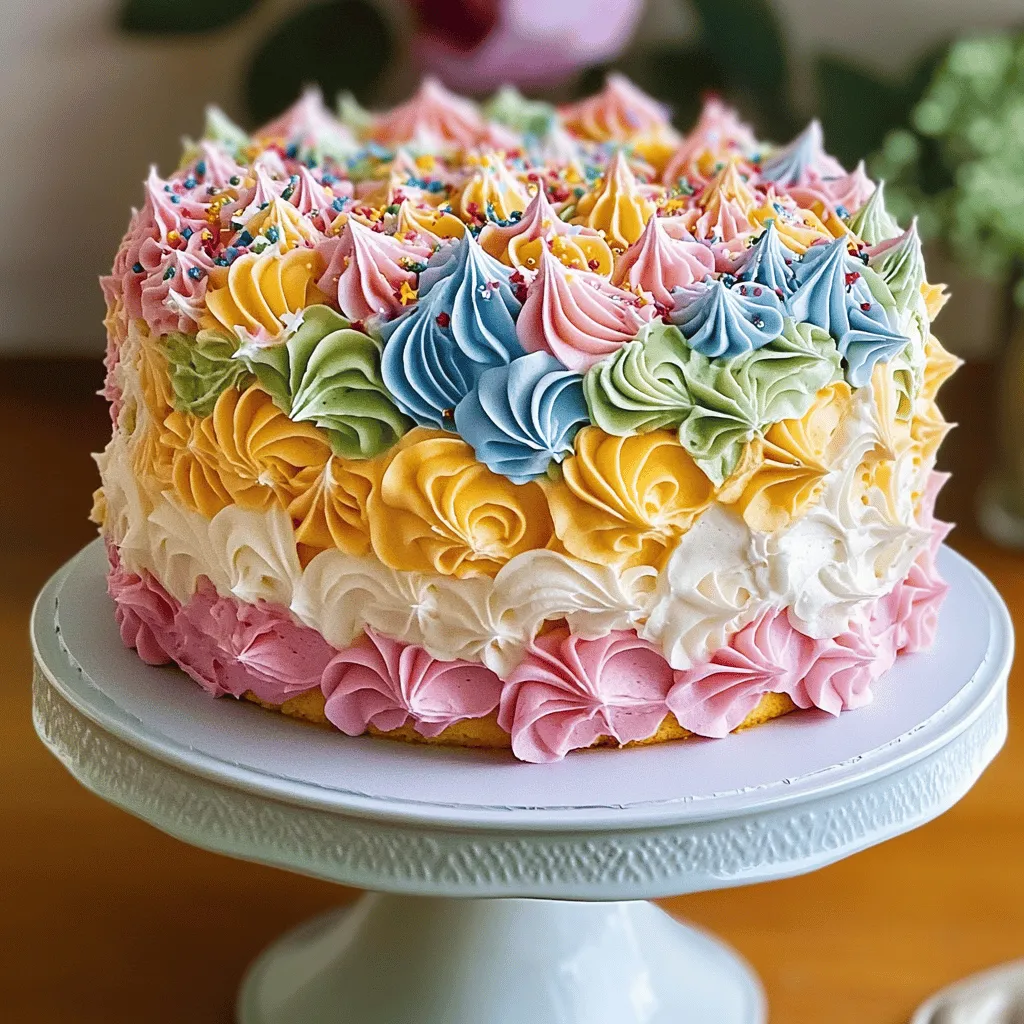
Ready to elevate your cake decorating game? In Cake Decor Piping Tips for Stunning Results, I’ll share the exact tools, techniques, and secrets to make your cakes look and taste incredible. From essential ingredients to mastering piping techniques, you’ll learn everything you need for show-stopping designs. Join me as I break down the steps that will turn your cakes into delightful masterpieces! Let’s get started!
Ingredients
Essential Ingredients for Piping
– 1 cup unsalted butter, softened
– 4 cups powdered sugar
– 2-4 tablespoons heavy cream or milk
– 1 tablespoon vanilla extract
– Gel food coloring (various colors)
Getting the right mix of these ingredients is crucial. Unsalted butter gives a rich taste. Powdered sugar adds sweetness and helps in the smooth texture. Heavy cream or milk makes the frosting easy to pipe. Vanilla extract adds great flavor. Gel food coloring lets you create bright and fun colors without changing the frosting’s texture.
Tools You’ll Need
– Several piping bags
– Various piping tips (star, round, petal, etc.)
– Scissors (for cutting piping bags)
You need the right tools to make your piping work well. Piping bags hold the frosting and allow precise decorating. Different piping tips create various shapes and styles. Using scissors lets you cut the bags to fit your needs easily.
Base Frosting Recipe Overview
Getting the right frosting consistency is key. Start by mixing the softened butter until it’s creamy. Next, add the powdered sugar slowly to avoid a sugar cloud. Mix in the heavy cream and vanilla. If your frosting feels too thick, add more cream. If it’s too runny, sprinkle in more sugar. This base recipe will give you a great start for all your cake decorating needs.
Step-by-Step Instructions
Preparing the Buttercream Frosting
To start, you need the right buttercream. First, take 1 cup of softened unsalted butter. Place it in a large mixing bowl. Beat it on medium speed until it looks creamy and smooth. This step is key for a good texture. Next, gradually add 4 cups of powdered sugar. Mix on low speed to avoid a sugary cloud. Once combined, increase the speed to medium. Keep mixing until it becomes fluffy.
Add 2 to 4 tablespoons of heavy cream or milk to the mix. Also, add 1 tablespoon of vanilla extract. This will add flavor. If the frosting feels too stiff, add more cream or milk, one teaspoon at a time. If it’s too runny, add more powdered sugar. You want a smooth, spreadable frosting.
Coloring Your Frosting
Now, let’s make your frosting colorful! Divide the frosting into bowls based on how many colors you want. Using gel food coloring is best. It gives bright, vibrant colors without making the frosting too runny. Add a small amount of gel to each bowl. Mix well until the color is even. You can adjust the color until it’s just right for you.
Filling and Preparing Piping Bags
Next, you must prepare your piping bags. Take several piping bags and cut the tip off each one. Insert your chosen piping tip, like star or round. This step is important for the design you want.
Fill each bag with your colored frosting. Twist the bag at the top to keep the frosting contained. Before you start decorating, practice your designs on parchment paper. This will help you get comfortable with your piping skills. You can create fun borders and rosettes. Once you feel ready, decorate your cake or cupcakes using what you have practiced. You’ll find that this method leads to stunning results!
Tips & Tricks
Mastering Piping Techniques
To get good at piping, practice is key. Use parchment paper for this. Draw designs like flowers or borders on the paper. It helps you feel the pressure needed while piping. Keep trying until you feel confident. You can create beautiful shapes that look great on your cake.
Common Mistakes to Avoid
Frosting consistency can make or break your design. If your frosting is too thick, it won’t pipe well. Add a bit of heavy cream or milk to loosen it up. If it’s too runny, add more powdered sugar until it thickens. Always check your frosting before you start decorating.
Presentation Enhancements
Make your cake pop with some easy tricks. Use a nice cake stand for display. Add edible glitter or sprinkles on top for sparkle. You can also use fresh fruit or flowers as decorations. These small touches make your cake look even more inviting.

Variations
Different Frosting Flavors
You can add fun flavors to your frosting. Think about chocolate, vanilla, or citrus. To make chocolate frosting, mix cocoa powder with your base frosting. For citrus, add lemon or orange zest. These flavors add a tasty twist and make your cake stand out.
Seasonal Decorating Ideas
Seasonal themes can bring joy to your cakes. For Halloween, use orange and black colors. Add spooky designs like ghosts or pumpkins. For Christmas, think red and green. Use stars, snowflakes, or trees. You can change your cake decor to fit any holiday or event.
Edible Decorations and Accents
Add some sparkle with edible decorations. Sprinkles, edible glitter, and fresh fruits can enhance your designs. Use sprinkles for a fun, colorful look. Edible glitter adds a touch of magic. Fresh fruits like berries or citrus slices can make your cake look fresh and vibrant. They taste great, too!
Storage Info
Storing Leftover Frosting
To keep your frosting fresh, store it in an airtight container. Make sure the container seals well. If you use plastic wrap, press it directly onto the frosting’s surface. This step prevents air from drying it out. Place the container in the fridge. Your frosting can last about one week this way. Before using, let it sit at room temperature. You can also re-mix it to regain its fluffy texture.
Short-term vs. Long-term Storage
For short-term storage, the fridge works well. Just remember that frosting can harden a bit. For long-term storage, freezing is your best bet. Place the frosting in a freezer-safe container. It can last up to three months in the freezer. When you’re ready to use it, thaw it in the fridge overnight. Once thawed, stir it to bring back its creamy consistency.
Preserving the Decorated Cake
To store a decorated cake, keep it in a cool, dry place. If you can, use a cake dome or box. This protects the design from dust and damage. Avoid placing the cake in the fridge if it has fresh fruit or whipped cream. The cold can ruin delicate decorations. If you must, cover the cake loosely with plastic wrap. This method keeps the frosting from drying out while protecting its beauty.
FAQs
What piping tips are best for beginners?
For those just starting, I recommend using a few simple piping tips. The star tip is great for making swirls and rosettes. A round tip works well for writing and dots. The petal tip allows you to create beautiful flower shapes. These tips are easy to handle and give great results.
How do I achieve the right frosting consistency?
To get the right frosting texture, you need to pay attention to the amount of liquid. Start by mixing your frosting until it is creamy. If it feels too thick, add a teaspoon of heavy cream or milk. Mix and check the texture again. For a runny frosting, add more powdered sugar. A good rule is to aim for a consistency that holds its shape but is still spreadable.
Can I make this frosting in advance?
Yes, you can make this frosting ahead of time! Store it in an airtight container. Keep it in the fridge for up to a week. If you want to store it longer, you can freeze it for up to three months. Before using, let it thaw and re-mix it to get back that creamy texture.
You learned about essential ingredients and tools for piping. We also covered making perfect buttercream and coloring techniques. Remember to practice piping on parchment paper and avoid common frosting mistakes. Experiment with flavors and seasonal decorations to elevate your cake design. Finally, store your frosting and decorated cakes properly to keep them fresh. Use these tips to improve your baking skills. Enjoy the journey of creating beautiful, delicious treats.


