Berry Smoothie Popsicles Refreshing Summer Treat

WANT TO SAVE THIS RECIPE?

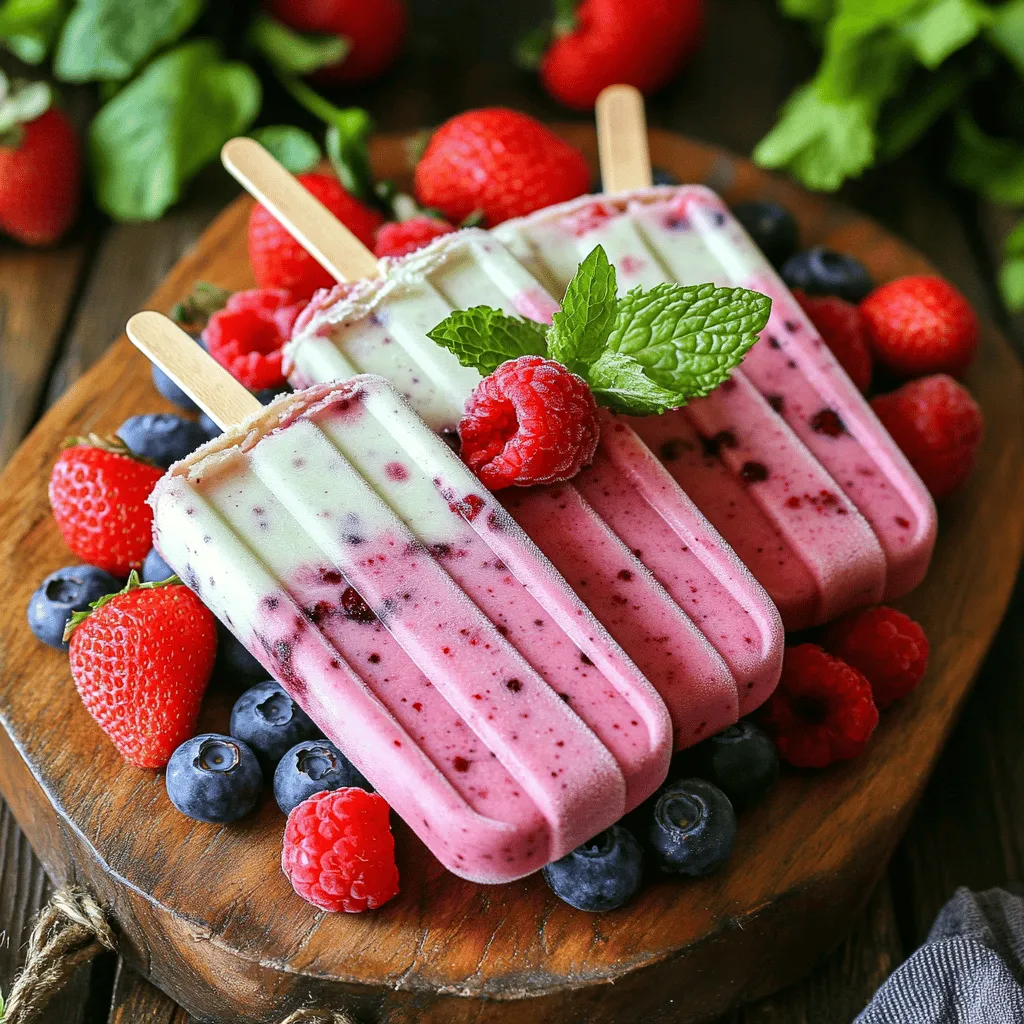
When summer hits, nothing beats a cool and tasty treat like Berry Smoothie Popsicles. These popsicles are easy to make and packed with fresh fruit flavor. With just a few simple steps, you can create a healthy snack that kids and adults will love. In this guide, I’ll share the best tips, tricks, and variations to help you master the art of these refreshing delights. Let’s dive in!

Ingredients

To make berry smoothie popsicles, gather these simple ingredients:

– 1 cup strawberries, hulled and sliced

– 1 cup blueberries

– 1 cup raspberries

– 1 ripe banana, sliced

– 1 cup Greek yogurt (plain or vanilla)

– 2 tablespoons honey or maple syrup

– 1/2 cup coconut milk (or milk of choice)

– 1 teaspoon vanilla extract

– A pinch of salt

These ingredients create a burst of flavor and nutrition. Fresh berries provide vitamins and antioxidants, while Greek yogurt adds creaminess and protein. The banana gives natural sweetness and smooth texture. Honey or maple syrup can be adjusted to match your taste. Coconut milk keeps the popsicles rich and creamy.

When you blend these ingredients, you create a beautiful mix. The colors will be vibrant, and the taste will be refreshing. This recipe is not just tasty; it’s also a great way to cool down on hot summer days. For the full recipe, check out the detailed steps to make these delicious treats.

Step-by-Step Instructions

Preparation Steps

1. First, blend all the ingredients until smooth. Use a strong blender for this.

2. After blending, taste the mix. Adjust the sweetness as needed. You can add more honey or maple syrup if you like it sweeter.

3. Next, pour the mixture into popsicle molds. Leave a little space at the top for expansion.

4. Insert sticks into the molds. Tap them gently on the counter to remove air bubbles.

Freezing Process

– Freeze the popsicles for 6-8 hours. This gives them time to set fully.

– To check if they are done, gently press on one. If it feels solid, they are ready.

Removal from Molds

– To remove the popsicles, run warm water over the outside of the molds for a few seconds. This helps them slide out easily.

– For a fun presentation, serve the popsicles on a rustic wooden platter. You can also garnish with fresh berries and a sprig of mint for a fresh look.

For the full recipe, check out the detailed steps above. Enjoy your refreshing treats!

Tips & Tricks

Perfecting Texture

To make your berry smoothie popsicles creamy, follow these steps:

– Use ripe bananas. They add natural sweetness and creaminess.

– Blend all ingredients well. This helps break down fruit fibers.

– Add Greek yogurt. It gives a rich texture and a protein boost.

To avoid ice crystals, freeze the mixture quickly. Here’s how:

– Use small molds. Smaller sizes freeze faster.

– Stir the mixture every hour for the first few hours. This helps keep it smooth.

Visual Appeal

Layering fruit in molds can make your popsicles look beautiful. Here’s how to do it:

– Start with a layer of smoothie. Fill the mold halfway.

– Add whole berries next. This adds color and fun.

– Finish with more smoothie. It should cover the berries completely.

For garnishing ideas, try these:

– Top the popsicles with fresh berries. This makes them pop!

– Add a mint leaf for a touch of green. It looks fresh and inviting.

These tips will make your berry smoothie popsicles not just tasty but also eye-catching! For the full recipe, check out the Berry Bliss Smoothie Popsicles.

Variations

Different Berry Combos

You can mix and match berries in your popsicles. If you love blackberries, try them instead of raspberries. Blackberries add a rich taste. Strawberries also work great. They bring a sweet and familiar flavor to your popsicles.

You can also use seasonal fruits. In summer, peaches or mangoes are great choices. In fall, consider using apples or pears. Just think about what fruits you enjoy, and blend them in!

Additional Ingredients

Want to boost the nutrition? Add spinach or kale to your smoothie blend. They mix in well and add vitamins without changing the taste much. This trick is perfect for sneaky nutrition.

You can also add protein powder or nut butter. These extras help to make your popsicles more filling. Nut butter adds a creamy texture and nutty flavor. Protein powder helps keep you strong and energized. Just a scoop will do!

For the full recipe, you can follow the steps above and enjoy your tasty, healthy treat!

Storage Info

Best Practices for Freezing

You want to store leftover popsicles properly. Place them in an airtight container. This keeps them fresh and prevents ice from forming. Label the container with the date. This helps you track how long they have been in the freezer.

To extend shelf life, freeze popsicles for no more than two months. After that, they may lose flavor. Use freezer-safe bags if you’re short on space. Just make sure to squeeze out as much air as possible before sealing.

Thawing Instructions

Thawing popsicles needs careful methods. The safest way is to leave them in the fridge for a bit. This keeps them cold but allows for easy removal. You can also run warm water over the molds briefly. Just be careful not to let water touch the popsicle.

I recommend eating the popsicles within a week of thawing. They taste best fresh. If they sit too long, they can lose their vibrant flavor. Enjoy your berry smoothie popsicles right away for the best experience!

FAQs

Can I use frozen berries instead of fresh?

Yes, you can use frozen berries. They work well in this recipe. Frozen berries may make the popsicle mixture a bit thicker. You can add a little more coconut milk to adjust the texture.

How do I make these popsicles vegan?

To make these popsicles vegan, swap Greek yogurt for a plant-based yogurt. Use maple syrup instead of honey. These simple changes keep the popsicles creamy and tasty.

What’s the best way to adjust sweetness?

Start with the amounts in the recipe. Taste the mixture after blending. If you want it sweeter, add more honey or maple syrup. Blend again to mix in the sweetness evenly.

How long do the popsicles last in the freezer?

These popsicles can last for about two months in the freezer. For best taste and texture, eat them sooner. Keep them in an airtight container to prevent freezer burn. You can find the full recipe [here](#).

This blog post showed you how to make tasty fruit popsicles. You learned about the simple ingredients and easy steps to blend and freeze. We also shared tips to make your popsicles creamy and visually appealing. Plus, there are fun variations you can try with different fruits. Remember to store your popsicles correctly to keep them fresh. Making these healthy treats is fun and rewarding. Now, grab your ingredients and start creating your own refreshing snacks!

To make berry smoothie popsicles, gather these simple ingredients: - 1 cup strawberries, hulled and sliced - 1 cup blueberries - 1 cup raspberries - 1 ripe banana, sliced - 1 cup Greek yogurt (plain or vanilla) - 2 tablespoons honey or maple syrup - 1/2 cup coconut milk (or milk of choice) - 1 teaspoon vanilla extract - A pinch of salt These ingredients create a burst of flavor and nutrition. Fresh berries provide vitamins and antioxidants, while Greek yogurt adds creaminess and protein. The banana gives natural sweetness and smooth texture. Honey or maple syrup can be adjusted to match your taste. Coconut milk keeps the popsicles rich and creamy. When you blend these ingredients, you create a beautiful mix. The colors will be vibrant, and the taste will be refreshing. This recipe is not just tasty; it’s also a great way to cool down on hot summer days. For the full recipe, check out the detailed steps to make these delicious treats. 1. First, blend all the ingredients until smooth. Use a strong blender for this. 2. After blending, taste the mix. Adjust the sweetness as needed. You can add more honey or maple syrup if you like it sweeter. 3. Next, pour the mixture into popsicle molds. Leave a little space at the top for expansion. 4. Insert sticks into the molds. Tap them gently on the counter to remove air bubbles. - Freeze the popsicles for 6-8 hours. This gives them time to set fully. - To check if they are done, gently press on one. If it feels solid, they are ready. - To remove the popsicles, run warm water over the outside of the molds for a few seconds. This helps them slide out easily. - For a fun presentation, serve the popsicles on a rustic wooden platter. You can also garnish with fresh berries and a sprig of mint for a fresh look. For the full recipe, check out the detailed steps above. Enjoy your refreshing treats! To make your berry smoothie popsicles creamy, follow these steps: - Use ripe bananas. They add natural sweetness and creaminess. - Blend all ingredients well. This helps break down fruit fibers. - Add Greek yogurt. It gives a rich texture and a protein boost. To avoid ice crystals, freeze the mixture quickly. Here’s how: - Use small molds. Smaller sizes freeze faster. - Stir the mixture every hour for the first few hours. This helps keep it smooth. Layering fruit in molds can make your popsicles look beautiful. Here’s how to do it: - Start with a layer of smoothie. Fill the mold halfway. - Add whole berries next. This adds color and fun. - Finish with more smoothie. It should cover the berries completely. For garnishing ideas, try these: - Top the popsicles with fresh berries. This makes them pop! - Add a mint leaf for a touch of green. It looks fresh and inviting. These tips will make your berry smoothie popsicles not just tasty but also eye-catching! For the full recipe, check out the Berry Bliss Smoothie Popsicles. {{image_2}} You can mix and match berries in your popsicles. If you love blackberries, try them instead of raspberries. Blackberries add a rich taste. Strawberries also work great. They bring a sweet and familiar flavor to your popsicles. You can also use seasonal fruits. In summer, peaches or mangoes are great choices. In fall, consider using apples or pears. Just think about what fruits you enjoy, and blend them in! Want to boost the nutrition? Add spinach or kale to your smoothie blend. They mix in well and add vitamins without changing the taste much. This trick is perfect for sneaky nutrition. You can also add protein powder or nut butter. These extras help to make your popsicles more filling. Nut butter adds a creamy texture and nutty flavor. Protein powder helps keep you strong and energized. Just a scoop will do! For the full recipe, you can follow the steps above and enjoy your tasty, healthy treat! You want to store leftover popsicles properly. Place them in an airtight container. This keeps them fresh and prevents ice from forming. Label the container with the date. This helps you track how long they have been in the freezer. To extend shelf life, freeze popsicles for no more than two months. After that, they may lose flavor. Use freezer-safe bags if you’re short on space. Just make sure to squeeze out as much air as possible before sealing. Thawing popsicles needs careful methods. The safest way is to leave them in the fridge for a bit. This keeps them cold but allows for easy removal. You can also run warm water over the molds briefly. Just be careful not to let water touch the popsicle. I recommend eating the popsicles within a week of thawing. They taste best fresh. If they sit too long, they can lose their vibrant flavor. Enjoy your berry smoothie popsicles right away for the best experience! Yes, you can use frozen berries. They work well in this recipe. Frozen berries may make the popsicle mixture a bit thicker. You can add a little more coconut milk to adjust the texture. To make these popsicles vegan, swap Greek yogurt for a plant-based yogurt. Use maple syrup instead of honey. These simple changes keep the popsicles creamy and tasty. Start with the amounts in the recipe. Taste the mixture after blending. If you want it sweeter, add more honey or maple syrup. Blend again to mix in the sweetness evenly. These popsicles can last for about two months in the freezer. For best taste and texture, eat them sooner. Keep them in an airtight container to prevent freezer burn. You can find the full recipe [here](#). This blog post showed you how to make tasty fruit popsicles. You learned about the simple ingredients and easy steps to blend and freeze. We also shared tips to make your popsicles creamy and visually appealing. Plus, there are fun variations you can try with different fruits. Remember to store your popsicles correctly to keep them fresh. Making these healthy treats is fun and rewarding. Now, grab your ingredients and start creating your own refreshing snacks!

Berry Smoothie Popsicles

Beat the summer heat with delicious Berry Smoothie Popsicles! These easy-to-make treats are packed with fresh, fruity flavors and are a perfect healthy snack for both kids and adults. With just a few simple ingredients like strawberries, blueberries, and Greek yogurt, you can whip up a refreshing delight in no time. Follow our step-by-step guide for tips, tricks, and creative variations, and discover how to enjoy this summer treat today! Click through for the full recipe!

Ingredients
  

1 cup strawberries, hulled and sliced

1 cup blueberries

1 cup raspberries

1 ripe banana, sliced

1 cup Greek yogurt (plain or vanilla)

2 tablespoons honey or maple syrup (adjust for sweetness)

1/2 cup coconut milk (or any milk of choice)

1 teaspoon vanilla extract

A pinch of salt

Instructions
 

In a blender, combine the strawberries, blueberries, raspberries, banana, Greek yogurt, honey (or maple syrup), coconut milk, vanilla extract, and a pinch of salt.

    Blend on high until all ingredients are smoothly combined and the mixture looks vibrant and creamy. Stop to scrape down the sides if necessary.

      Taste the mixture and adjust sweetness with more honey or maple syrup if desired.

        Pour the smoothie mixture evenly into popsicle molds, leaving a little space at the top for expansion.

          Insert popsicle sticks into the molds and gently tap the molds on the counter to remove any air bubbles.

            Freeze the popsicles for at least 6-8 hours, or until completely solid.

              To remove the popsicles, run warm water over the outside of the molds for a few seconds and gently pull them out by the sticks.

                Prep Time: 10 minutes | Total Time: 6-8 hours | Servings: 8 popsicles

                  - Presentation Tips: Serve the popsicles on a rustic wooden platter or a colorful dish. Garnish with fresh berries and a sprig of mint for a refreshing look.

                    WANT TO SAVE THIS RECIPE?

                    Leave a Comment

                    Recipe Rating