If you’re craving a dessert that’s both simple and scrumptious, look no further than this creamy banana pudding. This delightful dish combines ripe bananas, smooth pudding, and crunchy vanilla wafers for a taste explosion. In this post, I’ll guide you through the easy steps and share tips to make it perfect every time. Let’s dive into this simple and creamy recipe that will impress everyone at your next gathering!
Ingredients
List of Essential Ingredients
– 4 ripe bananas, sliced
– 1 cup vanilla wafers
– 2 cups whole milk
– 1/2 cup granulated sugar
– 1/3 cup cornstarch
– 1 teaspoon vanilla extract
– 1/4 teaspoon salt
– 3 large egg yolks
– 1 cup heavy whipping cream
– 2 tablespoons powdered sugar
– Fresh mint leaves for garnish (optional)
When making banana pudding, start with ripe bananas. They give the best flavor and sweetness. Next, vanilla wafers add a nice crunch. Whole milk makes the pudding creamy. Granulated sugar and cornstarch help thicken the pudding.
You will also need egg yolks for richness. Vanilla extract adds a lovely aroma. A pinch of salt balances the sweetness. For a light topping, whip the cream with powdered sugar. Finally, fresh mint leaves can make the dish look pretty.
Nutritional Information
– Calories per serving: Approximately 250-300 calories
– Breakdown of macronutrients: 5g protein, 35g carbs, 12g fat
– Common allergens: Dairy, eggs, gluten (in wafers)
Banana pudding is a treat that brings joy. Each serving has about 250 to 300 calories. It also has a good mix of macronutrients. This dish has some protein, carbs from the bananas and wafers, and fat from the cream. Be careful if you have allergies to dairy, eggs, or gluten.
Possible Substitutions
– Dairy-free options: Use almond milk or coconut milk.
– Gluten-free alternatives: Try gluten-free wafers.
– Sweetener alternatives: Use honey or maple syrup.
If you want a dairy-free pudding, almond or coconut milk works well. For gluten-free needs, gluten-free wafers are a great choice. You can also swap granulated sugar for honey or maple syrup to make it healthier.Enjoy your cooking!
Step-by-Step Instructions
Preparing the Pudding Base
1. Start by whisking together the sugar, cornstarch, and salt in a medium saucepan. This mix will help thicken your pudding.
2. Gradually add the whole milk while whisking. This keeps the mix smooth and lump-free. Place the saucepan over medium heat.
3. In a small bowl, whisk the egg yolks until smooth. When the milk bubbles, take a ladleful and slowly pour it into the egg yolks while whisking. This step is called tempering the yolks. It keeps them from scrambling.
Assembling the Layers
1. In an 8×8-inch dish, layer half of the vanilla wafers at the bottom. This forms a nice base.
2. Next, add half of the sliced bananas over the wafers. Then, pour half of the pudding on top.
3. Repeat the layers with the remaining wafers, bananas, and pudding. This gives you a beautiful, delicious stack.
Chilling and Serving
1. Cover the dish with plastic wrap and refrigerate it for at least 3 hours. This helps the pudding set well.
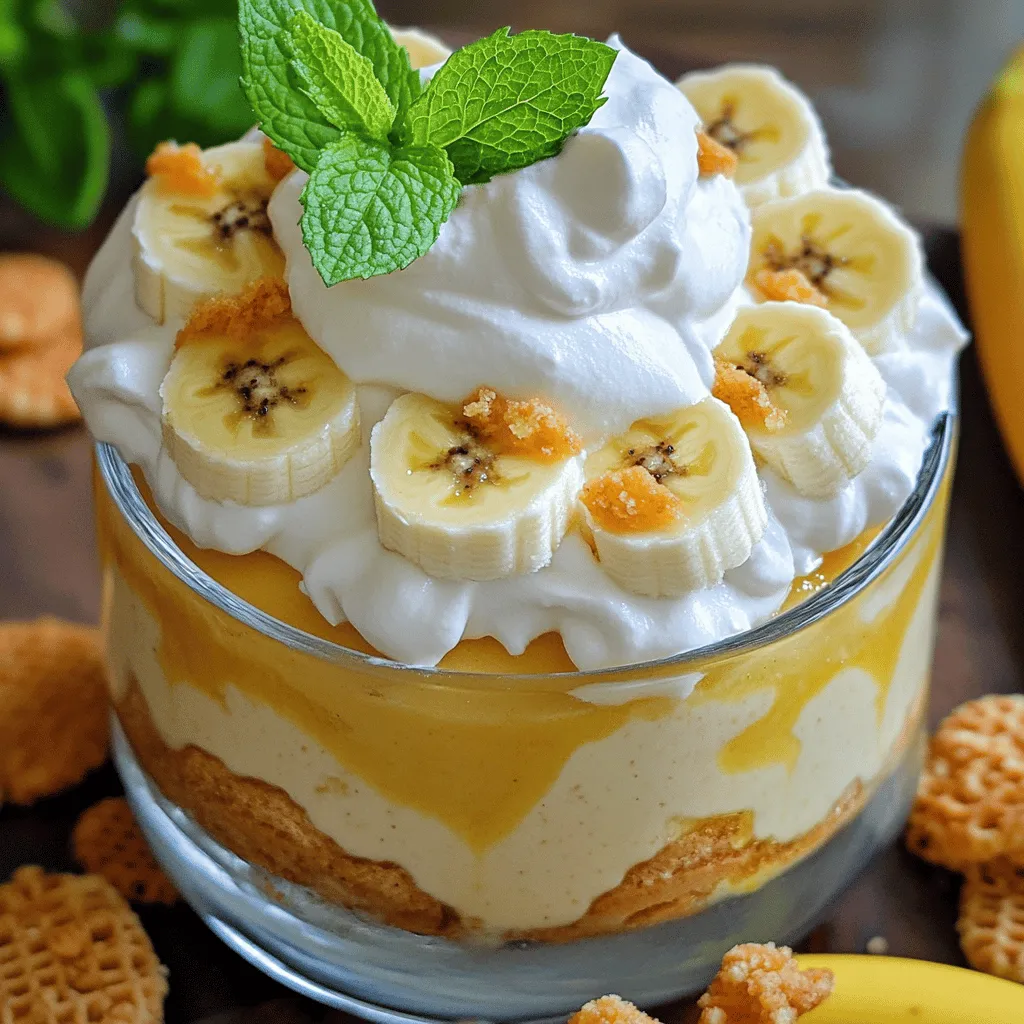
2. To serve, whip the heavy cream with powdered sugar until soft peaks form. Spread or pipe the whipped cream over the top of the pudding for a lovely finish.
3. Garnish with fresh mint leaves if you like. This touch adds color and flair to your dessert. Enjoy your delightful banana pudding!
Tips & Tricks
How to Achieve the Creamiest Texture
To get the best creamy texture, focus on whisking. Use a whisk instead of a spoon. This helps mix the dry and wet ingredients well. When you cook the pudding, watch the time. Cook it until it thickens, but don’t rush it. If you overcook, it can become lumpy.
Presentation Ideas
For a fun twist, serve banana pudding in small cups. This gives each guest their own treat. You can also layer the pudding in a clear bowl. It shows off the lovely layers of bananas and wafers. For garnish, add a few mint leaves on top. A sprinkle of crushed wafers adds a nice crunch.
Common Mistakes to Avoid
One big mistake is overcooking the pudding. This can ruin the smooth texture. Keep an eye on it, and stir often. Another mistake is using unripe bananas. They lack the sweet flavor we want. Always choose ripe bananas for the best taste.
Variations
Vegan Banana Pudding
To make a vegan version, you can swap regular milk for almond or coconut milk. Use cornstarch as a thickener since it’s plant-based. Instead of egg yolks, try using silken tofu blended until smooth. This gives the pudding a rich texture without eggs. You can add a splash of maple syrup for a unique sweetness. Try adding cocoa powder for a chocolate twist or a hint of cinnamon for warmth.
Gluten-Free Banana Pudding
For a gluten-free option, look for gluten-free vanilla wafers. Brands like Schar and Kinnikinnick offer tasty choices. To keep the texture right, make sure to follow the cooking times closely. Gluten-free wafers can be less sturdy, so layer gently. You can also use crushed gluten-free cookies for a fun crust at the bottom.
Flavor Variations
Chocolate banana pudding is a fun twist. Just add cocoa powder to the pudding base. Use about a half cup to get a rich chocolate flavor. For a peanut butter version, mix in a quarter cup of creamy peanut butter. This adds a nutty taste that pairs well with bananas. Both variations keep the same great layered style, making them just as delicious!
Storage Info
How to Store Leftovers
To keep your banana pudding fresh, use a glass or plastic container with a lid. This helps prevent drying out. Store it in the fridge for up to three days. If you want to enjoy it later, make sure to keep it covered well.
Freezing Instructions
Yes, you can freeze banana pudding! However, the texture may change. To freeze, place it in an airtight container. Leave some space at the top for expansion. When you want to eat it, let it thaw in the fridge overnight. This keeps the best taste and texture.
Reheating Tips
To reheat banana pudding, use a microwave on low power. Heat it in short bursts to avoid melting the cream. Stir gently after heating to keep it smooth. Serve it cold or at room temperature. Add fresh banana slices for a nice touch after refrigeration.
FAQs
What’s the best type of banana for banana pudding?
The best bananas for banana pudding are ripe ones. Look for bananas that are yellow with brown spots. These bananas are sweet and soft, which makes them perfect for layering. Unripe bananas are too firm and taste starchy. They won’t blend well with the creamy pudding. For the best flavor, use ripe bananas in your recipe.
Can you make banana pudding ahead of time?
Yes, you can make banana pudding ahead of time. This dessert tastes even better after chilling. Make it a day before your event for the best flavor. To prep in advance, layer the pudding in your dish, but wait to add the whipped cream until right before serving. This keeps it fresh and fluffy. Store it in the fridge to keep it cool.
How do I fix runny banana pudding?
If your banana pudding is runny, don’t worry. You can fix it! First, try cooking it a bit longer on low heat. Stir it until it thickens. If it’s still runny, mix a bit of cornstarch with cold milk, then stir it into the pudding while it cooks. Continue cooking until it thickens. This should help you achieve the perfect consistency.
This article explored the essential ingredients and steps to make banana pudding. We covered everything from preparing the pudding base to presentation tricks. Remember to use ripe bananas and avoid overcooking to prevent common mistakes. Explore variations like vegan or gluten-free options for a fresh twist. Proper storage helps keep your pudding delicious longer. With these tips, you can create a tasty dessert that impresses everyone. Enjoy your cooking!