

Crème Brûlée Cake offers the best of two delicious worlds: a soft cake and a crispy, sweet topping. In this easy recipe, I’ll guide you step-by-step to create a show-stopping dessert that will wow any crowd. With simple ingredients and tools, you’ll enjoy a delightful treat that feels fancy but is easy to make at home. Let’s get baking and impress your friends and family!
Ingredients
List of Ingredients
- 1 cup all-purpose flour
- 1 cup granulated sugar
- 1/2 cup unsalted butter, softened
- 2 large eggs
- 1/2 cup heavy cream
- 1/2 cup milk
- 1 tablespoon vanilla extract
- 1 teaspoon baking powder
- 1/4 teaspoon salt
- 1/2 cup granulated sugar (for topping)
When I make Crème Brûlée Cake, I gather my ingredients first. This helps me stay organized. I start with one cup of all-purpose flour. It gives the cake its structure. Next, I use one cup of granulated sugar for sweetness. I always choose half a cup of unsalted butter, softened, to ensure a rich flavor.
For the eggs, I like to use two large ones. They add moisture and help bind the cake. Heavy cream and milk both play important roles in texture. I use half a cup of heavy cream and half a cup of milk. One tablespoon of vanilla extract adds that classic flavor we all love.
I add one teaspoon of baking powder. This helps the cake rise. Finally, I use a quarter teaspoon of salt to balance all the sweetness. For the topping, I prepare half a cup of granulated sugar. This will create the crunchy, caramel layer on top.
Suggested Tools
- Mixing bowls
- Electric mixer
- Kitchen torch or broiler
- 9-inch round cake pan
To make this cake, I need some tools too. A set of mixing bowls is essential for combining the ingredients. An electric mixer helps to cream the butter and sugar well. I also use a kitchen torch or broiler for caramelizing the sugar on top.
Lastly, I need a 9-inch round cake pan to bake the cake evenly. With these ingredients and tools, I’m ready to create a delicious Crème Brûlée Cake!
Step-by-Step Instructions
Prepping Your Cake Batter
- Preheat oven to 350°F (175°C).
- Grease and flour a 9-inch round cake pan.
Start by turning on your oven. This helps the cake bake evenly. Greasing and flouring the pan stops the cake from sticking. Use butter or cooking spray for greasing. Then, sprinkle flour in the pan and shake it around. Make sure the whole pan is covered.
Mixing Ingredients
- Creaming butter and sugar.
- Adding eggs and vanilla extract.
In a large bowl, add softened butter and sugar. Use an electric mixer to beat them together until fluffy. This adds air, making the cake light. Next, crack in the eggs, one at a time. Mix well after each one. Finally, stir in the vanilla extract for flavor.
Combining Dry Ingredients
- Whisking flour, baking powder, and salt.
- Alternating between dry and wet ingredients.
In another bowl, whisk together flour, baking powder, and salt. This mixes them well and helps the cake rise. Now, add the dry mix to the wet mix. Do this in parts, adding milk and cream too. Mix until everything is smooth and combined.
Baking the Cake
- Pouring batter into the prepared pan.
- Baking time and testing for doneness.
Pour the batter into your prepared pan. Use a spatula to smooth the top. Bake the cake for 30 to 35 minutes. Check if it’s done by inserting a toothpick into the center. If it comes out clean, the cake is ready!
Caramelizing the Topping
- Sprinkling granulated sugar.
- Techniques for caramelizing with a torch or broiler.
Once the cake cools, sprinkle 1/2 cup of sugar on top. For a crispy crust, use a kitchen torch. Move the torch in circles until the sugar melts and turns golden. If you don’t have a torch, place the cake under a broiler for 1-2 minutes. Watch it closely to avoid burning.
This Crème Brûlée Cake recipe is both simple and delightful. Enjoy the sweet, creamy flavors that come together beautifully!
Tips & Tricks
Ensuring Perfect Texture
Using room temperature ingredients is key for a smooth batter. Cold eggs and butter can lead to lumps. Let them sit out for about 30 minutes before mixing. When you mix, use a gentle hand. Overmixing can make the cake tough. Stop mixing as soon as you see no dry flour.
Caramelization Techniques
You can use a kitchen torch or a broiler to caramelize the sugar. If you use a torch, keep it moving to avoid burning. Hold it about 2 inches above the sugar. If you choose a broiler, watch closely. It only takes 1-2 minutes to get that golden crust.
Serving Suggestions
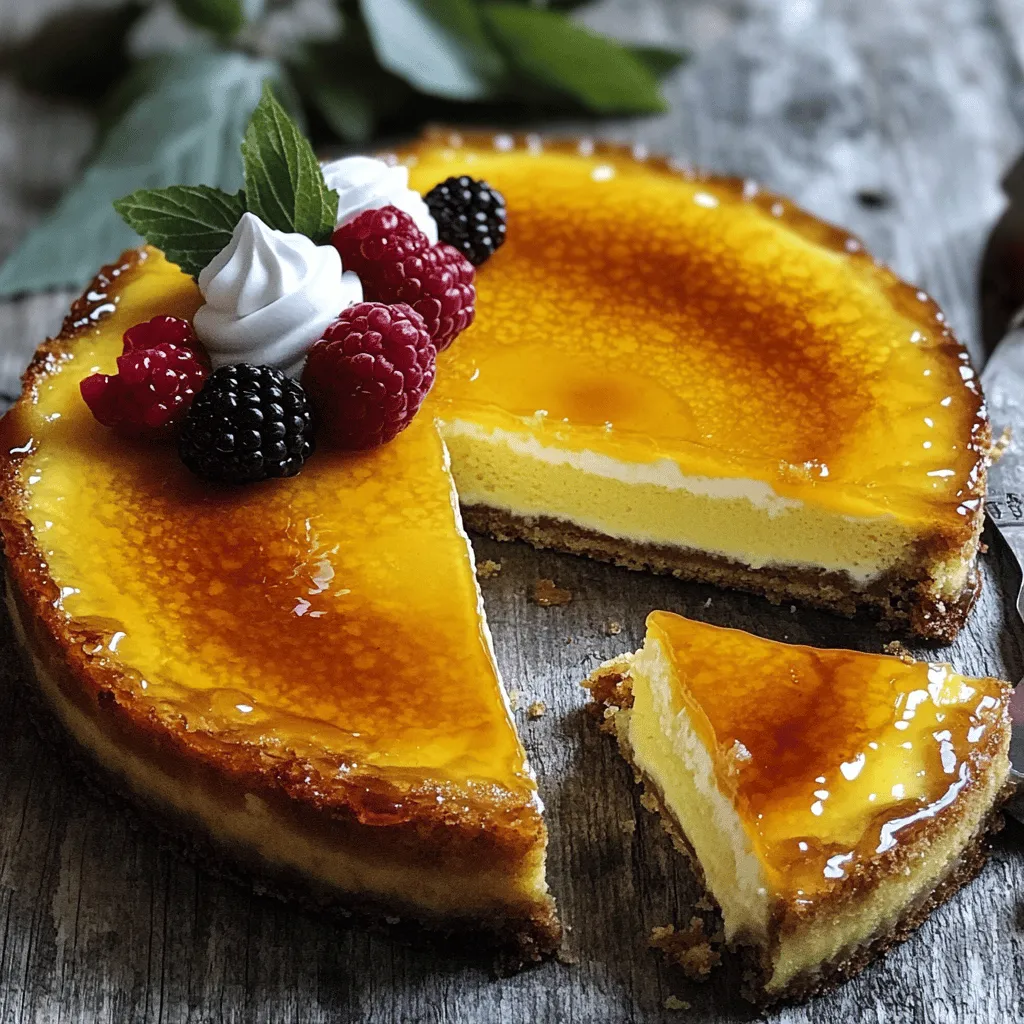
Serve each slice with a dollop of whipped cream and fresh berries. This adds color and flavor. For a nice touch, drizzle some chocolate sauce on the plate. A clean slice with a pretty garnish makes the dish pop. Using a sharp knife helps keep the edges neat.
Variations
Flavor Variations
You can make this cake your own with fun flavors. Adding citrus zest, like lemon or orange, brightens the cake. Just mix in a tablespoon of zest when you add the vanilla. This gives a fresh twist that pairs well with the creamy top.
If you love coffee, try adding espresso powder to the batter. A tablespoon will add depth without being too strong. For chocolate lovers, mix in cocoa powder instead of some flour. About a third cup will do the trick for a rich, sweet bite.
Dietary Adjustments
Need gluten-free options? Use almond flour or a gluten-free blend. This keeps the texture light and fluffy. Just substitute it one-to-one with all-purpose flour.
For a dairy-free twist, switch heavy cream with coconut cream. Use almond milk in place of regular milk. This way, you keep the cake moist and delicious without dairy.
Presentation Styles
You can layer the cake for a more stunning dessert. Bake two or three layers and stack them with cream in between. This looks fancy and tastes great!
When it comes to toppings, think outside the box. Instead of just caramelized sugar, try fresh fruit or chocolate shavings. A sprinkle of sea salt can also elevate the flavor. Each slice will look like a work of art!
Storage Info
Storing the Cake
To keep your Crème Brûlée Cake fresh, follow these tips. For short-term storage, cover the cake with plastic wrap. This keeps it moist and protects it from odors. You can store it at room temperature for up to two days. If you want it to last longer, refrigerate it. In the fridge, the cake stays fresh for about a week. However, the topping may lose its crunch if stored in the fridge.
Freezing Tips
Freezing Crème Brûlée Cake is easy and fun. First, slice the cake into pieces. Wrap each slice in plastic wrap tightly. Then, place the wrapped slices in an airtight container. This helps prevent freezer burn. You can freeze the cake for up to three months.
When you’re ready to enjoy it, remove a slice from the freezer. Thaw it in the fridge overnight for the best results. If you’re in a hurry, you can thaw it at room temperature for about an hour. Before serving, re-crisp the topping. Use a kitchen torch or broiler to melt the sugar again. Enjoy your delicious cake!
FAQs
How can I make Crème Brûlée Cake ahead of time?
You can make this cake a day in advance. Just bake and cool the cake. Wrap it tightly in plastic wrap. Store it in the fridge. You can caramelize the sugar just before serving. This keeps the topping crisp and fresh.
What is the best way to serve Crème Brûlée Cake?
Serve each slice on a plate. Add a dollop of whipped cream on the side. Fresh berries pair well for color and taste. You can also drizzle some chocolate sauce for extra flair.
Can I customize the recipe for dietary restrictions?
Yes, you can make this cake gluten-free. Use almond flour or a gluten-free blend. For a vegan option, swap eggs with flax eggs. Use almond or coconut milk instead of dairy.
How do I know when the cake is done baking?
Check the cake at 30 minutes. Insert a toothpick in the center. If it comes out clean, the cake is done. The top should be golden and slightly springy to touch.
What can I use if I don’t have a kitchen torch?
If you lack a kitchen torch, use your oven’s broiler. Sprinkle sugar on top of the cake. Place it under the broiler for 1-2 minutes. Watch closely to prevent burning. Enjoy your delicious cake with that perfect caramel layer!
This blog post covered everything you need for a perfect Crème Brûlée Cake. We explored ingredients, tools, and clear steps to guide you. I shared tips to ensure the right texture and caramelization techniques to achieve that sweet topping. Remember, variations exist, so feel free to put your spin on it. Proper storage can keep your cake fresh, and I answered common questions for further clarity. With this knowledge, you can bake with confidence. Enjoy making this delicious dessert!
