

Are you ready to treat yourself with a dessert that’s easy and delicious? Our Mocha Chip Icebox Cake is a no-bake wonder that layers creamy whipped goodness with rich chocolate. I’ll guide you through every step to make this delightful treat. Perfect for any occasion, it’s a sweet way to impress friends and family without the hassle of baking. Let’s dive into this delicious recipe!
Why I Love This Recipe
- Decadent Flavor Combination: This cake perfectly blends rich chocolate and bold coffee for a delightful dessert experience.
- No-Bake Convenience: With minimal effort and no baking required, this icebox cake is an easy treat for any occasion.
- Make-Ahead Delight: Prepare it in advance and let it chill, allowing the flavors to meld beautifully over time.
- Customizable Layers: Feel free to add your favorite toppings or adjust the coffee intensity to suit your taste.
Ingredients
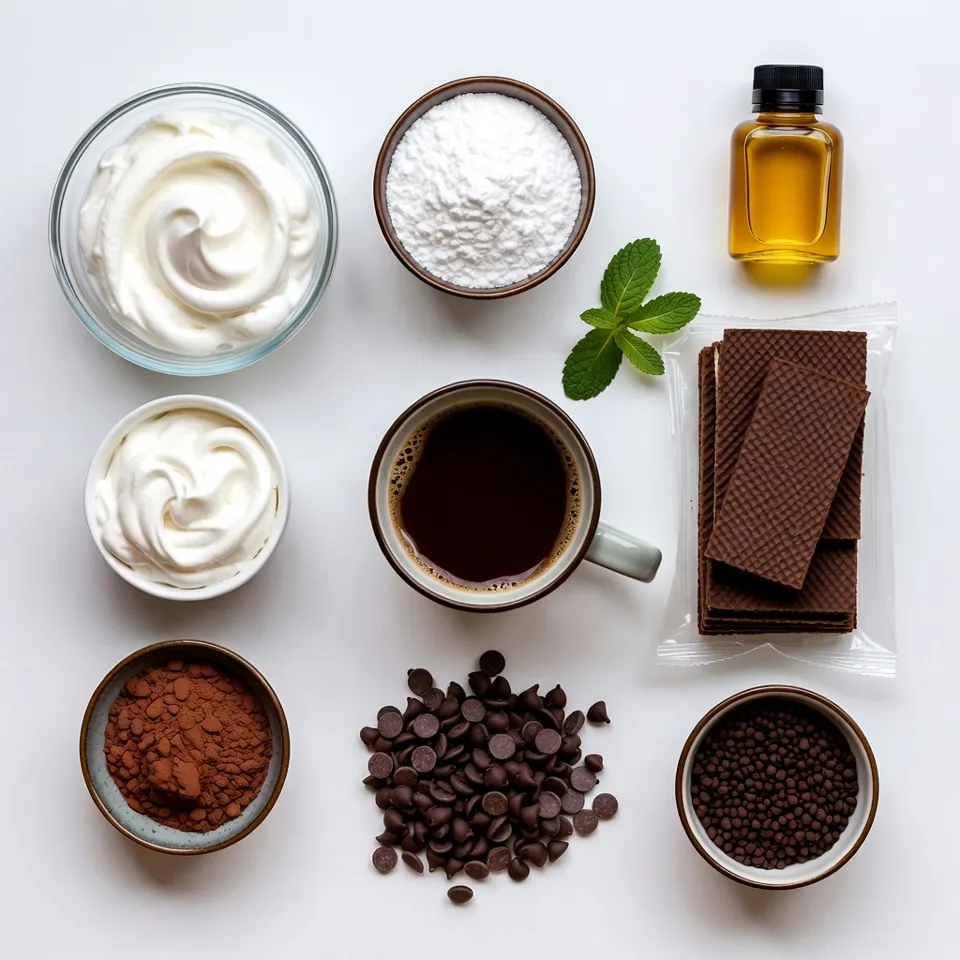
To make the Mocha Chip Icebox Cake, you need a few simple ingredients. Here’s what you will need:
- 2 cups heavy whipping cream
- 1 cup powdered sugar
- 2 teaspoons vanilla extract
- 1 cup brewed coffee, cooled
- 2 tablespoons cocoa powder
- 1 package (14.4 oz) chocolate wafer cookies
- 1 cup chocolate chips
- 1 tablespoon instant coffee granules (optional)
- Fresh mint leaves for garnish (optional)
Each ingredient plays a key role in creating this delightful dessert. The heavy whipping cream gives the cake its rich and creamy texture. The powdered sugar adds sweetness, while vanilla extract brings a warm flavor. Brewed coffee and cocoa powder create that perfect mocha taste.
Chocolate wafer cookies form the cake’s layers, providing a crunchy contrast to the cream. Chocolate chips add extra chocolatey goodness, and optional instant coffee granules can enhance the coffee flavor. Lastly, fresh mint leaves can brighten the presentation.
Gather these ingredients, and you are ready for a fun baking adventure!
Step-by-Step Instructions
Preparing the Whipped Cream
- In a large bowl, combine 2 cups of heavy whipping cream, 1 cup of powdered sugar, and 2 teaspoons of vanilla extract.
- Use an electric mixer on medium-high speed. Whip until stiff peaks form, which takes about 3-4 minutes. This makes your cream light and fluffy.
Coffee and Cocoa Mixture
- In another bowl, mix 1 cup of brewed coffee with 2 tablespoons of cocoa powder.
- If you want extra coffee flavor, add 1 tablespoon of instant coffee granules. Stir until well combined. This mixture gives the cake a rich mocha taste.
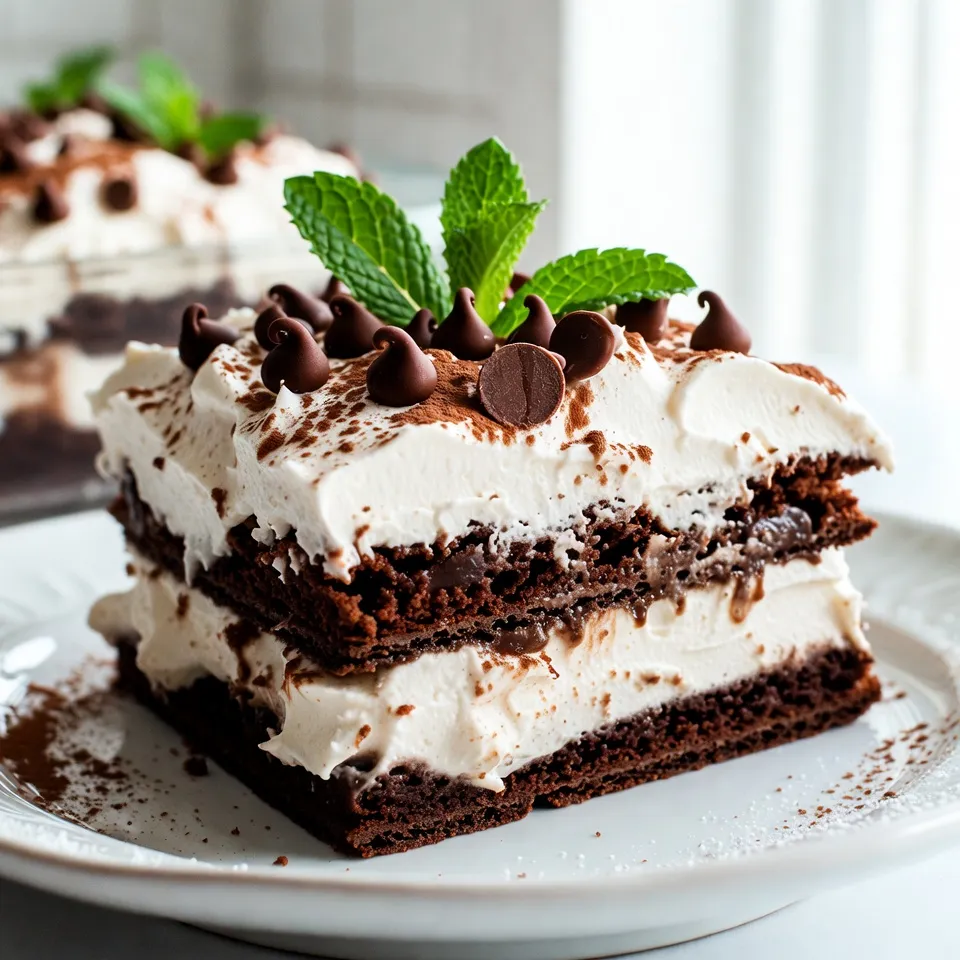
Assembling the Cake
- Take a chocolate wafer cookie and dip one side briefly into the coffee mixture.
- Layer the soaked cookie in a 9×13 inch baking dish. Repeat to form a base layer.
- Spread a layer of the whipped cream mixture over the cookies, then sprinkle some chocolate chips on top.
- Keep layering with soaked cookies, whipped cream, and chocolate chips until you run out of ingredients. Finish with a layer of whipped cream.
Chilling the Cake
- Cover the dish tightly with plastic wrap.
- Refrigerate for at least 6 hours, or overnight for the best flavor. This helps the cookies soften and the flavors blend.
Tips & Tricks
Achieving the Perfect Whipped Cream
To make great whipped cream, start with cold cream and a cold bowl. This helps the cream whip faster and better. Use an electric mixer on medium-high speed. Watch for stiff peaks, which take about 3-4 minutes. If you mix too long, it can turn to butter, so stop when it’s fluffy.
Layering Tips
For even layers, soak each cookie just enough. Dipping them in the coffee mixture should be quick. Too long will make them too soggy. Aim for about two to three cookies per layer. This keeps the cake balanced. Keep track of your layers for nice portioning when you serve.
Serving Suggestions
Presentation makes a big difference! Serve each square on a nice plate. Top it with a dollop of whipped cream. You can also dust cocoa powder on top for an extra touch. Fresh mint leaves add color and flavor. It looks fancy but is easy to do!
Pro Tips
- Whip to Perfection: Make sure your mixing bowl and beaters are cold before whipping the cream for the best volume and stability.
- Cookie Soaking Time: Don’t soak the cookies for too long; a quick dip is enough to absorb the coffee flavor without becoming mushy.
- Layering Strategy: To achieve even layers, use a spatula to gently spread the whipped cream mixture and sprinkle chocolate chips uniformly.
- Chill for Flavor: Allowing the icebox cake to chill overnight enhances the flavors and ensures the cookies soften perfectly.
Variations
Flavor Variations
You can change the taste of your mocha chip icebox cake easily. Try adding flavored extracts like almond or hazelnut. A splash of coffee liqueur can also make it richer. You may switch the chocolate wafer cookies for vanilla or even ginger snaps. Each cookie type adds a unique twist.
Dietary Modifications
If you need a dairy-free option, use coconut cream instead of heavy whipping cream. This change keeps the texture smooth. To make it gluten-free, swap the chocolate wafer cookies for gluten-free cookies. Many brands offer great gluten-free options that taste just as good.
Seasonal Additions
Seasonal fruits can brighten up your cake. In summer, add fresh berries like strawberries or raspberries. In fall, try chopped apples with cinnamon for a cozy flavor. You can also mix in peppermint extract during winter for a festive touch.
Storage Info
How to Store Leftovers
To keep your mocha chip icebox cake fresh, store it in the fridge. Use plastic wrap to cover the dish tightly. This helps keep the cake moist and prevents it from absorbing other smells. If you have a large piece left, cut it into smaller squares. This makes it easier to grab a piece later.
Shelf Life
You can enjoy your cake for up to five days in the fridge. After that, the cookies may become too soft. To ensure the best taste, try to eat it within three days. This way, you will enjoy the creamy layers and flavors at their best.
Freezing Options
If you want to save some for later, freezing is a great choice. Cut the cake into squares and place them in an airtight container. You can also wrap each piece in plastic wrap and then place them in a freezer bag. This helps keep them fresh. To enjoy frozen cake, thaw it in the fridge overnight. Do not refreeze after thawing, as this can change the texture.
FAQs
Can I make this dessert a day in advance?
Yes, you can make this dessert a day ahead. It helps the flavors blend well. Just follow the steps and chill it overnight. This way, the cookies soften nicely, and the dessert tastes even better.
How do I know when the whipped cream is ready?
You will know the whipped cream is ready when it forms stiff peaks. This means the cream stands tall and does not fall over. It usually takes about 3-4 minutes of mixing on medium-high speed. Just watch closely, and stop when it looks thick and fluffy.
Can I use other types of coffee?
Absolutely! You can use any coffee you like. Brewed espresso or flavored coffee can add unique tastes. Just make sure it is cooled before using it. This will soak the cookies well without making them too soggy.
What if I don’t have chocolate wafer cookies?
If you don’t have chocolate wafer cookies, you can substitute them. Use graham crackers, chocolate cookies, or even vanilla wafers. The dessert will still taste great, even with different cookies. Just remember to soak them briefly in the coffee mixture.
This dessert combines simple ingredients, like heavy cream and chocolate wafers. You learned how to whip the cream and layer it with coffee and cocoa. Remember to chill it for the best taste.
Feel free to mix flavors or use different cookies to make it your own. Storing leftovers is easy, so enjoy this treat for days. I hope you feel inspired to try making this cake—it’s sure to pleas
Mocha Chip Icebox Cake
Ingredients
- 2 cups heavy whipping cream
- 1 cup powdered sugar
- 2 teaspoons vanilla extract
- 1 cup brewed coffee, cooled
- 2 tablespoons cocoa powder
- 1 package chocolate wafer cookies (14.4 oz)
- 1 cup chocolate chips
- 1 tablespoon instant coffee granules (optional)
- Fresh mint leaves for garnish (optional)
Instructions
- In a large mixing bowl, combine the heavy whipping cream, powdered sugar, and vanilla extract. Whip the mixture with an electric mixer on medium-high speed until stiff peaks form. This should take about 3-4 minutes.
- In another bowl, mix the brewed coffee with the cocoa powder and instant coffee granules (if using) until well combined.
- Take a chocolate wafer cookie, dip one side briefly into the coffee mixture to soak, then layer it on the bottom of a 9x13 inch baking dish. Repeat with more cookies, forming a base layer.
- Spread a layer of the whipped cream mixture over the cookies in the dish, then sprinkle a portion of chocolate chips on top.
- Repeat the layering process using the soaked cookies, whipped cream mixture, and chocolate chips until you run out of ingredients, finishing with a layer of whipped cream on top.
- Cover the dish with plastic wrap and refrigerate for at least 6 hours, or overnight for best results to allow the flavors to meld together and the cookies to soften.
- When ready to serve, remove the dish from the refrigerator. Use a spatula to smooth the top, if necessary, and sprinkle some additional chocolate chips on top for decoration.
- Cut into squares, serve chilled, and garnish with fresh mint leaves if desired.