Are you ready to whip up a sweet treat that’s both easy and delicious? This No Bake Chocolate Pistachio Fudge combines rich chocolate with crunchy pistachios, creating a mouthwatering dessert you’ll love. Plus, it only takes a few simple steps to make! Whether you’re a baking pro or a kitchen newbie, I’ll show you how to create this delightful fudge. Let’s indulge your sweet tooth without turning on the oven!
Ingredients
Main Ingredients
- 1 cup semi-sweet chocolate chips
- 1 cup sweetened condensed milk
- 1 teaspoon vanilla extract
Additional Ingredients
- 1 ½ cups chopped pistachios (reserve some for topping)
- 2 tablespoons unsweetened cocoa powder
- Pinch of sea salt
Optional Ingredients
- Vegan chocolate substitutions
- Gluten-free options
This fudge recipe is simple and delicious. The main ingredients are key to its rich flavor. First, you need semi-sweet chocolate chips. They give the fudge its deep, chocolate taste. Sweetened condensed milk adds creaminess. It also helps the fudge set. A touch of vanilla extract rounds out the flavors nicely.
Next, we have the additional ingredients. Chopped pistachios add a nice crunch and a nutty flavor. Make sure to save some for the topping. Unsweetened cocoa powder boosts the chocolate flavor. A pinch of sea salt enhances all the tastes.
For those with dietary needs, there are options. You can use vegan chocolate chips. These work just as well for a dairy-free treat. If gluten is a concern, this recipe is naturally gluten-free. It’s a great choice for everyone!
Feel free to mix and match these ingredients as you like. The options are endless, but the key is to enjoy the making process.
Step-by-Step Instructions
Preparation
- Line the baking dish with parchment paper.
- Gather all ingredients.
Start by taking an 8×8 inch square baking dish. Place parchment paper in it, letting it hang over the sides. This makes it easy to lift out the fudge later. Next, set all your ingredients on the counter. You will need semi-sweet chocolate chips, sweetened condensed milk, vanilla extract, chopped pistachios, cocoa powder, and sea salt. Having everything ready helps the process go smoothly.
Making the Fudge
- Melt chocolate chips and condensed milk over low heat.
- Add vanilla extract and cocoa powder to the mixture.
In a medium saucepan, combine one cup of semi-sweet chocolate chips and one cup of sweetened condensed milk. Heat this mixture over low heat. Stir it constantly until the chocolate chips melt and the mixture is smooth. Once melted, take it off the heat. Stir in one teaspoon of vanilla extract and two tablespoons of cocoa powder. Mix well until everything blends together.
Finalizing the Fudge
- Fold in chopped pistachios and sea salt.
- Transfer the mixture to the baking dish and smooth the top.
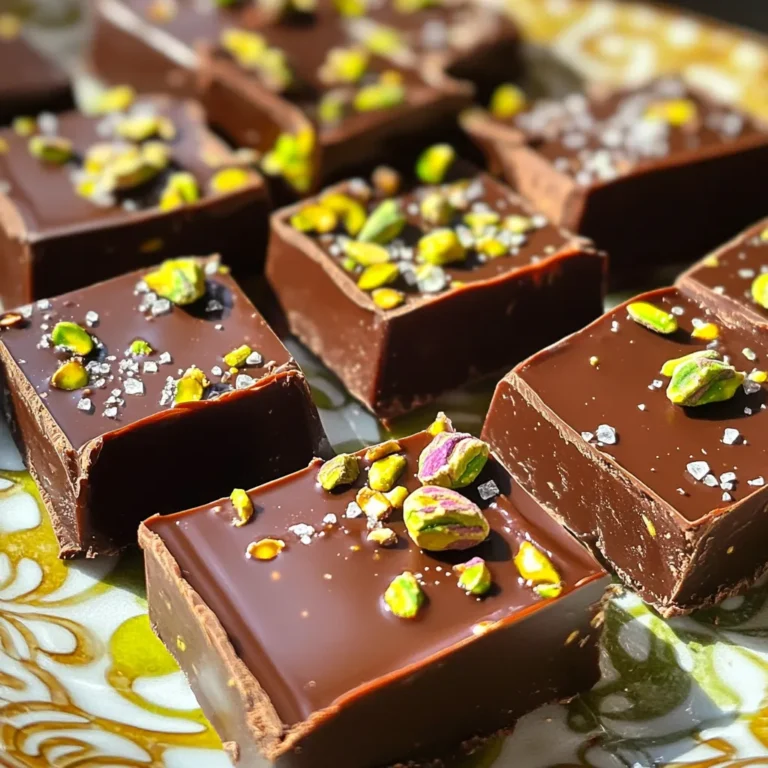
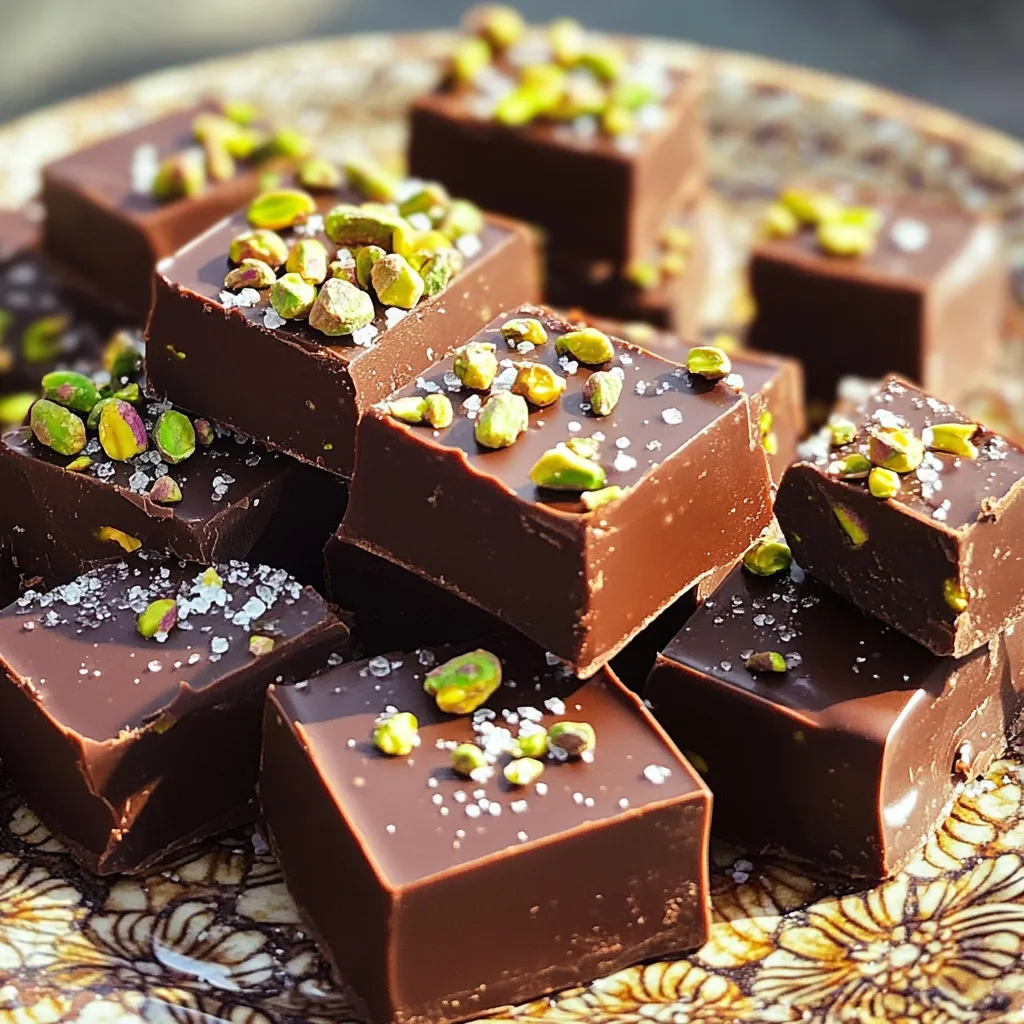
Now comes the fun part! Gently fold in one and a half cups of chopped pistachios and a pinch of sea salt. Make sure they are mixed in evenly. Then, pour the fudge mixture into your lined baking dish. Use a spatula to smooth the top, so it looks nice.
Setting the Fudge
- Refrigerate until firm (at least 3 hours).
- Remove from dish and cut into squares.
Cover the dish with plastic wrap and place it in the fridge. Let it chill for at least three hours. This will help the fudge set properly. Once firm, lift the fudge out using the parchment overhang. Cut it into squares. For a special touch, top with some reserved chopped pistachios.
Tips & Tricks
Perfecting the Fudge Consistency
To make great fudge, you must stir continuously. This keeps the chocolate smooth and helps it melt evenly. If you stop stirring, the chocolate can burn. When melted, the mixture should be shiny and thick. Aim for a texture that holds together but is soft enough to cut.
Serving Suggestions
When serving your fudge, presentation matters. Arrange fudge squares on a decorative plate. You can drizzle melted chocolate over the top for a fancy touch. A sprinkle of sea salt adds flavor and makes the fudge look nice, too. Use reserved pistachios to top each piece for extra crunch and color.
Common Mistakes to Avoid
One big mistake is overheating the chocolate mixture. Melt it slowly over low heat to avoid burning. Another mistake is not chilling the fudge long enough. Give it at least three hours in the fridge. This helps the fudge set properly. If it is too soft, it won’t hold its shape when you cut it.
Variations
Dietary Variations
You can make a vegan version of No Bake Chocolate Pistachio Fudge. Use coconut milk instead of sweetened condensed milk. Choose vegan chocolate chips for rich flavor. This way, everyone can enjoy a tasty treat!
For gluten-free options, check that your chocolate chips are gluten-free. Most brands are, but it’s good to double-check. Use gluten-free nuts and ensure no cross-contamination happens.
Flavor Variations
Want to mix it up? You can add other nuts or dried fruits. Chopped almonds or walnuts work great. Dried cranberries or apricots can add a nice touch too. Each addition brings a new taste to your fudge.
Swapping chocolate types is another fun option. Use dark chocolate for a rich flavor. Milk chocolate gives a sweeter taste, and white chocolate adds creaminess. Each choice changes the whole fudge profile.
Swappable Ingredients
If you’re out of sweetened condensed milk, use coconut cream or cashew cream. Both provide creaminess and sweetness. You can also make your own sweetened condensed milk at home.
For flavor, try different extracts like almond or hazelnut. They give a unique twist to your fudge. This allows you to customize the taste according to your mood or pantry!
Storage Info
How to Store Fudge
To keep your fudge fresh, store it in an airtight container. This prevents air from drying it out. You can also place parchment paper between layers. This helps avoid sticking. If you plan to eat it within a week, the fridge works well. For longer storage, consider freezing it instead.
Freezing Fudge
To freeze your No Bake Chocolate Pistachio Fudge, first cut it into squares. Wrap each square in plastic wrap. Then, place them in a freezer-safe container. This keeps them from getting freezer burn. When you want to enjoy some, take a piece out and thaw it. Leave it in the fridge for a few hours or on the counter for about 30 minutes. Serve it cool or at room temperature.
Shelf Life
In the fridge, your fudge can last up to two weeks. If stored well, it stays tasty and fresh. If you notice a change in color or smell, it’s best to toss it. Signs of spoilage include a dry texture or strange tastes. Always check your fudge before diving in for a treat!
FAQs
Can I make No Bake Chocolate Pistachio Fudge ahead of time?
Yes, you can make this fudge ahead of time. It keeps well in the fridge for about two weeks. I suggest making it the day before you need it. This way, it has time to chill properly and flavors can blend. Just store it in an airtight container to keep it fresh.
How do I make the fudge more chocolatey?
To boost the chocolate flavor, you can add more cocoa powder. Start with an extra tablespoon. You can also use dark chocolate chips instead of semi-sweet ones. If you love chocolate, try adding some chocolate syrup on top before chilling. This adds a rich layer of flavor.
Can I add more toppings or mix-ins?
Absolutely! You can add many toppings or mix-ins. Try using crushed cookies, chopped dried fruit, or other nuts. You can also sprinkle some sea salt on top for a sweet and salty mix. Get creative! Just be sure not to overpower the chocolate and pistachio flavors.
Is this recipe customizable?
Yes, this recipe is very flexible. You can swap out pistachios for other nuts, like walnuts or almonds. You can even change the extract. Instead of vanilla, try almond extract for a new twist. Get adventurous with your flavors and make it your own!
This blog post shared how to make delicious No Bake Chocolate Pistachio Fudge. We covered the main ingredients, step-by-step instructions, and helpful tips. You learned how to store and freeze your fudge properly. Remember to avoid common mistakes for the best results. The recipe is flexible, letting you customize flavors and dietary needs. Now, gather your ingredients and start creating a tasty treat that everyone will love! Enjoy your fudge journey!
