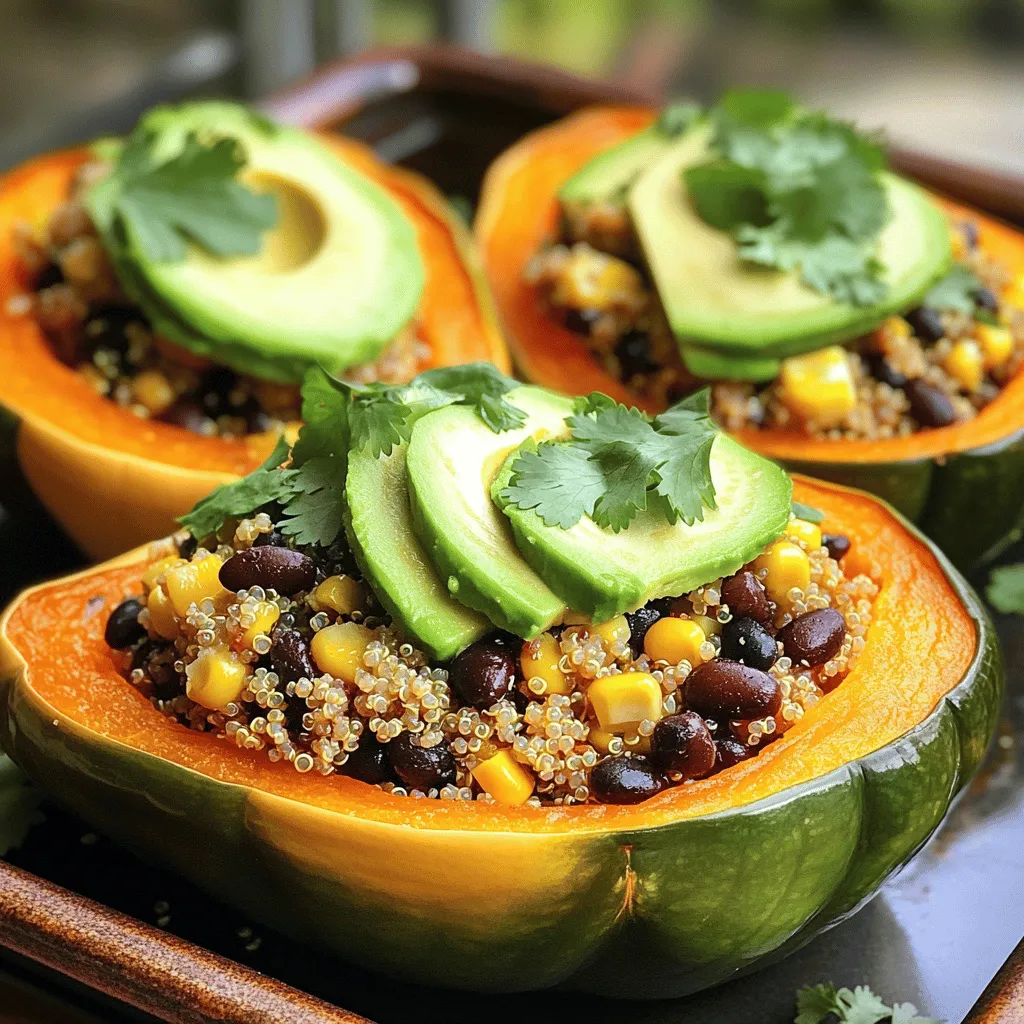
Get ready to savor the flavors of the Southwest with my Southwest Quinoa Stuffed Acorn Squash Delight! This dish combines sweet roasted acorn squash with a hearty, spiced quinoa filling. Whether you’re looking for a healthy dinner option or a festive side dish, this recipe is perfect for any occasion. Join me as we dive into easy steps, handy tips, and mouthwatering variations that will make your meal unforgettable!
Ingredients
List of Ingredients
- 2 acorn squashes, halved and seeds removed
- 1 cup quinoa, rinsed
- 2 cups vegetable broth
- 1 cup canned black beans, drained and rinsed
- 1 cup corn (fresh, canned, or frozen)
- 1 red bell pepper, diced
- 1 small red onion, diced
- 2 cloves garlic, minced
- 1 teaspoon cumin
- 1 teaspoon smoked paprika
- 1 teaspoon chili powder
- Salt and pepper to taste
- 2 tablespoons olive oil
- Fresh cilantro, for garnish
- Avocado slices, for serving (optional)
This dish starts with acorn squash, a sweet and nutty vegetable. You cut each squash in half and remove the seeds. This opens the way for the tasty filling. Next, we have quinoa, a protein-rich grain. Rinsing it helps remove bitter flavors.
We then add black beans and corn for extra texture and taste. Black beans bring fiber, while corn adds a sweet crunch. The red bell pepper and onion give color and flavor. Garlic, cumin, smoked paprika, and chili powder add warmth and depth.
Finally, we finish with salt, pepper, and olive oil. The oil helps the flavors blend. Fresh cilantro makes a bright garnish, and avocado slices add creaminess. Together, these ingredients create a delightful and satisfying meal.
Step-by-Step Instructions
Preparing the Acorn Squash
Preheating the Oven
First, preheat your oven to 400°F (200°C). This step is key for even cooking.
Roasting the Squash
Slice the acorn squashes in half and scoop out the seeds. Place them cut-side up on a baking sheet. Drizzle 1 tablespoon of olive oil over each half. Sprinkle some salt and pepper on top. Roast them for 30-35 minutes. Look for tender flesh and a nice caramelized color.
Cooking the Quinoa
Combining Ingredients
In a medium saucepan, combine 1 cup of rinsed quinoa and 2 cups of vegetable broth. This mix gives the quinoa great flavor.
Simmering and Fluffing
Bring the mix to a boil over medium heat. Once it boils, reduce the heat to low and cover the pot. Let it simmer for about 15 minutes. After that, remove it from heat and let it sit for 5 minutes. Finally, fluff the quinoa with a fork to make it light and airy.
Creating the Southwest Filling
Sautéing Vegetables
Use a large skillet to heat the remaining tablespoon of olive oil over medium heat. Add the diced red onion and red bell pepper. Sauté them for about 5 minutes until they soften.
Mixing in Spices and Beans
Next, stir in minced garlic, cumin, smoked paprika, and chili powder. Cook for another minute to bring out the flavors. Then, add in the black beans and corn. Mix it all well. Finally, fold in your cooked quinoa and season with salt and pepper.
Stuffing and Baking
Filling the Squash
Once your acorn squashes are done roasting, fill each half with the quinoa mixture. Press it down gently to pack it well.
Final Baking Instructions
Put the stuffed squashes back in the oven. Bake them for another 10-15 minutes. This time helps the tops get crispy. When done, take them out and let them cool slightly. Garnish with fresh cilantro and serve with avocado slices if you like.
Tips & Tricks
Perfecting Roasted Acorn Squash
- Cooking Time and Temperature: I set my oven to 400°F (200°C). This heat helps the squash roast evenly. Cook the squash for about 30-35 minutes. Check for tenderness by piercing the flesh with a fork.
- Achieving Caramelization: Drizzle olive oil on the cut sides. This helps create a nice caramelized surface. Add salt and pepper for flavor. Caramelization gives a sweet and rich taste.
Fluffing the Quinoa
- Techniques for a Light Texture: Once the quinoa is done cooking, let it sit for 5 minutes. Then, fluff it gently with a fork. This makes it light and fluffy. Avoid using a spoon, as it can make the quinoa mushy.
- Cooking Variations: You can cook quinoa in vegetable broth for added flavor. If you want a different taste, try chicken broth or even coconut milk. Both can add a unique twist.
Serving Suggestions
- Complementary Side Dishes: Pair your stuffed acorn squash with a fresh salad. A simple green salad with a lemon vinaigrette works well. You can also serve it with roasted veggies for extra color and nutrition.
- Garnishing Ideas: Fresh cilantro adds a burst of flavor. You can also add avocado slices for creaminess. This adds a nice texture contrast to the dish.
Variations
Alternative Ingredients
You can switch up the beans in this recipe. Try kidney beans or pinto beans. They add a nice twist. Adding different beans also changes the flavor and texture.
You can also add more veggies. Consider spinach, zucchini, or mushrooms. These add color and nutrition. You can mix and match based on what you have at home.
Dietary Modifications
If you want a vegan option, this recipe is perfect. It is already plant-based. Just skip any cheese or dairy. The flavors are still great without them.
For gluten-free adjustments, this recipe works well too. Quinoa is naturally gluten-free. Just check your broth to ensure it is gluten-free as well.
Flavor Enhancements
Adding cheese can make this dish even yummier. Crumbled feta or shredded cheese works well. Just sprinkle it on top before the final bake.
You can spice it up with hot sauce. A few drops add great heat. Fresh herbs like cilantro or parsley also boost flavor. They add brightness and freshness to each bite.
Storage Info
How to Store Leftovers
- Refrigeration Guidelines: First, let the stuffed acorn squash cool down. Then, place leftovers in an airtight container. They will stay fresh in the fridge for about 3 to 5 days. Make sure to keep the quinoa filling in the squash for best flavor.
- Freezing Instructions: If you want to save some for later, freezing works well. Wrap each stuffed squash tightly in plastic wrap. Then, place them in a freezer bag or container. They can last up to 3 months in the freezer. For best results, thaw in the fridge overnight before reheating.
Reheating Tips
- Best Methods for Reheating: The oven is the best way to reheat stuffed acorn squash. Preheat your oven to 350°F (175°C). Place the squash on a baking sheet and cover with foil. Heat for about 20 minutes or until warmed through. You can also use a microwave for quick reheating, but the texture may not be as good.
- Maintaining Flavor and Texture: To keep the flavor strong, add a splash of vegetable broth before reheating. This adds moisture and helps the quinoa stay fluffy. If using the microwave, heat in short bursts to avoid drying out the squash.
FAQs
What can I substitute for quinoa?
You can use several grains if you lack quinoa. Here are some options:
- Alternative Grains: Try brown rice or farro for a hearty texture. Bulgur is quick to cook and works well too.
- Low-Carb Options: If you prefer low-carb, consider cauliflower rice or riced broccoli. These alternatives keep your dish light and fresh.
How long does acorn squash last?
Acorn squash has a good shelf life.
- Storing Squash Before Cooking: Keep it in a cool, dark place. It can last up to a month.
- Freshness of Cooked Squash: Once cooked, store in the fridge. It lasts about 4-5 days in an airtight container.
Can I make this ahead of time?
Yes, you can prepare this dish in advance.
- Prepping in Advance: Cook the quinoa and prepare the filling a day ahead. Store them separately in the fridge.
- Storage and Reheating Tips: Stuff the squash just before baking. Reheat the filling in the microwave or a pan before stuffing. Bake as directed for the best flavor.
This blog post shared how to make a tasty stuffed acorn squash. We covered ingredients, steps, and tips to ensure success. You learned how to prepare acorn squash, cook quinoa, and create a flavorful filling. Plus, we explored variations and storage tips.
Enjoy experimenting with different flavors and ingredients. Cooking should be fun! Try new spices or add veggies. With these guidelines, you can make a healthy and delicious meal that suits your tastes.